I was writing a small program to drive Cypress test runner via its module api to run the same spec file against multiple apps. There is a list of application names and we go through each app one by one.
1 | require('console.table') |
The testApp function calls Cypress module to actually run the tests.
1 | const cypress = require('cypress') |
Ok, so let's run it with two different apps, what do we see?
1 | TodoMVC results |
Hmm, not really useful. There are columns that are going to be the same: screenshots, video and version. And there is the most important column missing - the name of the app for each row! I also want to highlight the number of failures if there are any. Any value above zero in the failures column should be displayed in red, while zero should be displayed in green.
Ok, we are good programmers so we separate changing the shape of the object from changing colors. We can attach transforms to the promise returned from cypress.run
1 | const testApp = app => { |
The function is addInfo that will remove some properties and add others. We can write it in my usual "procedural" style. That's how I usually start my code - just get the thing working.
1 | const testApp = app => { |
Hmm, is this function testResults doing what I think it should be doing? How can I test it - it is deep inside the testApp closure, hard to reach to test it. The only reason it has to be there is because it needs variable app. Let us solve this problem - let us move addInfo outside. We can pass the app name as an argument.
1 | const addInfo = (results, app) => { |
Hmm, but using this function is a little inconvenient.
1 | return cypress |
See what I mean? We know app right away, but have to wait until the cypress.run promise resolves to get the results value. In situations like this, when we know one argument much earlier than the other arguments, we should place first in the functions signature. So this order would be preferred. Now we can do partial application right in .then callback.
1 | const addInfo = (app, results) => { ... } |
Great, JavaScript can even do partial application in ES5, but we can shorten our code using a helper library like Ramda.
1 | const R = require('ramda') |
But we can make this even more convenient by currying the addInfo function - in ES6 it is so simple to do, no extras required.
1 | const addInfo = app => results => {...} |
Easy peasy.
Let us look inside the function addInfo itself. The point of functional refactoring is to split unrelated operations into many small single purpose functions and then compose back slides. We currently have two different things going on - deleting some properties and adding a new one.
1 | // deleting |
Deleting a list of properties from an object is so common, there is a function in Ramda that does exactly that R.omit. And it is already designed "the right way" - the names of properties we know is at first position, and the function is curried.
We can even move it out of addInfo into its own .then(...) step.
1 | cypress.run(...) |
Now let's add the app property. There is no built-in method for this - and you will see why shortly (there is more general and powerful one). We could make our own tiny function just for this. That is what I do a lot - writing tiny functions when I do not want to bring heavy guns.
1 | const setProp = name => value => object => { |
Great, we have triple function setProp! But it is not as polished as R.omit. We can notice this by inspecting the input and output objects.
1 | const result = R.omit(['foo'])(input) |
R.omit does not mutate the input object - it creates a new one without the listed properties. Our function setProp mutates the object - making it harder to rely on it. Any object passed into setProp will be forever changed. Or not, you really cannot tell in JavaScript. So lets look at what Ramda can give us. Working with object properties is done via lenses. First we create a lens to look at specific property app. Then we use a different function to set a specific value via this lens on an object that will arrive later.
1 | const lens = R.lensProp('app') |
We don't need to make lens object separately, we can just make it in place when needed.
1 | cypress.run(...) |
Perfect, remember why we have started this? So that our function appInfo is testable. Look what has happened now - we have eliminated appInfo completely. Instead we have two very simple functions from a well tested and widely used library. It is very unlikely that anything will go wrong in R.omit or R.set functions, so we don't have to worry.
Next we should look at the addColors function. My original implementation is using chalk.
1 | const addColors = results => { |
Notice the similarity to our previous refactoring - we are working with specific property on an object that is yet to arrive. So we will make a lens to "look" at the property failures and we are going to modify its value and will put it back into the object. Or rather we will make a new object with updated property (thanks immutability).
1 | const failuresLens = R.lensProp('failures') |
Notice how we split the function into its atomic operations? And the great thing - the last line is NOT needed - all it does is passing results as the last argument to R.over. Since every function in Ramda is curried, we can get rid of it. Plus we can create the lens in place, bringing our logic to super simple two-liner.
1 | const colorFailures = n => (n ? chalk.red(n) : chalk.green(n)) |
So here is our final code - pure functions, passing and modifying data along the chain.
1 | const colorFailures = n => (n ? chalk.red(n) : chalk.green(n)) |
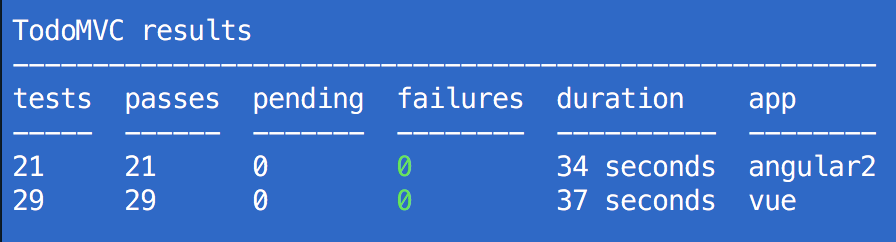
And here the result - nice little table we got here.
PS: you do not have to code every object transform by hand. I wrote a tiny utility change-by-example that given two objects computes the transformation using Ramda functions and especially lenses