Let's take a look at a modern React application like this Sudoku game that you can play online at https://sudoku-raravi.now.sh/.
- Talks
- Sudoku game
- Implementation
- Numbers component
- cypress-react-unit-test
- Visual testing
- Controlling the clock
- Deterministic board
- Local workflow
- Continuous Integration
- Pull request workflow
- Summary
- More info
Talks
I have covered this topic in a JSNationLive 2020 presentation
Video (20 minutes)
Later I have shown an expanded version of this talk at Des Moines meetup
Video (1 hour video)
Sudoku game
The game is nicely done. There are different difficulty levels, game modes and it looks very polished.
It is a well-designed web application with responsive styles for 3 different browser widths
The application is made out of React components, which we can see in the src folder, or by using React DevTools. There is <App /> and <Game /> components, and lots of smaller components matching the sections of the user interface.
Implementation
Let's look at the code. Note: you can find my fork of the game at bahmutov/sudoku, which includes all code shown in this blog post.
1 | import React from 'react'; |
The App component creates the React context object, imports the application's styles and creates the Game component
1 | import React from 'react' |
The Game component is much larger source file, because it brings all the logic together
1 | import React, { useState, useEffect } from 'react' |
The Game component renders all the components shown above, passing props that receive user events
1 | return ( |
Numbers component
Among individual smaller components there is Numbers component that you can use to enter numbers into the grid.
The Numbers component receives its inputs from the parent component in two ways: via a context and via props.
1 | import React from 'react'; |
For example, the currently selected number (if any) is grabbed from the context.
1 | let { numberSelected } = useSudokuContext(); |
The click handler is grabbed from the props argument and used to send the clicked number back to the parent component.
1 | export const Numbers = (props) => { |
If we want to refactor the above component, how do we ensure that we don't break it? How do we ensure that it renders in exactly the same way, and that when the user clicks, the number is sent to the parent component? How do we write component tests?
In my view, the component receives its inputs, the props and the context, and generates some output. The output is both the DOM nodes the component renders, and the props.onClickNumber invocations on click. Let's make sure the component works this way.
cypress-react-unit-test
To test the React components I will install cypress-react-unit-test. This adaptor allows the Cypress test runner to mount React components like little mini web applications and then use the full Cypress API to interact with them. Our application uses react-scripts, thus the setup is trivial
1 | require('cypress-react-unit-test/support') |
1 | module.exports = (on, config) => { |
1 | { |
Let's write our first test.
1 | import React from 'react' |
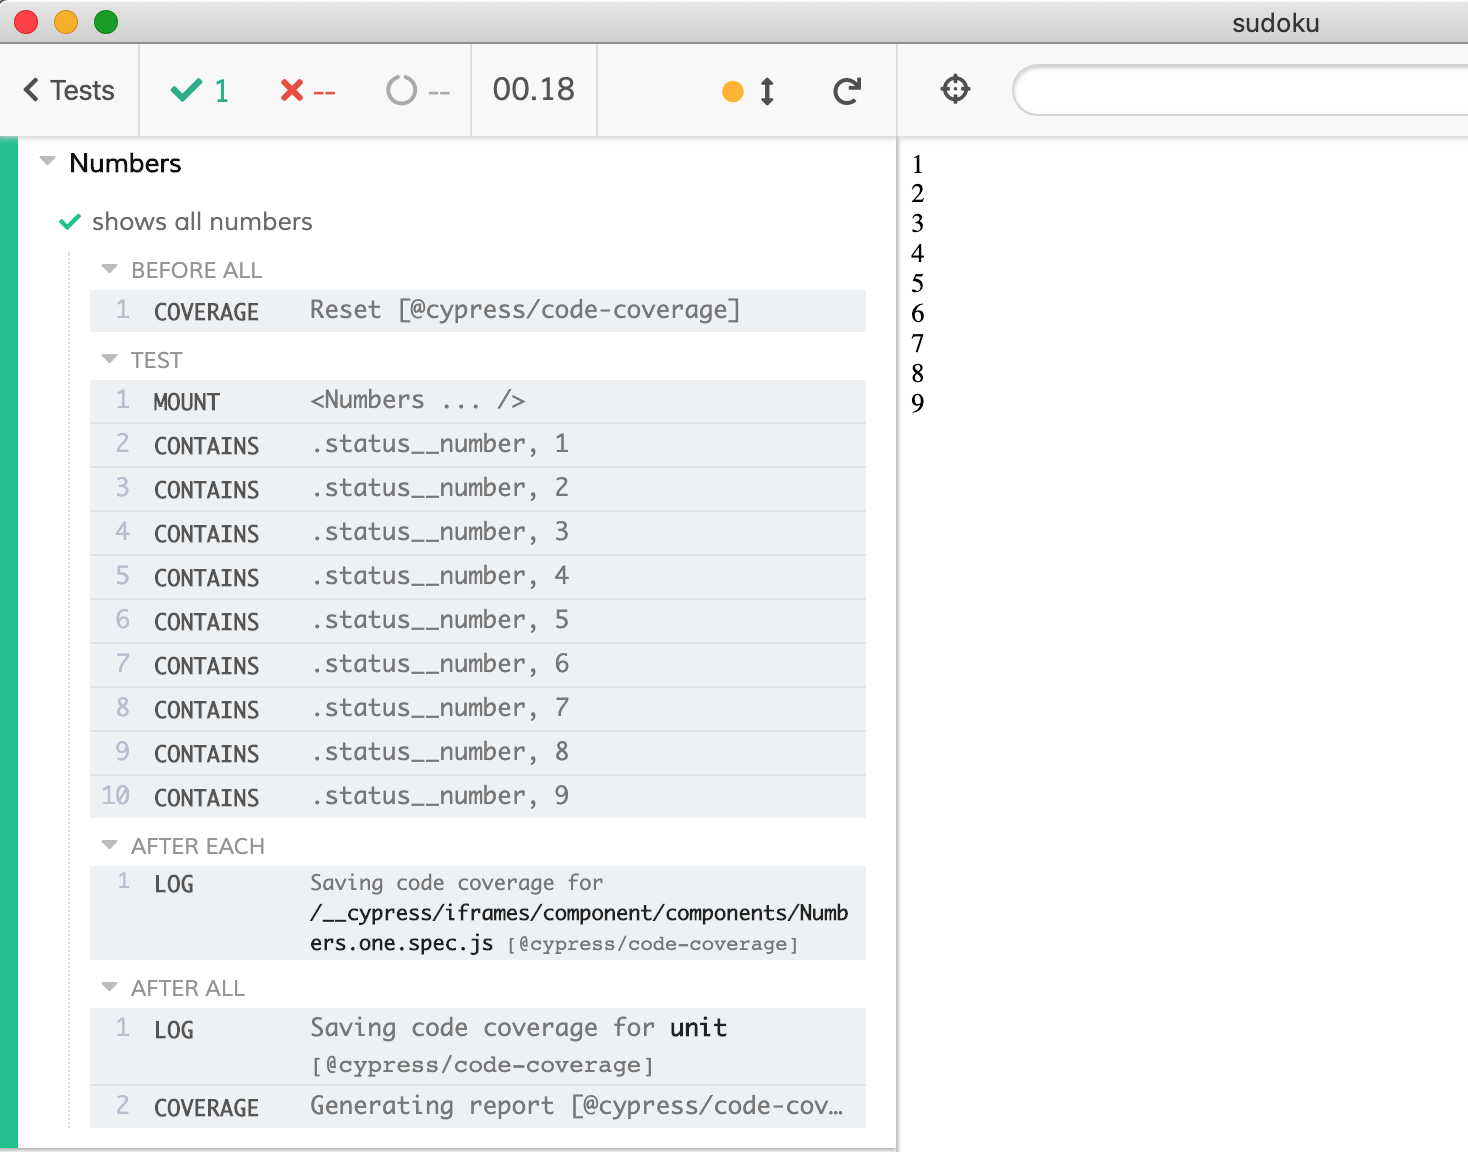
Open Cypress with yarn cypress open or npx cypress open and run the test. There is no need to start the application, because we are working with an individual component, not with a page.
Hmm, the test passes, all the numbers are there. But the component does not look right!
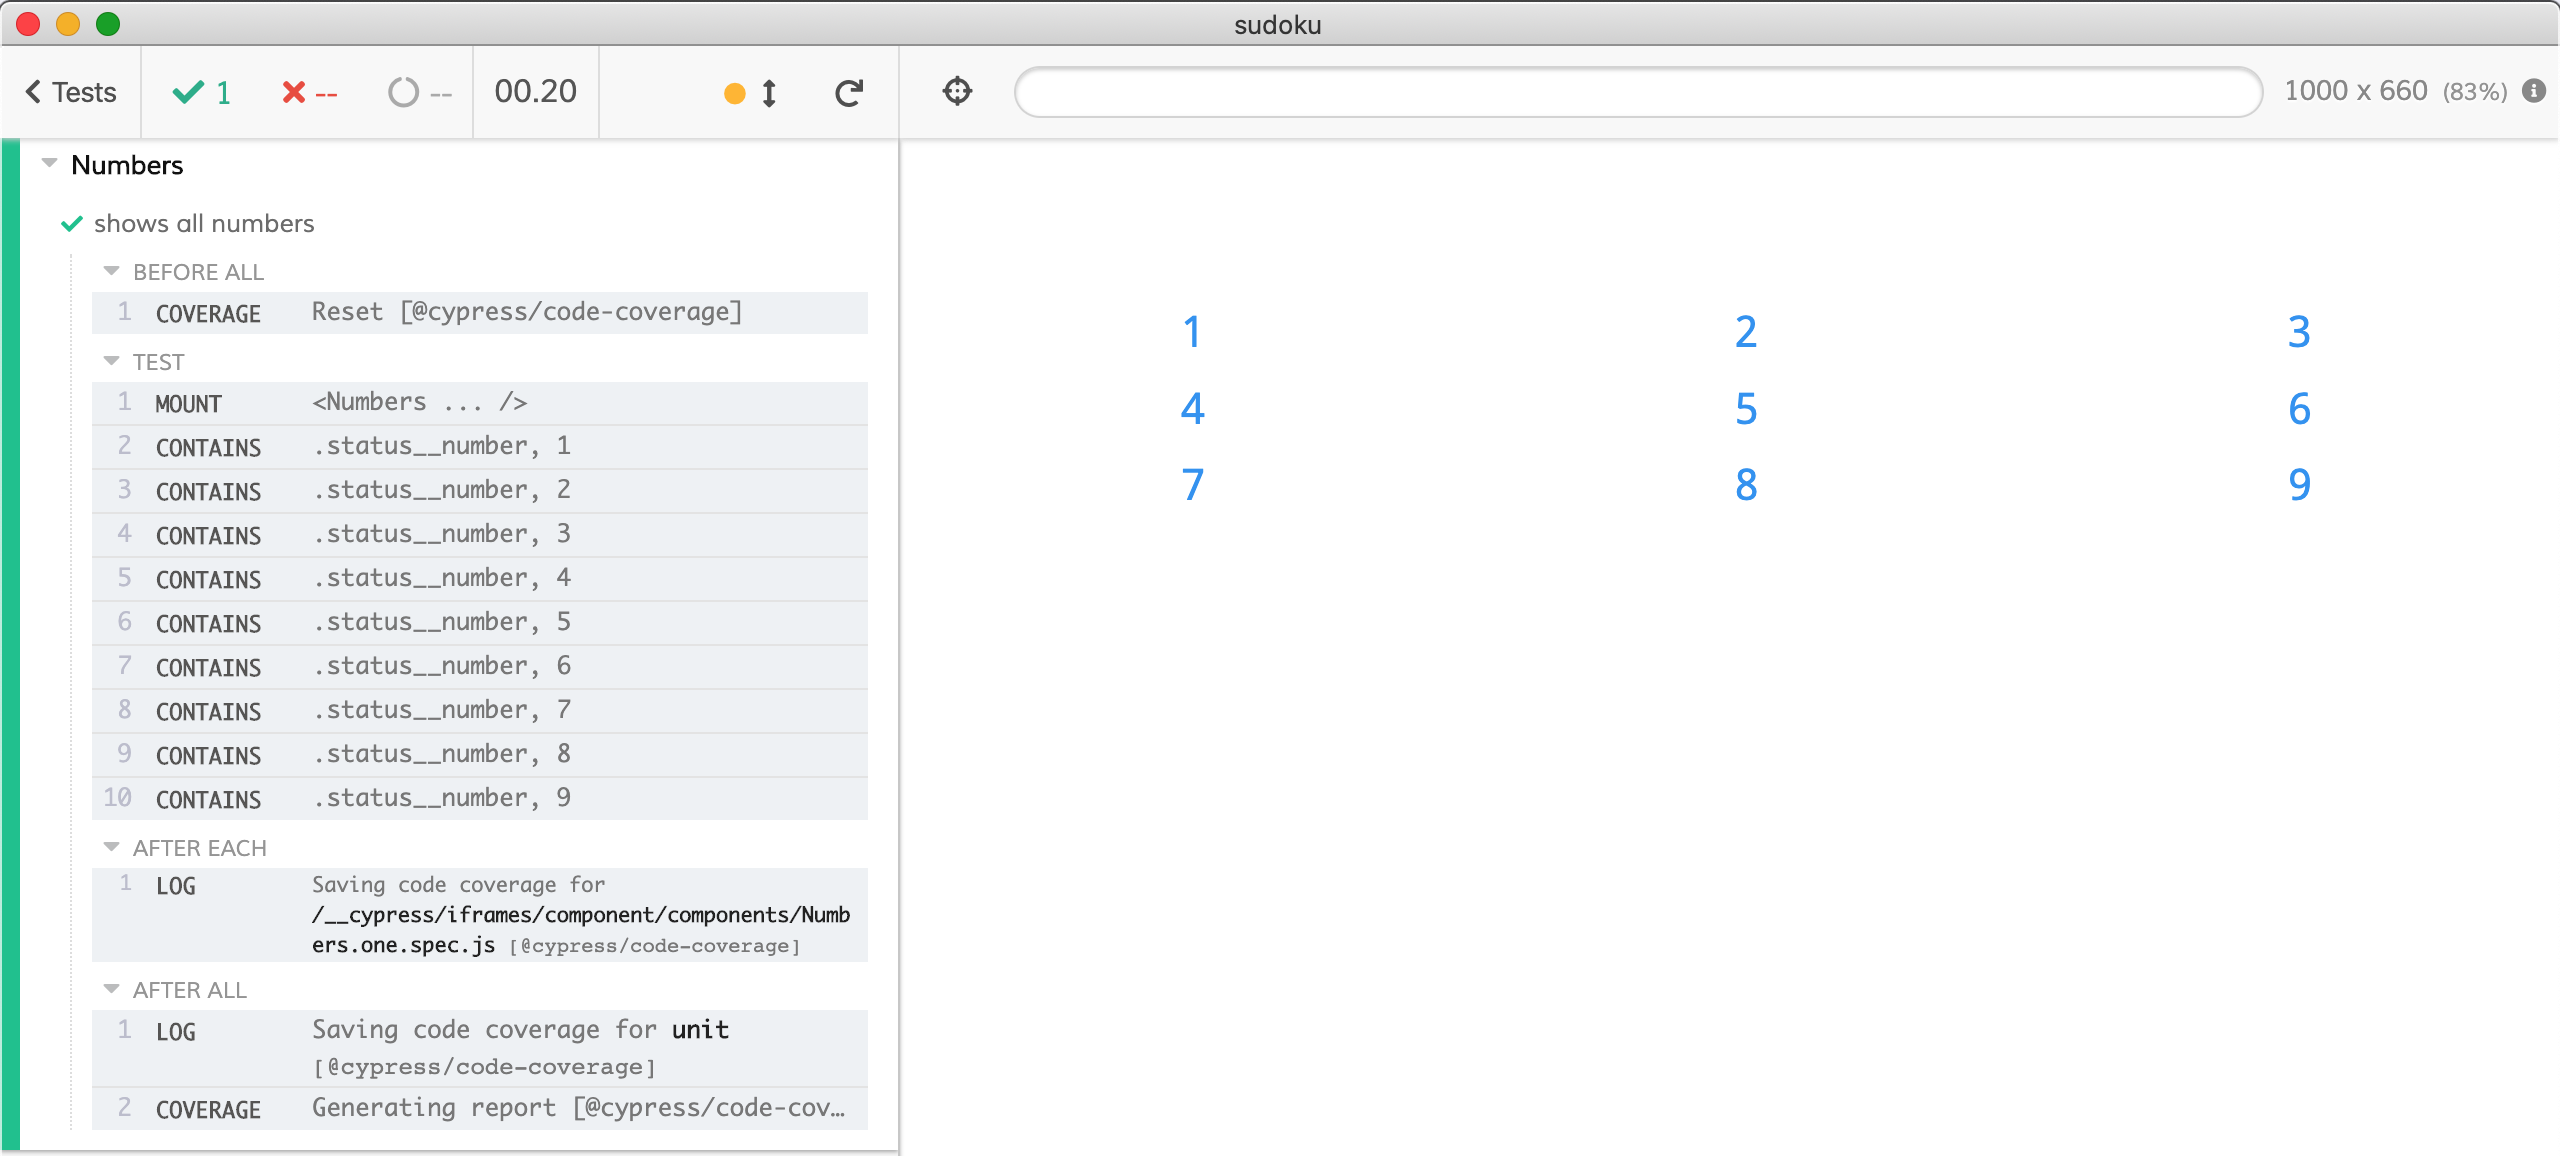
I think it is very important to see the component to understand what the users will experience. Our component needs styles - and the styles are in the src/app.css file. Because we point the cypress/plugins/index.js at the react-scripts settings, the spec files will use the same loaders and bundlers as the application code. Which means we can import app.css from the spec file too:
1 | import { Numbers } from './Numbers' |
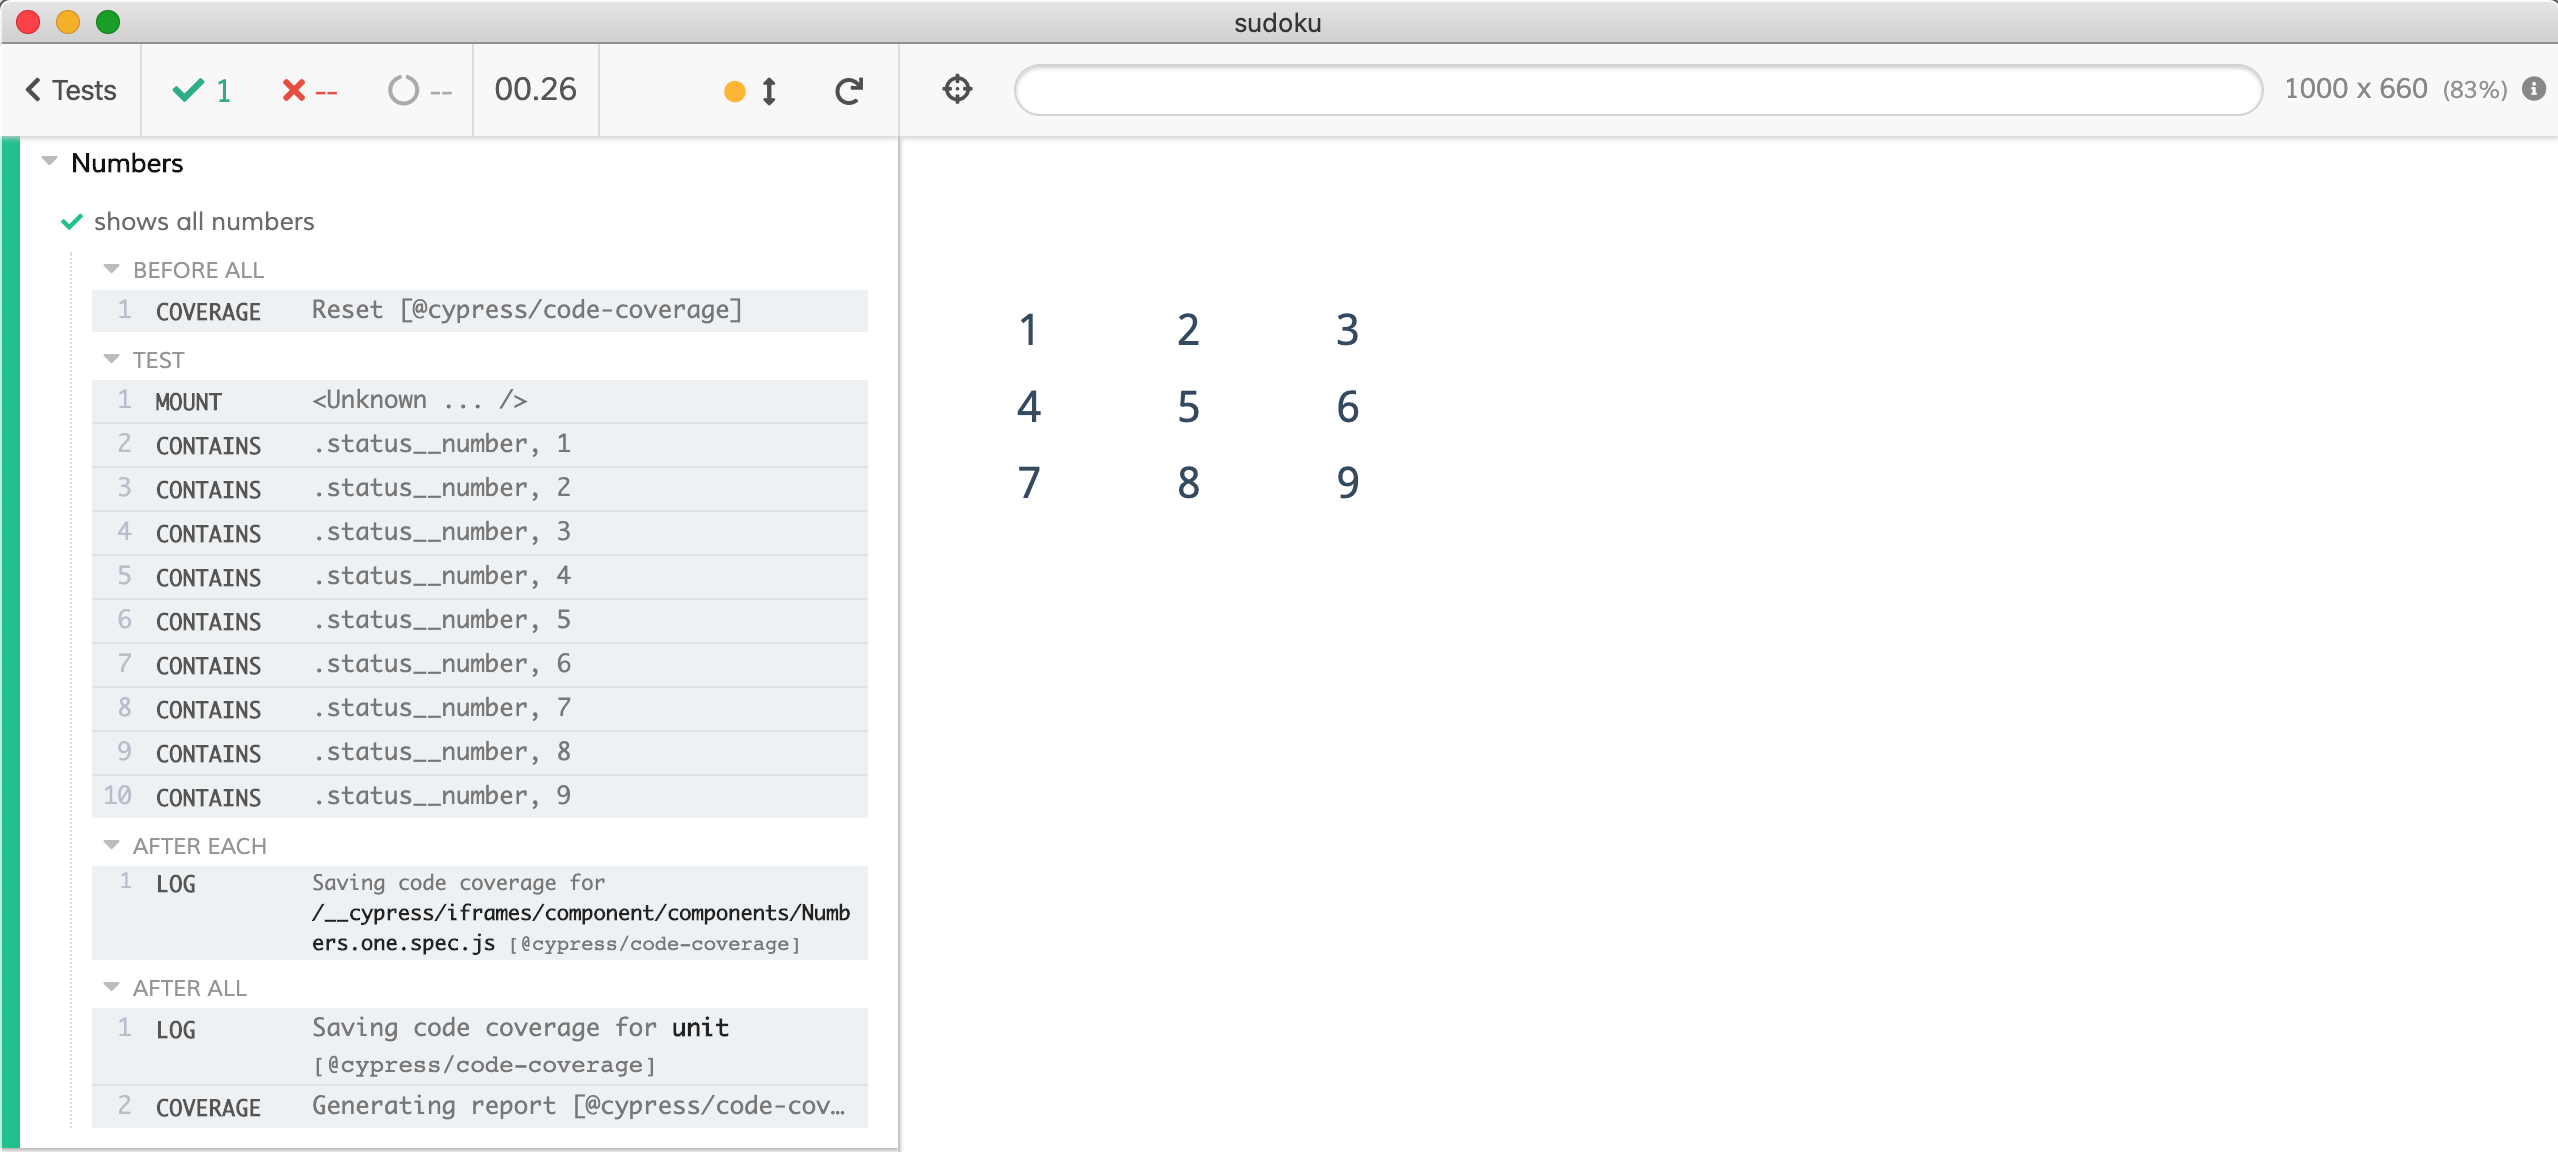
This is better, but still not exactly the same. Since the CSS assumes certain document structure, we need to surround our <Numbers/> with elements with specific class names.
1 | mount( |
This looks much better - now we see what the user is going to see.
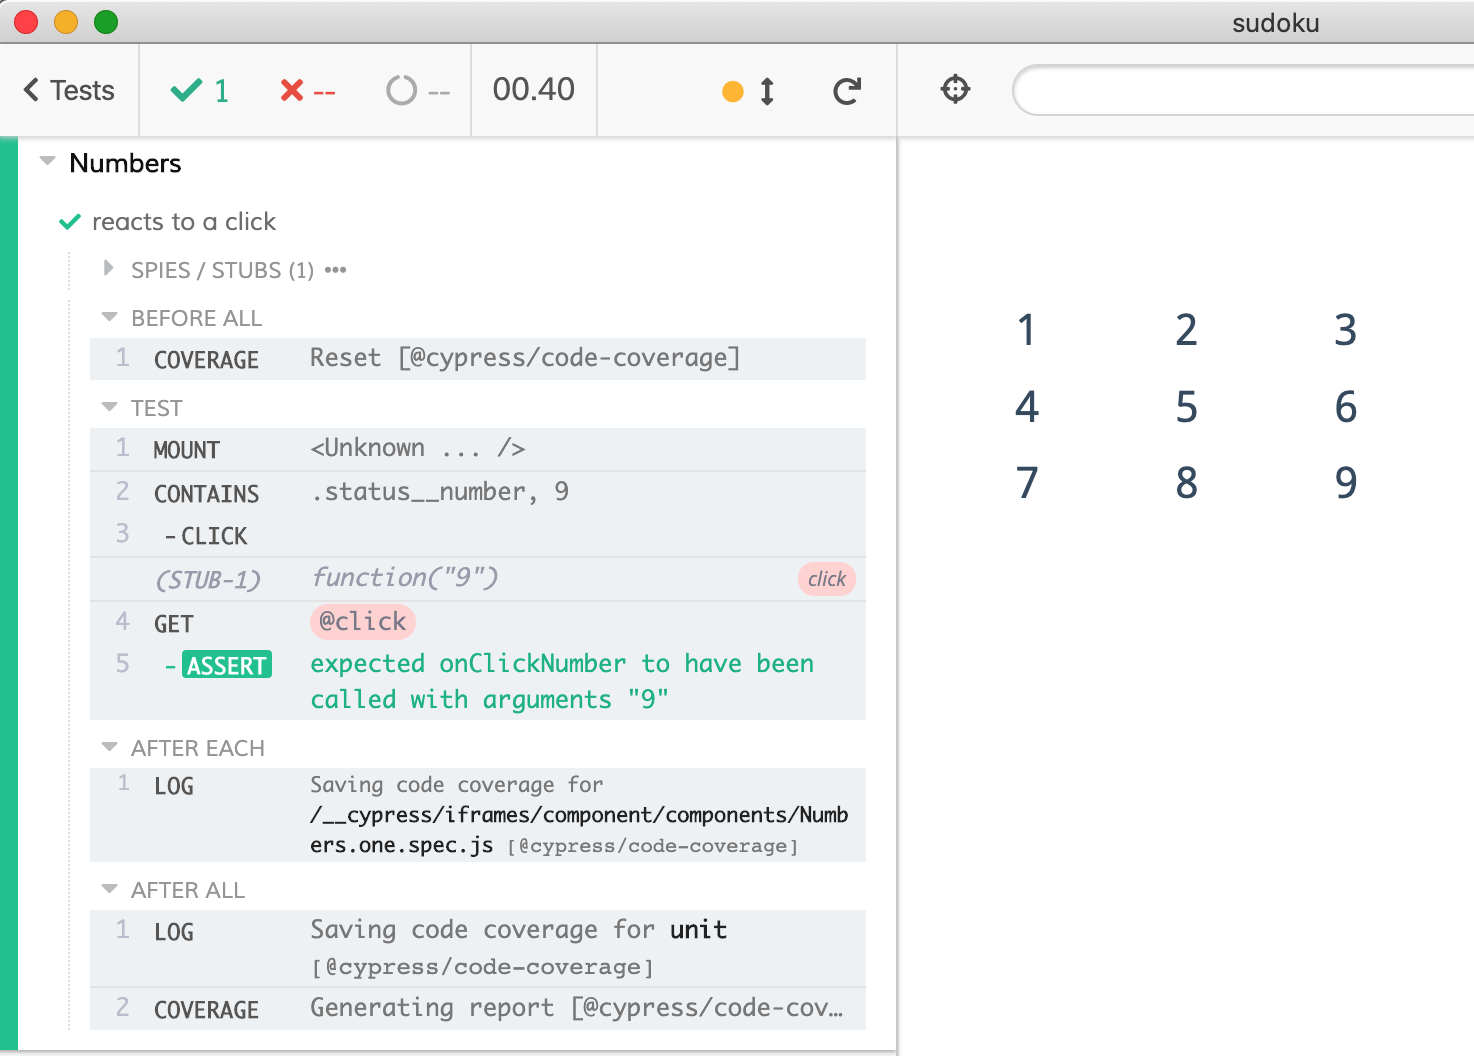
Super. We can also confirm that the component calls the prop onClickNumber when the user clicks a number in the DOM:
1 | it('reacts to a click', () => { |
In the test above we pass cy.stub and confirm it was called with expected number 9 when the user clicks on the DOM element.
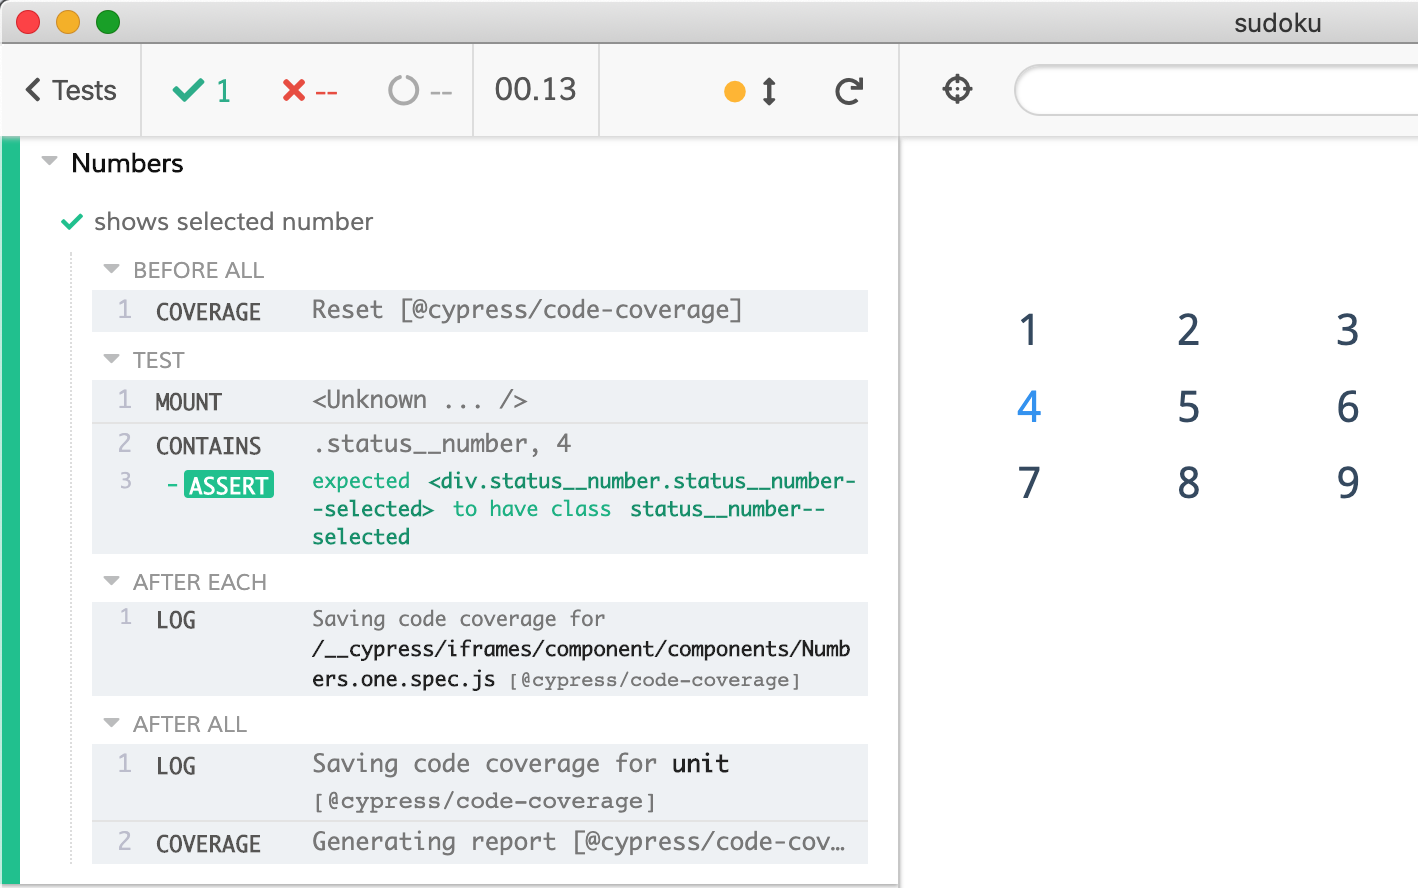
How does our component look when there is a selected number? In order to test this, we need to wrap the <Numbers /> component with a mock context provider.
1 | import {SudokuContext} from '../context/SudokuContext' |
The number 4 does have the expected class status__number--selected and we do see the color difference.
Ok, but do we need to look at the tests to tell if the component looks correctly? Do we need a human in the loop? What if we change the App.css file and accidentally break some other component? This game has its own polished style, it would be a shame to break it accidentally.
Visual testing
If we want to confirm the look of the component, we could assert every computed CSS property of every DOM node ... but that would be unbelievably brittle and hard to maintain. Instead, we could render the component into an image and look at it. While computers are not very good (yet) at understanding images, they are really good at comparing them. So let's generate screenshots of our component with different inputs and store those images with the code. Any time there is a pull request, we will repeat the above steps and then compare the new images pixel by pixel with saved good images.
There are many commercial services that do this, but in this blog post I will use open source image comparison plugin for Cypress called cypress-image-snapshot. We can install it as a dev dependency and include its files in the support and plugins files.
1 | require('cypress-react-unit-test/support') |
1 | module.exports = (on, config) => { |
Now we get a new Cypress command cy.matchImageSnapshot(<snapshot name>). Let's use it to create image snapshot of the Number component with selected digit "4".
1 | it('shows selected number', () => { |
In the test we have confirmed the component has been rendered using an assertion
1 | cy.contains('.status__number', '4') |
Then we create an image with the entire .status__numbers DOM element rendered.
1 | cy.get('.status__numbers') |
The snapshots are saved in cypress/snapshots folder.
If we edit the CSS file src/App.css and change the text padding around the numbers like this:
1 | .status__number { |
The test runs - and the generated snapshot (under the hood cypress-image-snapshot uses cy.screenshot) is slightly different. It is hard to notice, so the pixel by pixel comparison done by the computer is perfect tool for automating it. The cypress-image-snapshot plugin produces the diff image in cypress/snapshots/**/__diff_output__ folder. The diff image has three parts: on the left is the original baseline image. On the right is the current image. In the middle there is a composite image highlighting the difference.

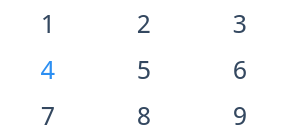
The visual snapshots replace a lot of individual assertions. For example, there is no need to confirm that individual numbers are present in the DOM. Instead we can confirm the number of DOM elements with the class (to make sure the component has rendered) and take a single snapshot.
1 | it('shows all numbers', () => { |
A single image snapshot can confirm so much - as long as the components render consistently from the same data. Let's look how to ensure it.
Controlling the clock
Inside the app, we have a timer that shows elapsed time since the start of the game
1 | import { App } from './App' |
Hmm, how do we make sure we take consistent snapshot of a timer element that keeps changing? By controlling the clock using cy.clock and cy.tick.
1 | import { App } from './App' |
Because we explicitly control the app's clock, the timer stays frozen at "00:00" when we take the first snapshot, and stays frozen at "11:40" when we take the second snapshot 700 seconds later. A nice bonus for this technique is that we can test an application with long actions in a blink of an eye.
Deterministic board
If we can test the smaller components, why can't we mount the entire <App> and take an image snapshot? That would give us a lot of confidence.
1 | import { App } from './App' |
Unfortunately the above test would not work. We cannot just take a snapshot - the board is generated randomly every time the game starts. Every new board will produce a new image, breaking the test.
Let's look how the game generates the board data. The <App> component has the <Game> child component, which imports a function to generate the board.
1 | import { getUniqueSudoku } from './solver/UniqueSudoku' |
To generate the same board, we will stub the ES6 import getUniqueSudoku. I have intercepted the results from getUniqueSudoku() call using the DevTools and saved the two arrays as two JSON fixture files.
1 | // cypress/fixtures/init-array.json |
Plugin cypress-react-unit-test comes with a Babel plugin that can mock ES6 module imports, and for any application that uses react-scripts it should work automatically. Let mock the getUniqueSudoku import and return the arrays loaded from the fixture files.
1 | import { App } from './App' |
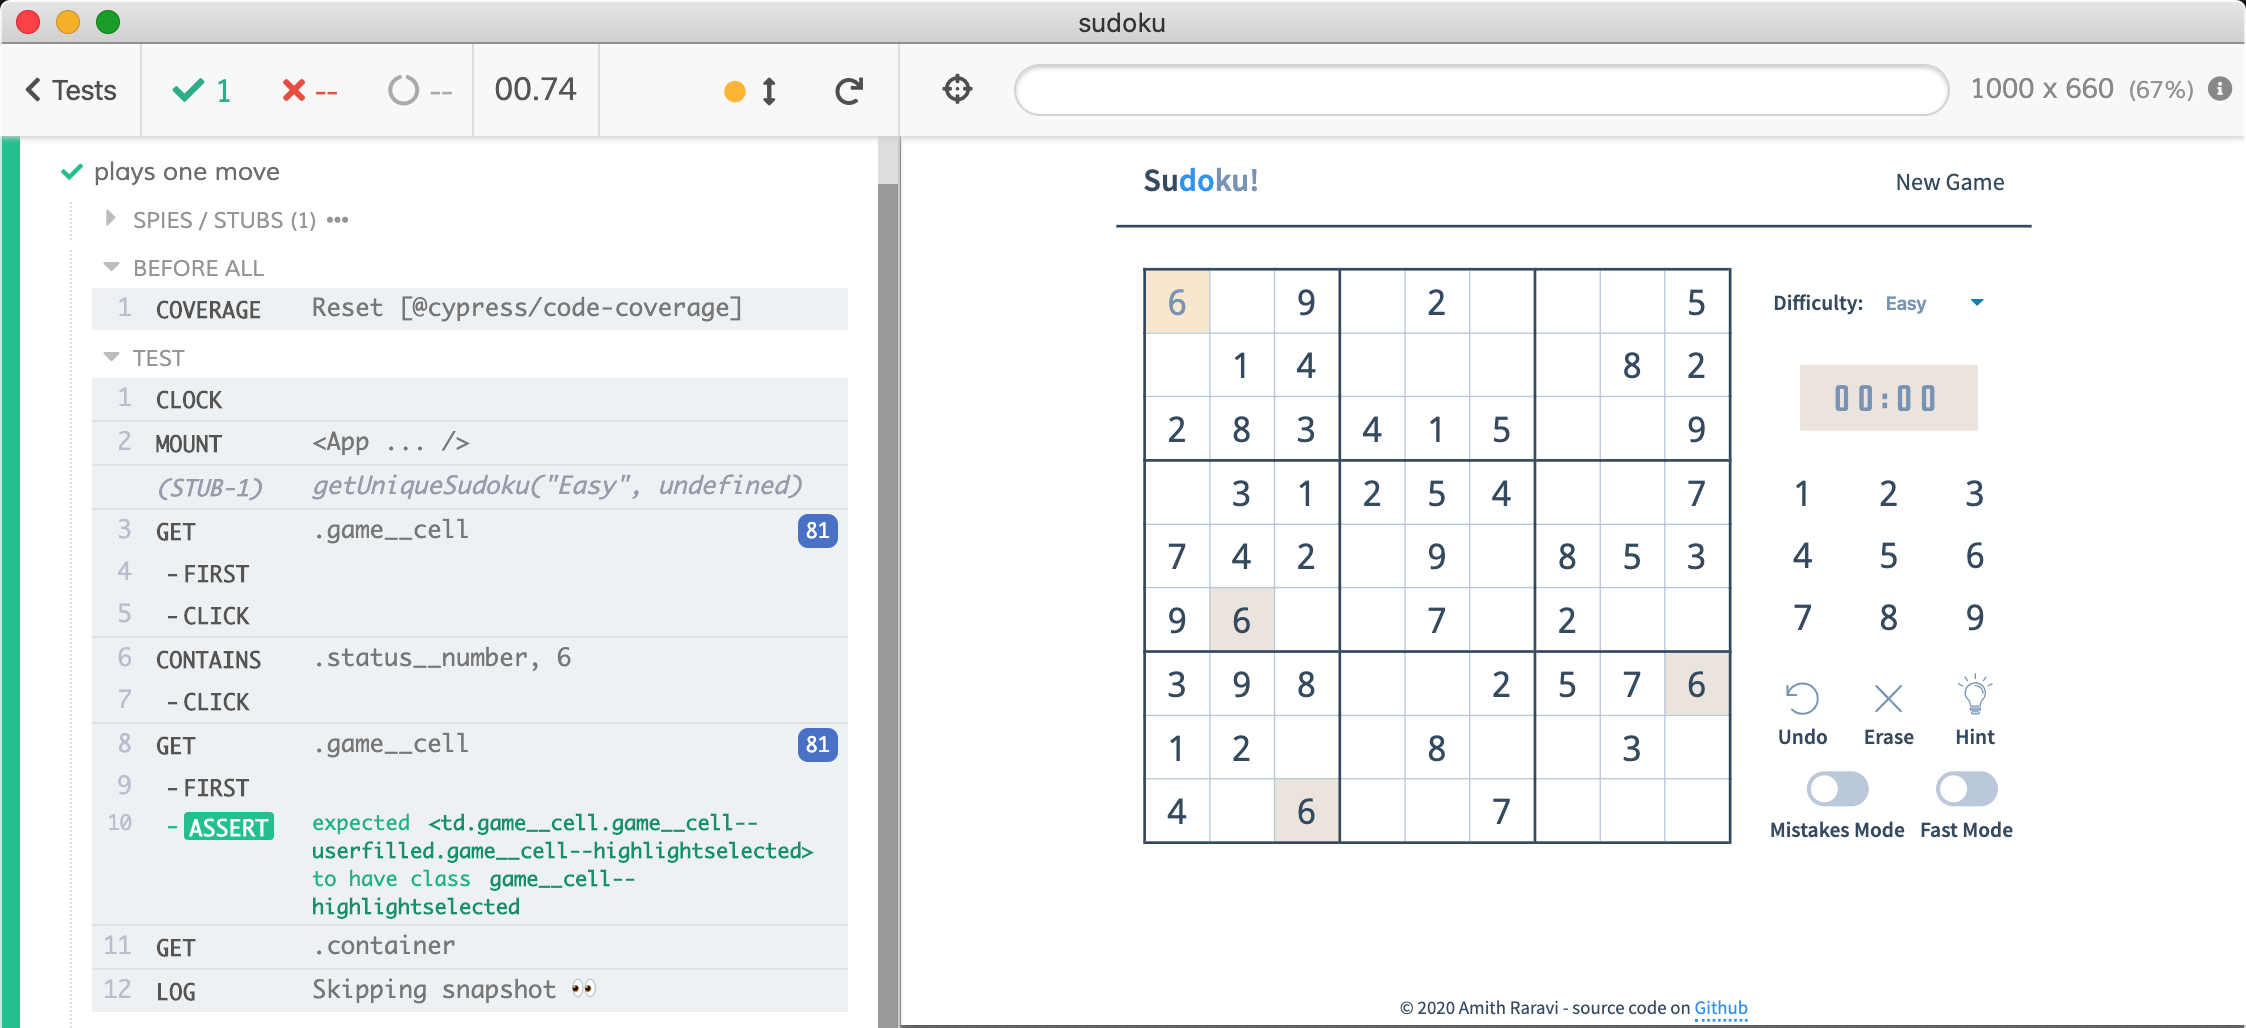
The above test always generates the same board, freezes the clock at "00:00" and generates a consistent snapshot image. Building on top of this approach, we can write a test that plays a move, since we have a deterministic board to start with.
1 | import { App } from './App' |
While a screenshot is nice, the power of Cypress comes from its full browser experience and time-traveling debugging feature. The video below shows what every test command does as we hover it.
Tip: if a lot of tests load the same fixture, you can load it once and store in a closure variable.
1 | let initArray |
Read blog post Import Cypress fixtures for details.
Local workflow
We can write visual tests for our components and generate consistent images by mocking data and the clock. Is this enough to use visual testing in our day-to-day life?
No.
If we take a visual snapshot in Cypress GUI opened with yarn cypress open on Mac we will get an image with a specific resolution, for example 1300x600 pixels. When we take the same snapshot in the headless mode using yarn cypress run we will get an image with only the half resolution in each dimension: 650x300 pixels. This is due to pixel density of the graphical application vs headless rendering mode. Thus I disable snapshots in the interactive mode from the support file.
1 | import { addMatchImageSnapshotCommand } from 'cypress-image-snapshot/command'; |
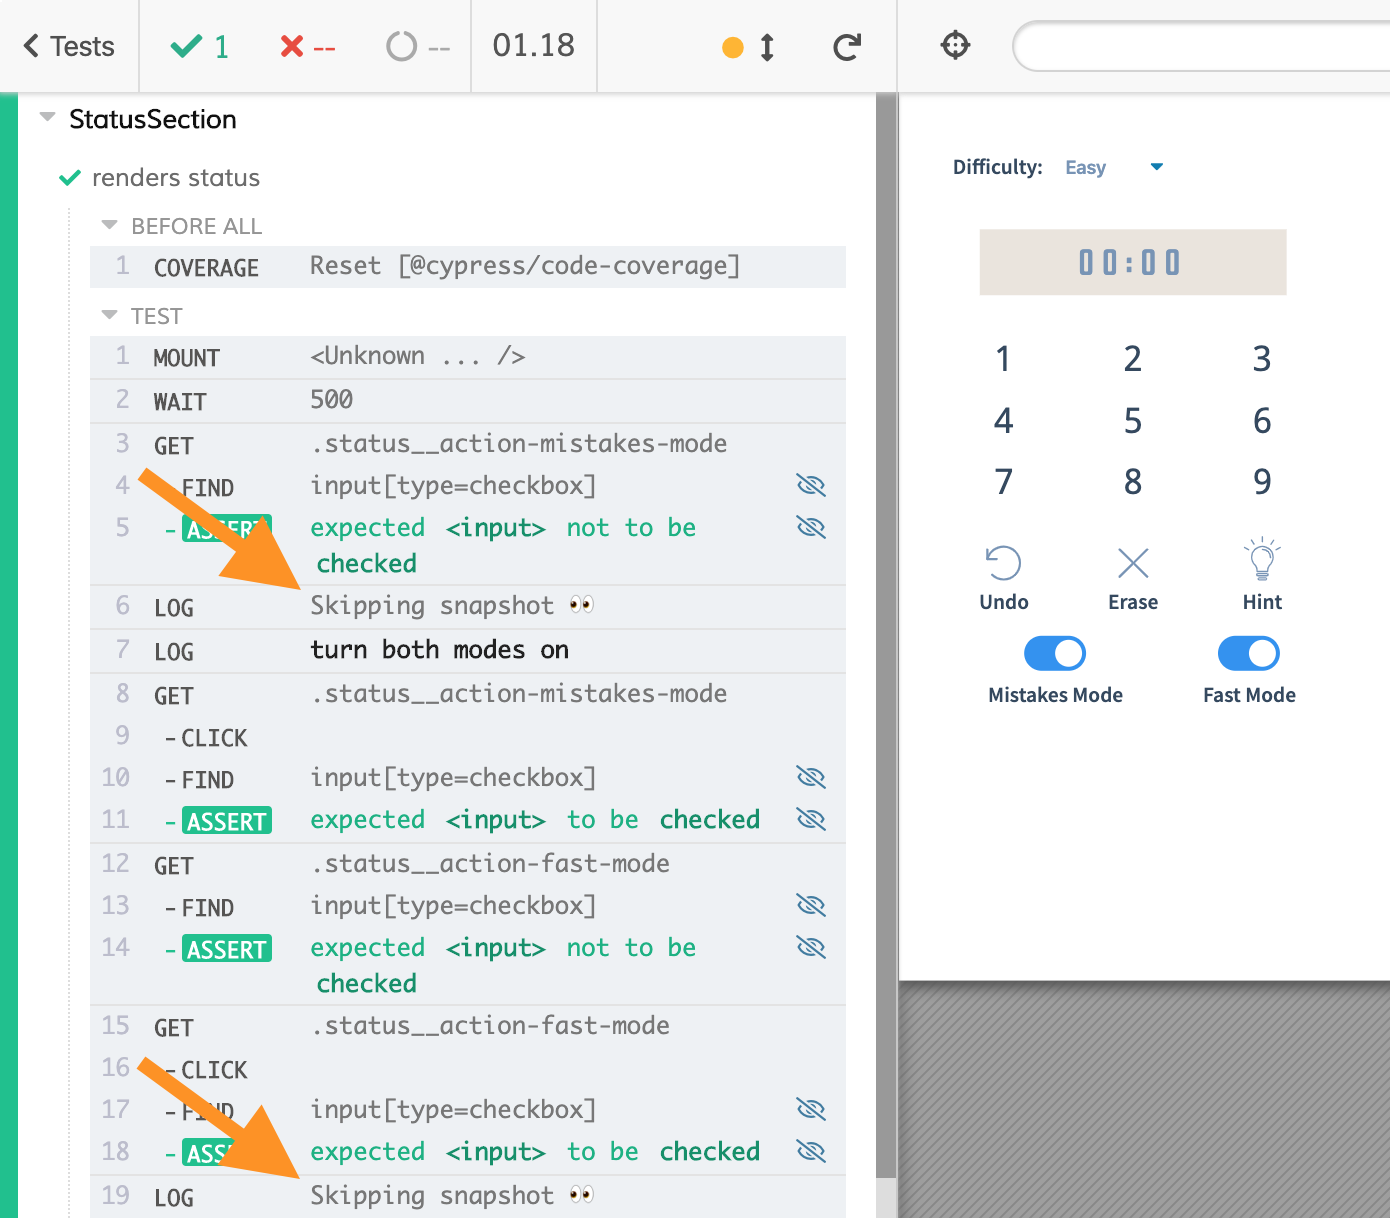
When the test is running, the Command Log shows the places where the snapshots would be taken.
To really take a snapshot, I execute yarn cypress run, inspect any new snapshot files, add them to the source control and push the code to the remote repository.
If I need to update a saved image snapshot, I can delete the snapshot image and execute yarn cypress run to save new image. Or I can run Cypress with environment variable telling the cypress-image-snapshot to update every snapshot if there is difference.
1 | CYPRESS_updateSnapshots=true yarn cypress run |
Note: make sure to inspect every changed snapshot before committing, since all snapshots can be updated during the above command.
Continuous Integration
Even when saving image snapshots in the headless mode we can encounter problems. For example, if we save the image snapshots on Mac and compare them to the images generated on Linux CI, there will be tiny pixel differences due to font rendering, aliasing, and different browser versions.

The image above shows the detected pixel differences between 00:00 rendered on Mac (left) and on Linux (right). Even these tiny differences still fail the test.
We can configure the cypress-image-snapshot command to accept a small percentage of different pixels per image.
1 | // when adding matchImageSnapshot command |
I do not trust such thresholds, since they can miss actual visual problems. Instead I recommend generating image snapshots using exactly the same environment as the one on CI. This is simple to do using Docker containers from cypress-docker-images. Instead of running the command yarn cypress run to generate or update snapshots, we will use a Docker image locally.
1 |
|
Because the component tests do not require a server, we can run them with a single command using the pre-installed Cypress Docker image cypress/included:<version>. On CI we can use a Docker with exactly the same OS dependencies, fonts and browser version. Here is an example CI config
1 | jobs: |
The Docker image cypress/included:4.5.0 is built from cypress/browsers:node12.13.0-chrome80-ff74 image with Cypress globally installed. Thus the browser should render the same HTML pages in exactly the same way.
Pull request workflow
Let's discuss what happens with image snapshots during pull requests. When someone opens a PR with a new feature or a bug fix, it is beneficial to separate the functional tests from the visual tests. If a button has changed its appearance, the functional tests should pass, and the visual tests should fail. This will tell us quickly if there are visual differences due to layout, color, or style changes.
For this purpose, bahmutov/sudoku runs tests on CI with an environment variable that tells the cypress-image-snapshot plugin to generate image diffs, but not fail the command matchImageSnapshot.
1 | - name: Cypress run 🧪 |
At the end of the run we can find these diff images and report them separately using GitHub commit status check.
1 | async function getVisualDiffs() { |
If there are any DIFF images, then the status check will be fail. The video below shows a pull request where at first there are visual changes. Then the tests are updated and the next commit has no visual differences.
Whenever there are visual differences, you can inspect the diff images if you store them on CI as test artifacts; the snapshots are stored in cypress/snapshots folder.
1 | - name: Store snapshots 📸 |
Summary
In this blog post we have looked at writing React component tests and using visual diffing to compare the current image against the good baseline image. We must generate the same image, which we can do by mocking the data and the clock to be deterministic. We also need to ensure that the snapshots are generated using exactly the same environment to be pixel-perfect matches.
Finally, we briefly looked at the visual tests during pull request workflow. Looking back at the entire work, I conclude:
- writing React component tests using cypress-react-unit-test is fast and easy
- cypress-image-snapshot plugin allows one to do visual testing for free, but we have to do a lot of work to manage images, render them, and review them during pull requests
I would strongly recommend giving a commercial visual testing service a try: Applitools, Happo.io, and Percy.io have Cypress plugins and are free to try and cheap use.
More info
Take a look at the example Sudoku repository, and especially at the long list of short videos there: bahmutov/sudoku#videos. These videos show every part of the process I have described in this blog in more detail.
You should also read the Cypress visual testing guide.