Note: most of this tips apply to all versions of Cypress. For Cypress v10+ specific tips, read the blog post Cypress v10 Tips and Tricks.
- Read the docs
- Run Cypress on your own CI
- Record success and failure videos
- Move common code into utility package
- Separate tests into bundles
- Make JavaScript crashes useful
- Use test names when creating data
- Get test status
- Explore the environment
- Run all spec files locally
- Get command log on failure
- Wait on the right thing
- Write and read files
- Read JSON files with retries
- Conditional logic
- Customize Cypress test runner colors
- Shorten assertions
- Disable ServiceWorker
- Control
navigator.language - Use fixtures to stub network requests
- Use code coverage
- Use visual testing
- Interactive and headed mode
- Produce high quality video recording
- Use the page base url
- Pass the environment variables correctly
- Parse and use URL
- Deal with
target=_blank - Deal with
window.open - Deal with
window.location.replace - Minimize memory use
- Start browser with specific time zone
- Scaffold the new projects faster
- Install Chromium via Puppeteer
- Create aliases before each test
- Hover command
- Wait for data
- Make HTTP requests
- Restart the tests
- Wait for network idle
- Check if the network call has not been made
- Find good Cypress examples
- Use cy.log to print to the Command Log
- Use a single cy.contains command
- Disable Save Credit Card prompt
- Print timestamp with the error message
- Add a custom delay command for better videos
- Visit the blank page to stop the running app
- Do not load pesky 3rd party script
- Deal with type module
- Access a MySQL database
- Fix Create-React-App ESLint warnings
- Use Lodash
- Detect when the document reloads
- Time part of the test
- Difference between cy and Cypress globals
- Compare two loaded files
- Do not truncate arrays and objects in assertions
- Vary test commands depending on the viewport
- cy.get vs cy.intercept commands
- See also
- Related posts
We have been successfully using Cypress to verify our websites and web apps for a while. Here are some tips & tricks we have learned.
Even this blog is tested using Cypress :)
Read the docs
Cypress has excellent documentation at https://docs.cypress.io/, including examples, guides, videos and even a busy Gitter chat channel. There is also "Search" box that quickly finds relevant documents. The search is really good and covers the docs, the blog posts and the examples.
Recently common recipes were combined into a single place. If you still have an issue with Cypress, please search through open and closed issues.
You can also read my other blog posts about Cypress under tags/cypress and subscribe to my monthly Cypress Tips & Tricks Newsletter.
Run Cypress on your own CI
As long as the project has a project key, you can run the tests on your own CI boxes. I found running inside Docker to be the easiest, and even built an unofficial Docker image with all dependencies.
Note that cypress ci ... will upload recorded videos and screenshots
(if capturing them is enabled)
to the Cypress cloud, while cypress run ... will not.
Record success and failure videos
When Cypress team has released the video capture feature in version 0.17.11 it quickly became my favorite. I have configured our GitLab CI to keep artifacts from failed test runs for 1 week, while keeping videos from successful test runs only for a 3 days.
1 | artifacts: |
Whenever a test fails, I watch the failure video side by side with the video from the last successful test run. The differences in the subject under test are quickly obvious.
Move common code into utility package
Testing code should be engineered as well as the production code. To avoid duplicating testing helper utilities, we advise to move all common helpers into their own NPM module. For example, we use local CSS styles with randomized class names in our web code.
1 | <div class="table-1b4a2 people-5ee98"> |
This makes the selectors very long since we need to use prefixes.
1 | cy.get('[class*=people-]') // UGLY! |
By creating a tiny helper function we alleviated the selector head aches.
1 | import {classPrefix} from '@team/cypress-utils/css-names' |
The test code became a lot more readable.
Separate tests into bundles
Using a single cypress/integration/spec.js file to test a large web
application quickly becomes difficult and time consuming. We have separated
our code into multiple files. Additionally, we keep the source files
in src folder and build the multiple bundles in cypress/integration
using kensho/multi-cypress tool.
The multi-cypress tool assumes that Docker and GitLab CI are used to
actually run the tests. Each test will be inside its own "test job", thus
10 spec files can be executed at once (assuming at least 10 GitLab CI
runners are available).
The command to run a specific spec file is
cypress run --spec "spec/filename.js" by the way.
Make JavaScript crashes useful
As I have said before, the true value of a test is not when it passes, but when it fails. Additionally, even a passing test might generate client-side errors that are not crashes and do not fail the test. For example, we often use Sentry exception monitoring service where we forward all client-side errors.
If a client-side error happens while the E2E Cypress test is running, we need this additional context: which test is executing, what steps were already finished before the error was reported, etc.
By loading a small library send-test-info before each test, we can capture the name of the test, its spec filename and even the Cypress test log as breadcrumbs; this information is then sent to Sentry with each crash. For example, the exception below shows the name of the test when the error was reported
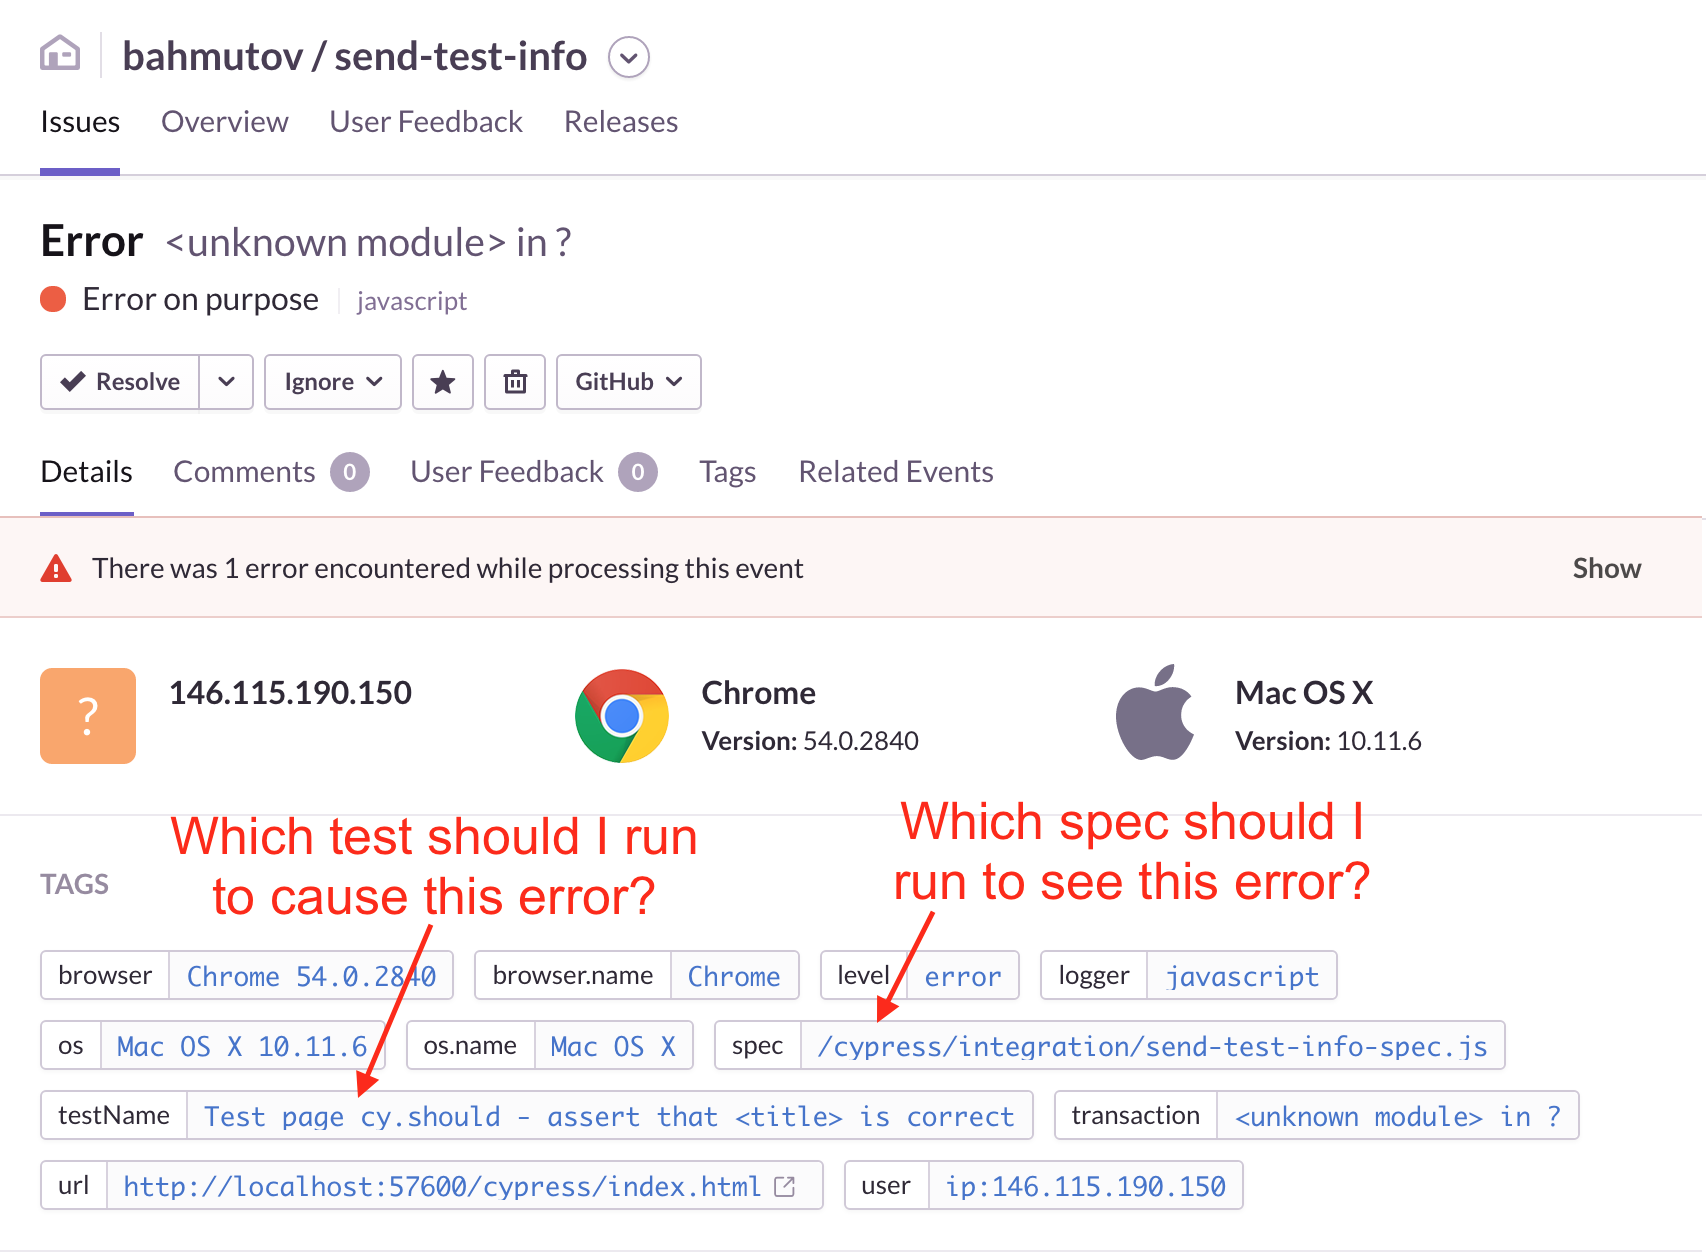
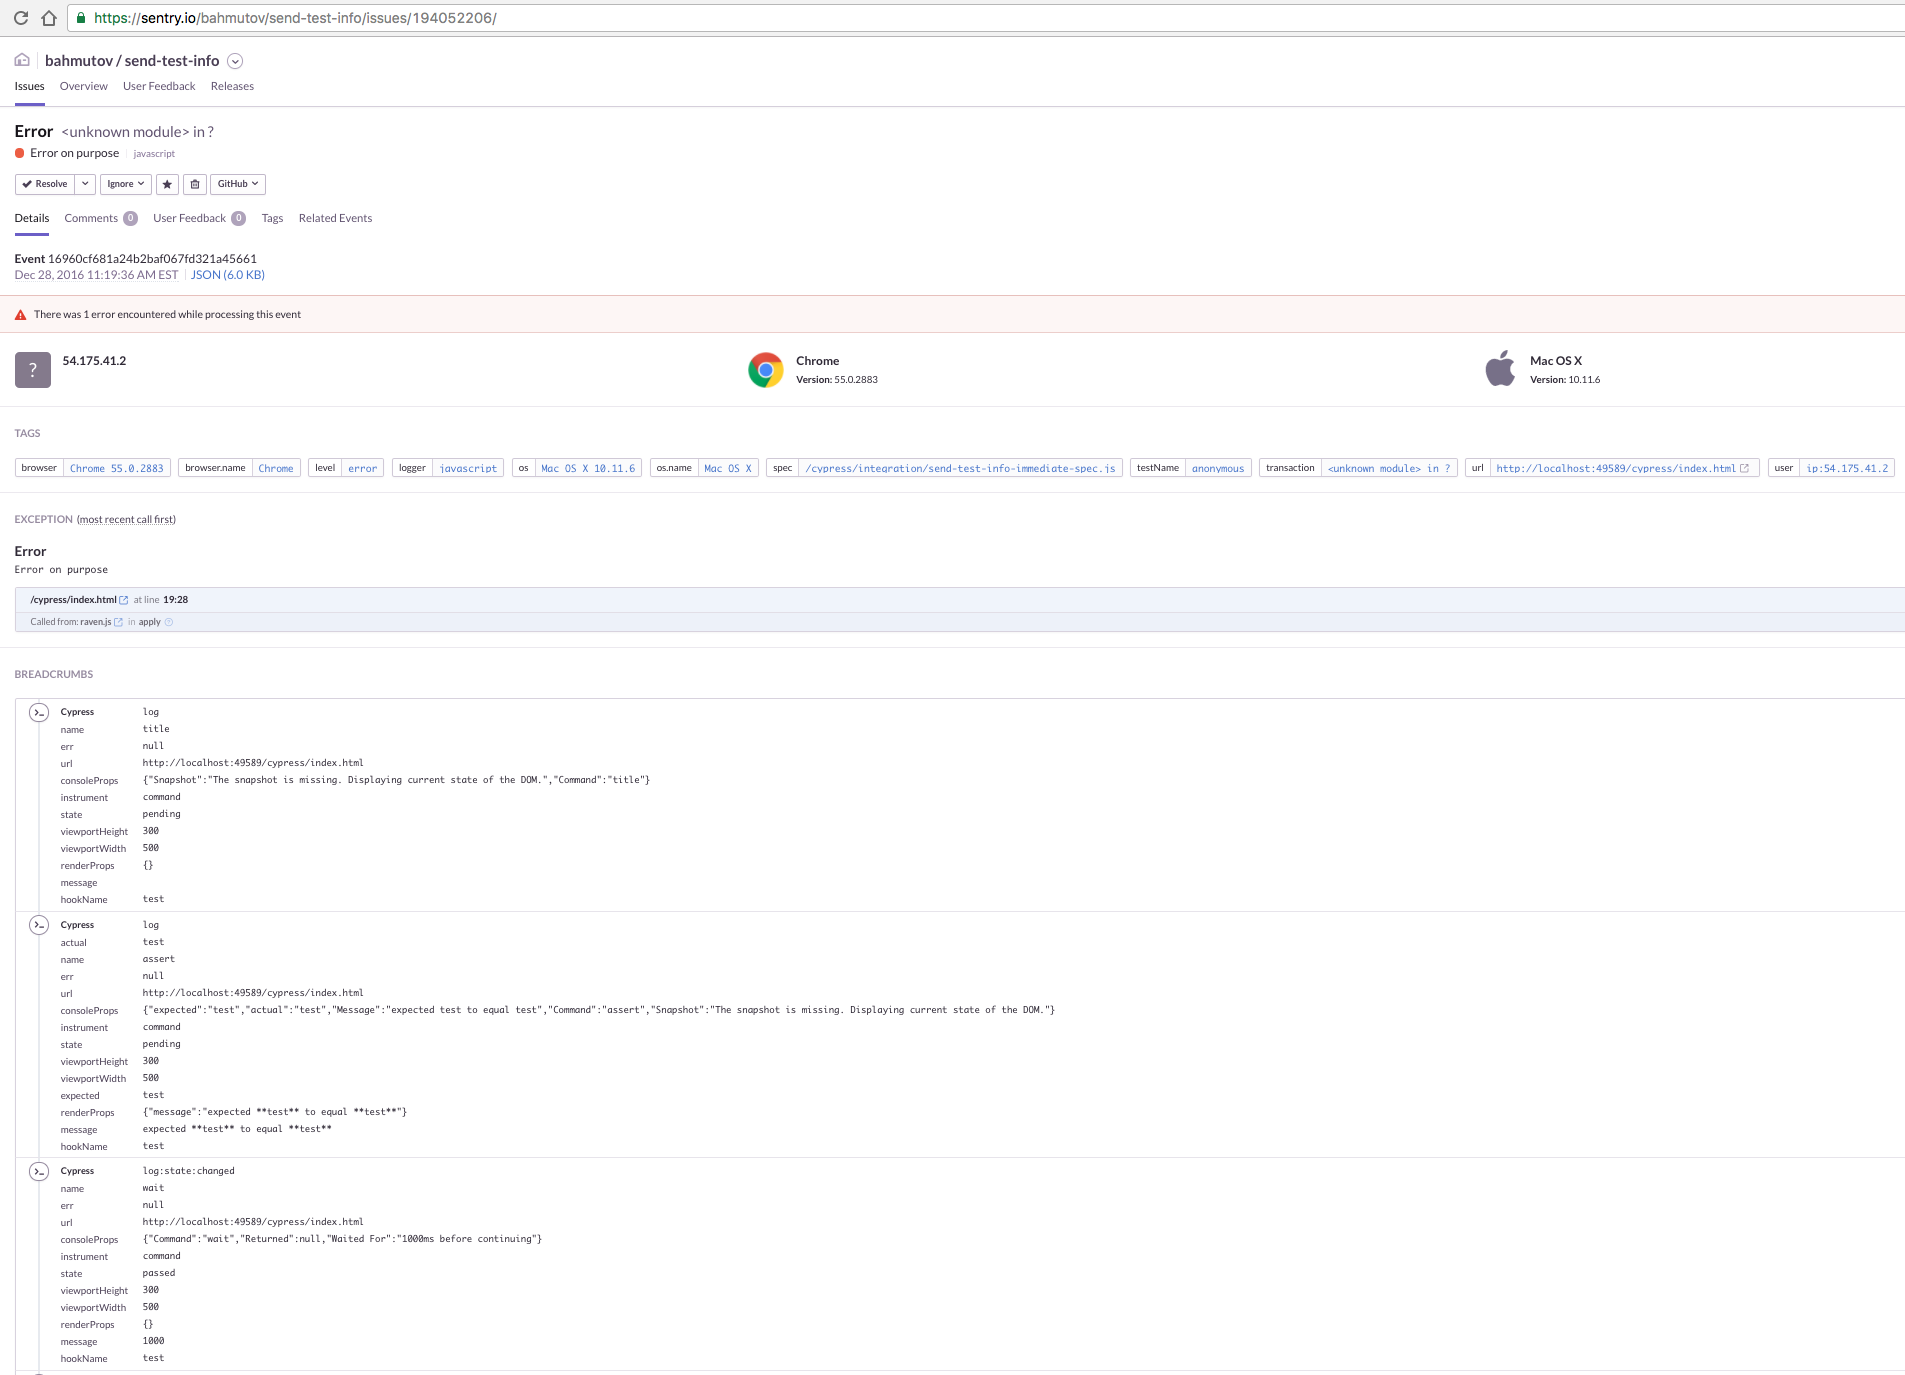
Similarly, the Cypress test steps are logged as breadcrumbs and are sent with the exception allowing any developer to quickly get a sense when the error happens as the test runs.
Use test names when creating data
Often as part of the E2E test we create items / users / posts. I like to put the full test title in the created data to easily see what test created which datum. Inside the test we can quickly grab the full title (which includes the full parent's title and the current test name) from the context.
I also like creating random numbers for additional difference
1 | const uuid = () => Cypress._.random(0, 1e6) |
Get test status
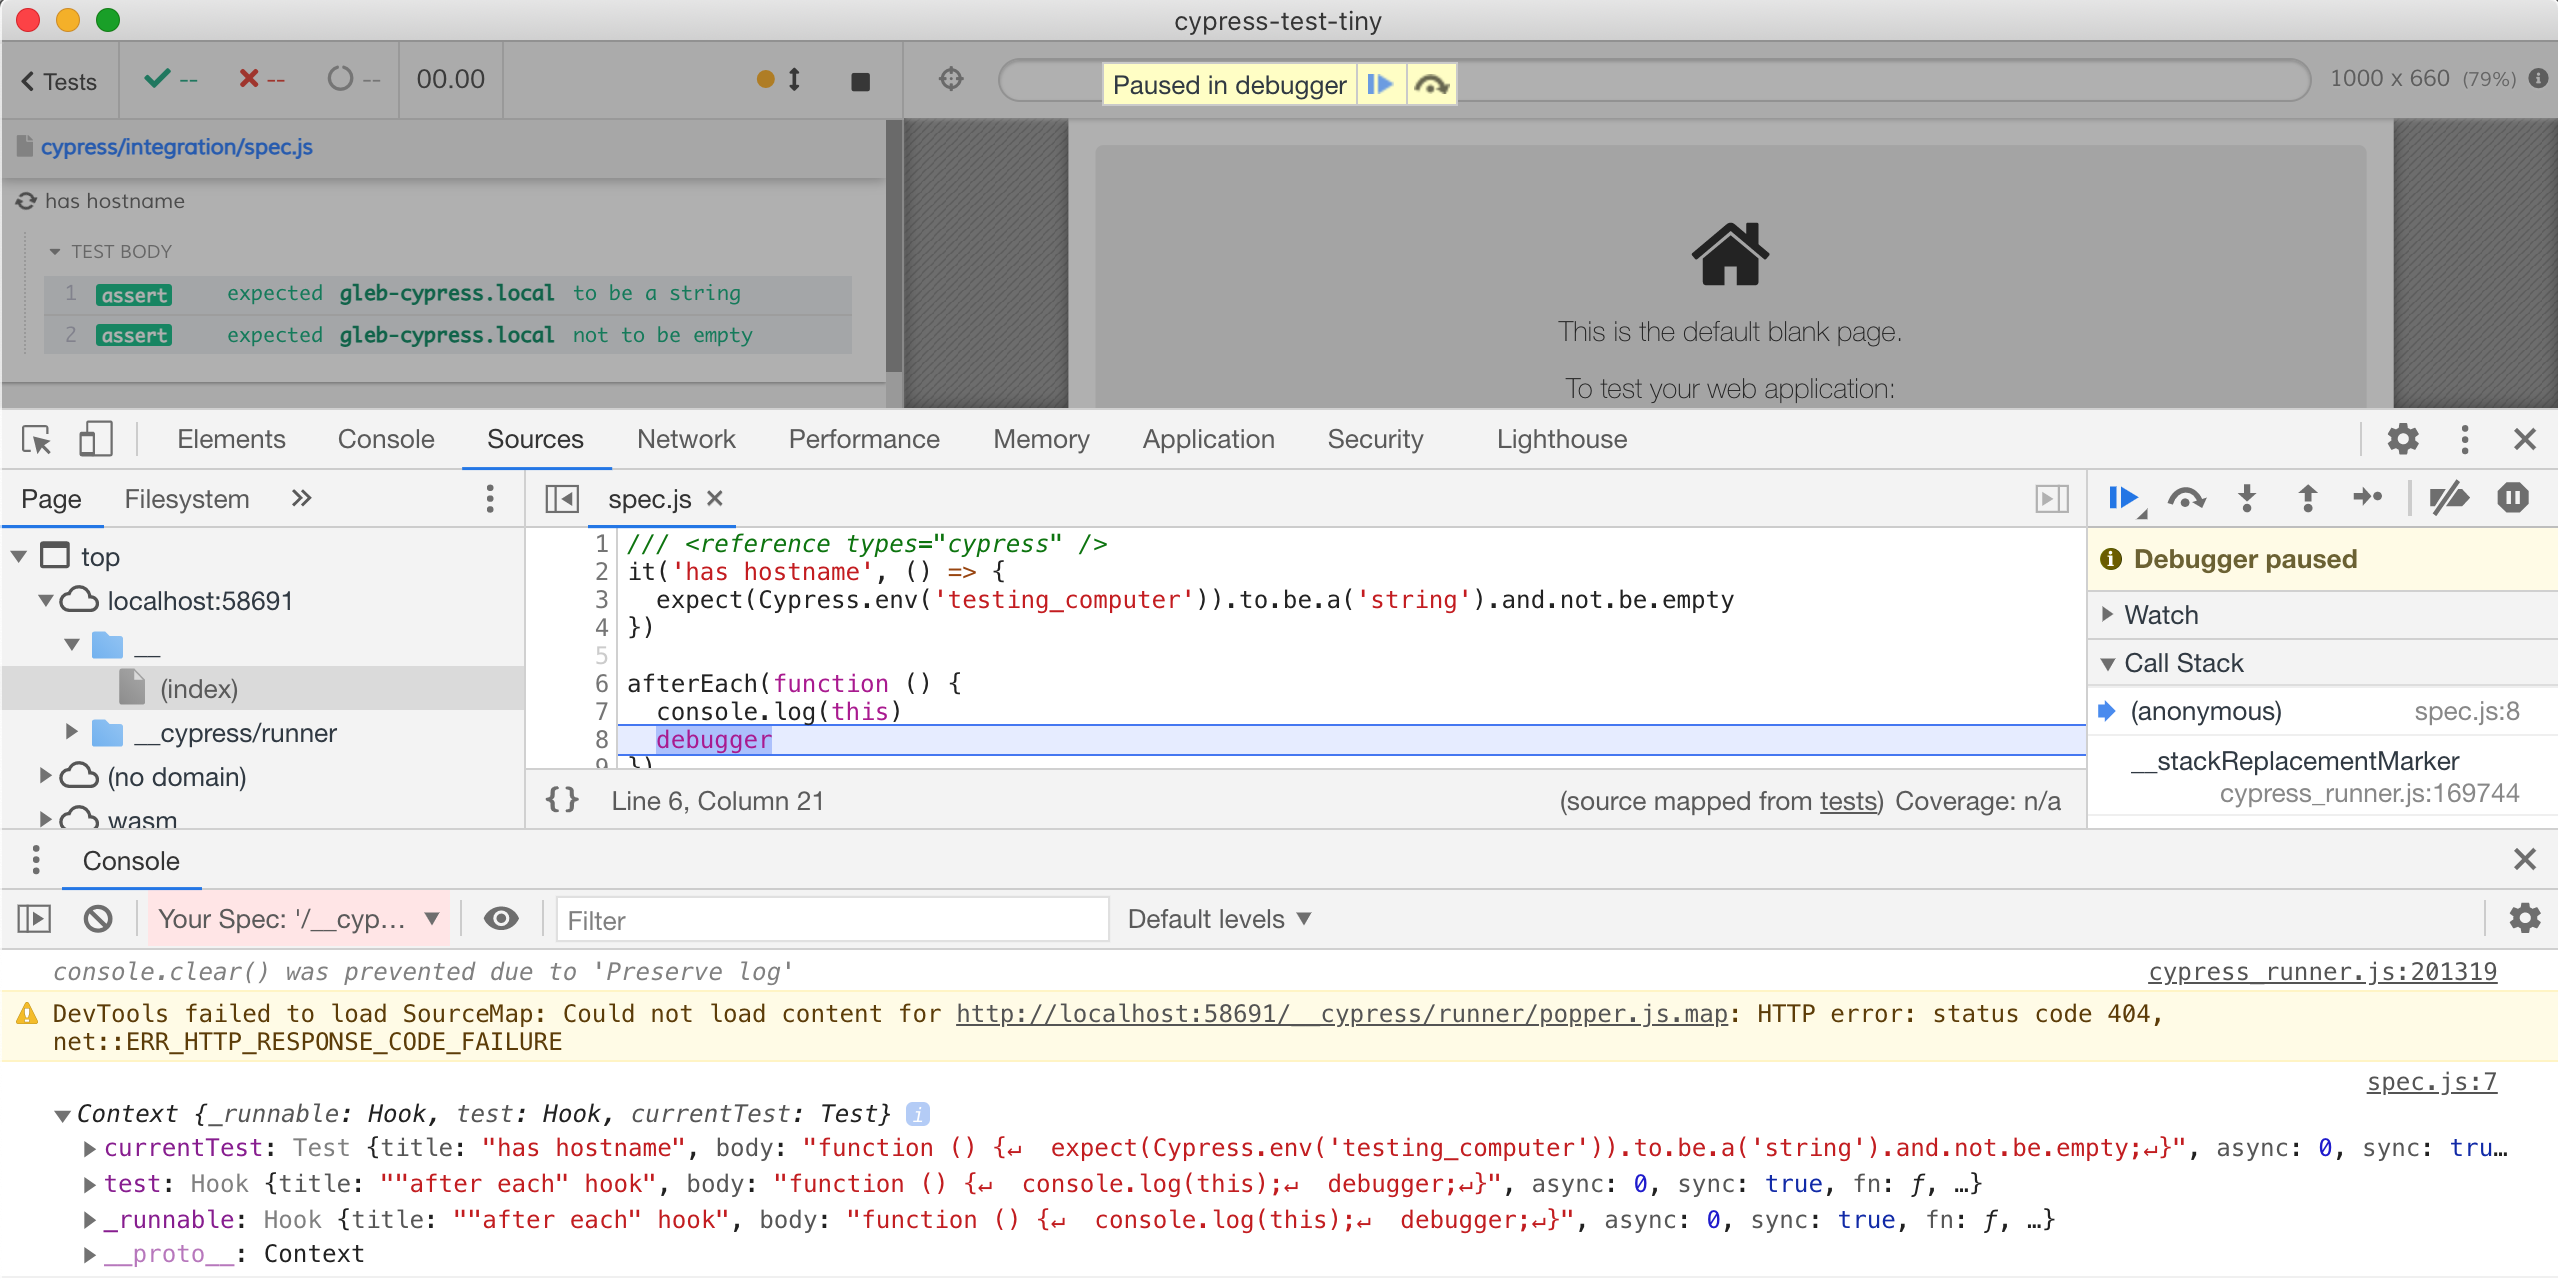
If you use function () {} as the test's body, or a body of a hook, you can find lots of interesting properties in the this object. For example, you can see the state of the test: passed or failed. To see them all, place the debugger keyword and run the test with DevTools open.
1 | afterEach(function () { |
There is an object for the entire test, and for the current hook
The this.currentTest object contains the status of the entire test
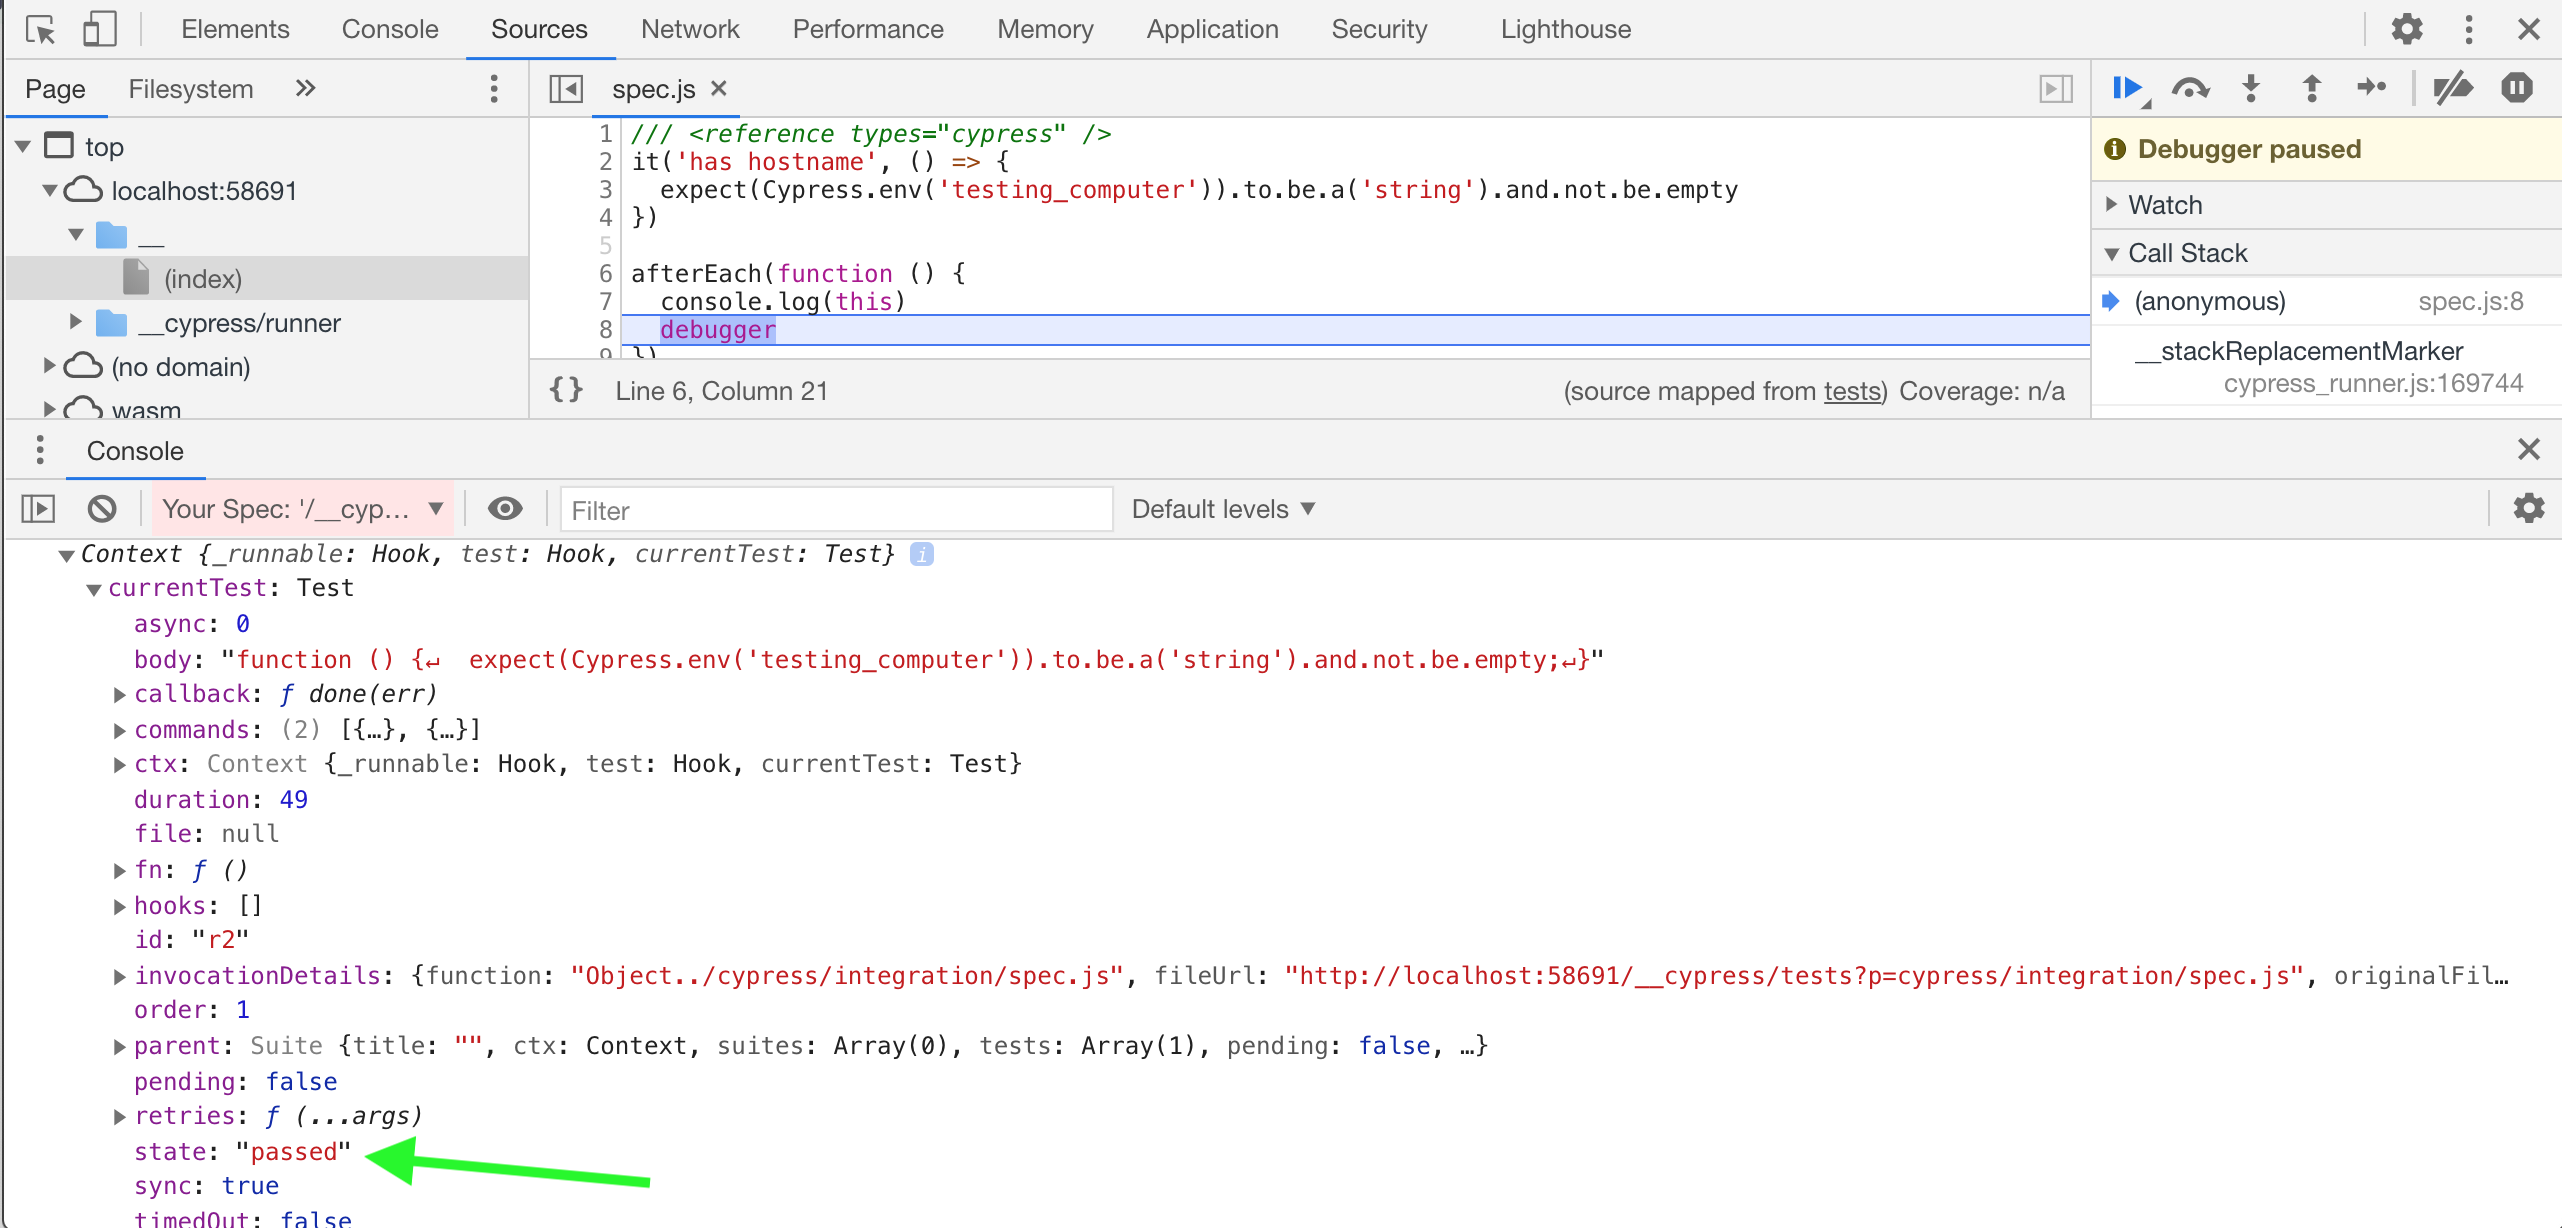
1 | afterEach(function () { |
📺 You can see the explanation for this trick in the video Check The Test Status Inside The After Each Hook.
Explore the environment
You can pause the test execution by using debugger keyword. Make sure
the DevTools are open!
1 | it('bar', function () { |
Run all spec files locally
If you separate Cypress E2E tests into multiple spec files, you soon end up with lots of files. If you need to run the scripts one by one from the command line, I wrote a small utility run-each-cypress-spec.
1 | npm install -g run-each-cypress-spec |
If you need environment variables (like urls, passwords), you can easily inject them using as-a
1 | as-a cy run-specs |
Get command log on failure
While videos of the failed tests are useful, sometimes we just want to get a sense of the failure before triaging it. In the headless CI mode, you can get a JSON file for each failed test with the log of all commands. See the JSON file below as an example of a failed test and the file it generated.
1 | { |
This is a separate project that just needs to be included from your
cypress/support/index.js file. For instructions see
cypress-failed-log project.
Wait on the right thing
It is important to wait for the right element. Imagine we have a list of items in the DOM. We expect a new element to appear with text "Hello". We could select first the list, then the element containing "Hello" and check if it becomes visible
1 | cy.get('.list') |
But sometimes it does not work. When we cy.get('.list') Cypress saves the
DOM element as the "subject" and then tries to wait for a child of that
element with text "Hello" to become visible. If we use React for example, the
DOM of the list might be recreated from scratch if we push a new item into
the list. When that happens Cypress notices that the "subject" DOM it holds
a reference to becomes "detached from the DOM" - it becomes an orphan!
A better solution to this problem is to use a composite CSS selector that will grab the list AND the item in a single operation.
1 | cy.contains('.list li', 'Hello') |
This forces Cypress to wait for the list AND list item element without caching
a reference to the DOM element .list.
You can use advanced CSS selectors to get an element in a single command.
For example instead of cy.get('.something').first() you could
use cy.get('.something:first-child'). Similarly,
1 | // get first element |
Write and read files
You can write files to disk directly from Cypress using
cy.writeFile and read an
existing file using cy.readFile.
What if you want to read a file that might not exist? cy.readFile will fail
the test if file does not exist, thus we need to find a work around.
In my case, the file I would like to load is a JSON of test values useful for Jest-like snapshot testing.
Here is a neat trick. Save the file using cy.writeFile, for example
cy.writeFile('spanshots.json') whenever there is something to save.
When reading the file, fetch it through the Cypress code proxy using fetch
Notice how the test spec itself is served by Cypress from URL which looks like
http://localhost:49829/__cypress/tests?p=cypress/integration/spec.js-438.
Let us "hack" it to load a file that might not exist.
The code below tries to load snapshots file before each test.
If the fetch call fails, the file does not exist.
1 | let snapshots |
If the fetch call succeeds, the returned text will NOT be original JSON!
Instead it will be webpacked module :)
For example, here is the saved file
1 | { |
Here is how built-in Cypress bundler returns it in response to
/__cypress/tests?p=./snapshots.json - I have shortened the webpack
boilerplate preamble.
1 | (function e(t,n,r){function ...)({1:[function(require,module,exports){ |
Notice that our JSON has been placed into module with id '1' (first line
expression {1:). The entire bundle registers a stand alone require
function. If we want to get into the actual "module" contents we have to
do the following in our function loadedText(text) to finish the hack
1 | function loadedText (text) { |
Boom, the object snapshots has been loaded from the file snapshots.json
which might or might not exist.
Note while I have successfully used the above hack when running Cypress
locally, it was always failing when doing cypress run in headless mode.
Read JSON files with retries
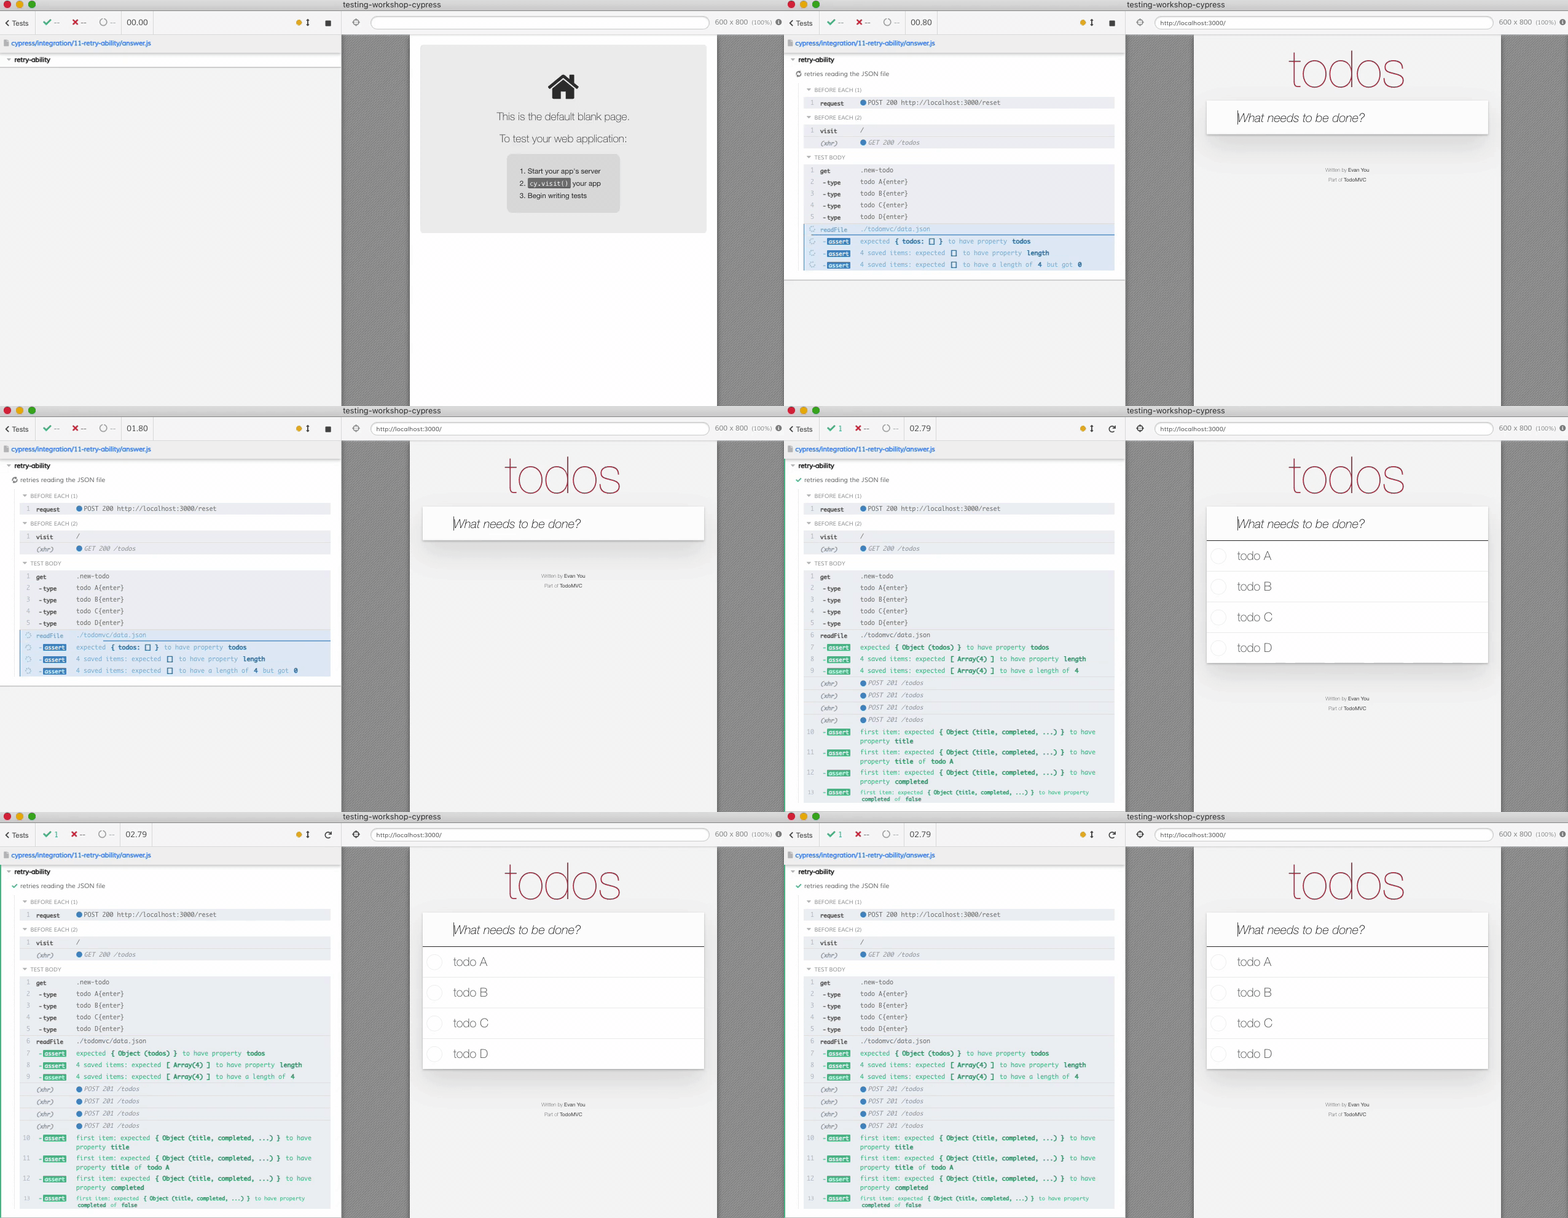
Cypress cy.readFile command automatically parses JSON files. It also re-reads the file if the assertions on the returned JSON fail. For example, let's validate the number of items stored by the app in its JSON "database" file:
1 | // note cy.readFile retries reading the file until the should(cb) passes |
Even if the application sends the items after a time delay, the cy.readFile(...).should(cb) combination retries and successfully passes when all four items are found.
Conditional logic
Sometimes you might need to interact with a page element that does not always exist. For example there might a modal dialog the first time you use the website. You want to close the modal dialog.
1 | cy.get('.greeting') |
But the modal is not shown the second time around and the above code will fail. In order to check if an element exists without asserting it, use the proxied jQuery function Cypress.$
1 | const $el = Cypress.$('.greeting') |
The above check is safe.
Customize Cypress test runner colors
Read Cypress Halloween Theme and check out cypress-dark plugin.
Shorten assertions
For cy.location you can pass the part you are interested in
1 | cy.location().should(location => { |
is the same as
1 | cy.location('pathname').should('equal', '/todos') |
You can use its to get nested properties easier
1 | cy.get('@login').should(req => { |
is the same as
1 | cy.get('@login').its('response.body.accessToken') |
and this could be expressed more clearly in steps
1 | cy.then(() => { |
You can wait for network request to happen and then check something using cy.then
1 | // notice that we are waiting for @login XHR alias |
Instead we can use .then after waiting for the network request. It is also helpful to print the message when checking for the token, otherwise command log simply says "expect null to equal null".
1 | cy.wait('@login') |
You don't need to wrap elements just to dynamically use them. For example if you want to test each item from the list
1 | const inputs = [ |
Every Cypress command is automatically inserted into the queue, so you can iterate over the items and use Cypress commands, everything will be queued correctly.
1 | inputs.forEach(input => { |
I prefer cy.first() to cy.eq(0).
Disable ServiceWorker
ServiceWorkers are great - but they can really affect your end-to-end tests by introducing caching and coupling tests. If you want to disable the service worker caching you need to remove or delete navigator.serviceWorker when visiting the page with cy.visit.
First, here is the way that does not work - simply deleting the property from the navigator object.
1 | it('disables it', function () { |
The reason for this is that we are deleting the property from the wrong object. The serviceWorker is NOT defined on the navigator, it is defined on its prototype. You can confirm this by using Object.getOwnPropertyDescriptor method:
1 | Object.getOwnPropertyDescriptor(win.navigator, 'serviceWorker') |
After we delete the property from the right object, the application code will no longer think it can register the service worker.
1 | it('disables it', function () { |
1 | <body> |
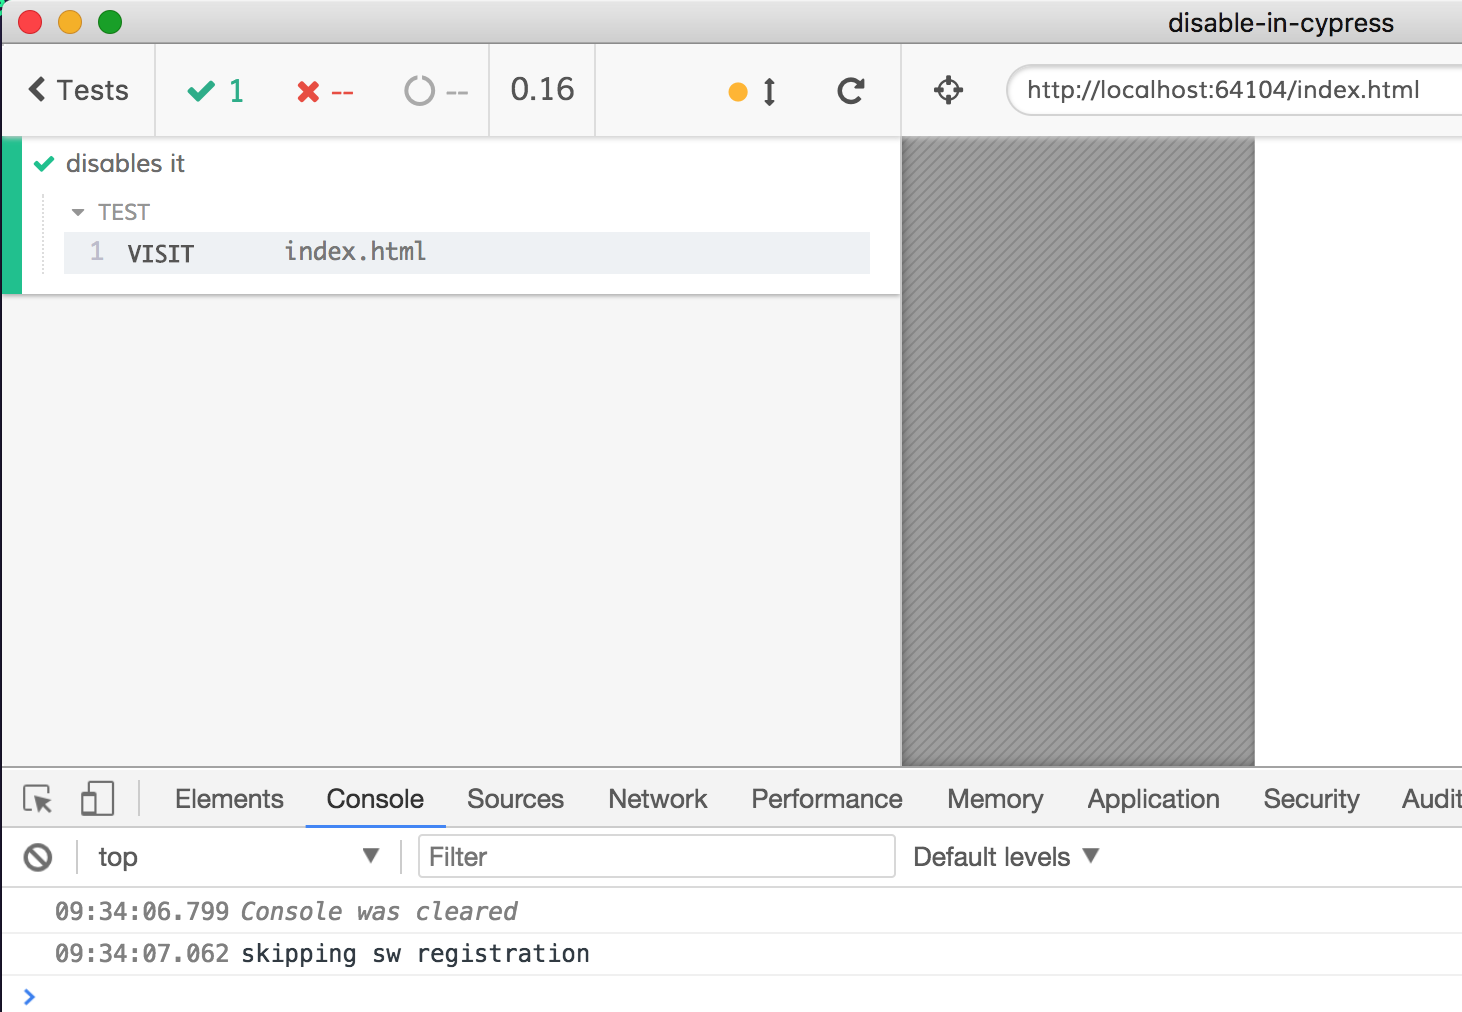
Note: once deleted, the SW stays deleted in the window, even if the application navigates to another URL.
You can find this advice shown in the video Disable ServiceWorker In Cypress Test.
Alternative: delete from each window object
You can register an event handler to fire on every window load event, where you can remove the serviceWorker
1 | Cypress.on('window:before:load', (win) => { |
Read also "Stub navigator API in end-to-end tests" for another example.
Imagine you have a page that shows different greeting depending on the navigator.language property.
1 | <body> |
How do we check if the default English greeting is displayed? Easily
1 | it('shows default greeting', () => { |
But how do we force the Klingon greeting to be displayed? Trying to change read-only navigator.language property throws an error.
1 | it('shows Klingon greeting', () => { |
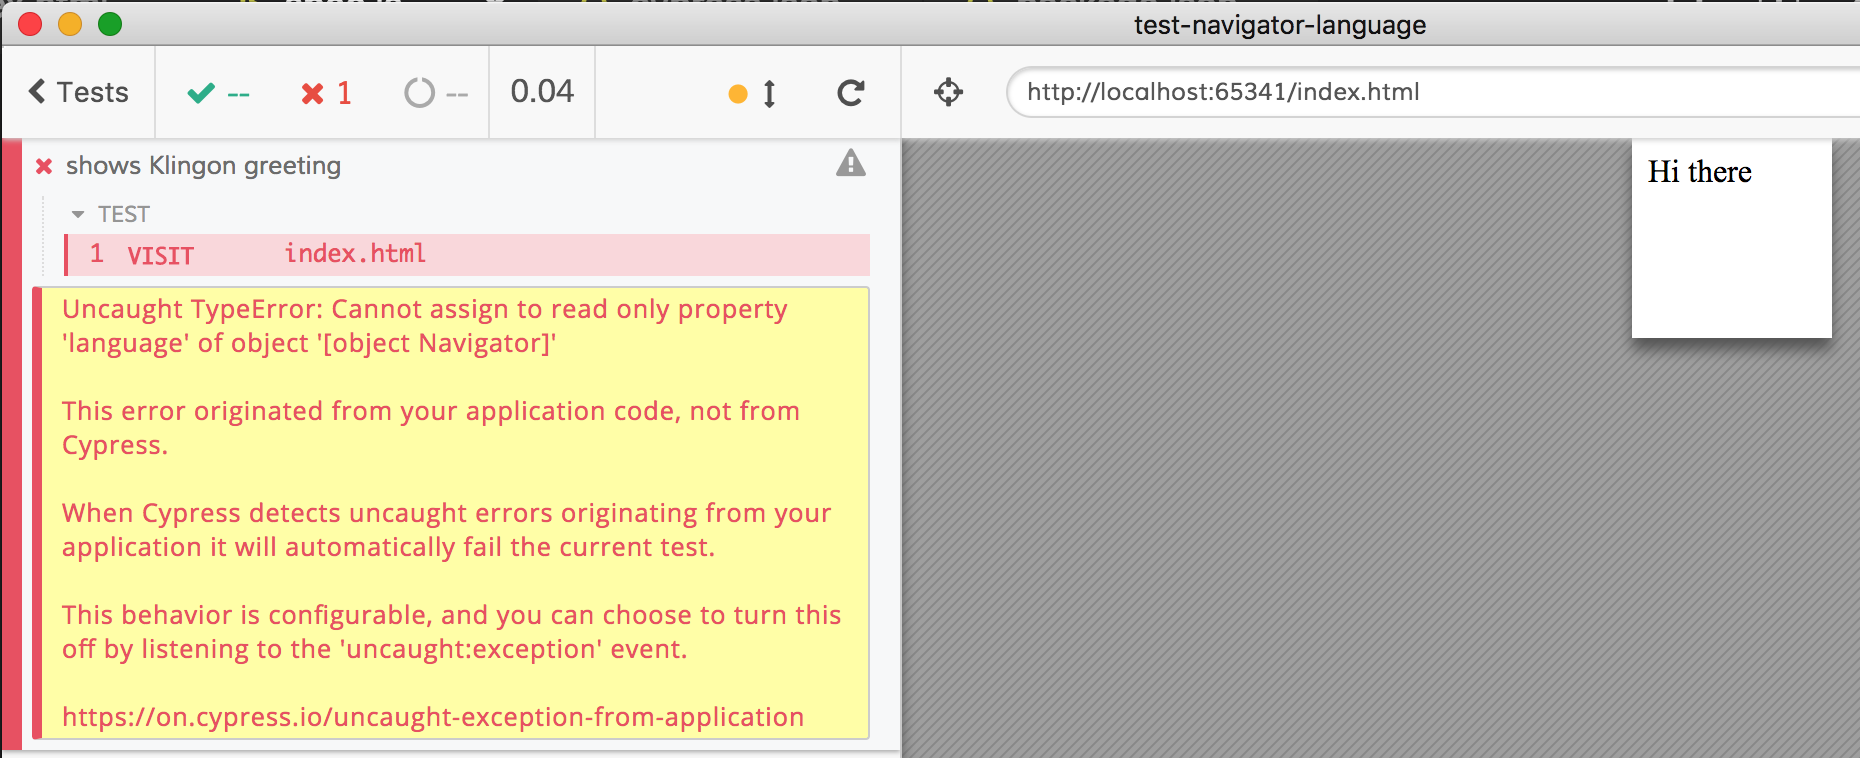
The navigator.language property is actually set on navigator.__proto__ object:
1 | Object.getOwnPropertyDescriptor(navigator, 'language') |
We can create language property on the navigator object instead - thanks, prototypical inheritance! We can specify the property's value:
1 | it('shows Klingon greeting', () => { |
This test shows proper respect to each Klingon warrior browsing the web.

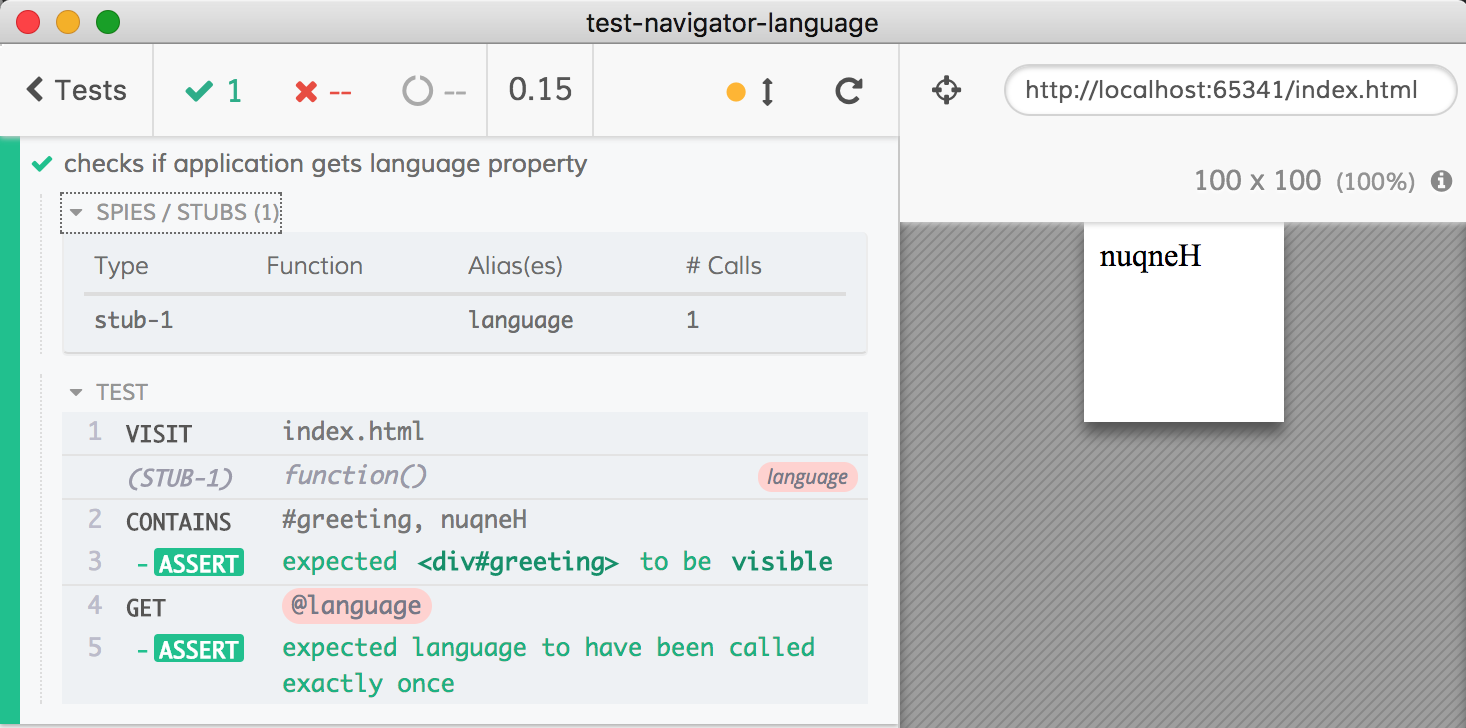
How do we ensure that the application actually read navigator.language property when displaying the greeting? Maybe the "nuqneH" is hard-coded! We need to track navigator.language "get" access. We can do this using cy.stub method.
1 | it('checks if application gets language property', () => { |
Now we know for sure how the application behaves.
Use fixtures to stub network requests
If your tests are full of stubbed network responses, move the responses into fixtures
before
1 | it('does A', () => { |
after 1
1 | it('does A', () => { |
after 2
You can even require the JSON fixtures directly if the second response is just a little bit different from the first response
1 | const responseFixture = require('../fixtures/first_query_response') |
See cy.route and cy.fixture documentation.
Bonus: read Import Cypress fixtures
Use code coverage
You can instrument your application and use Cypress code coverage plugin to produce combined reports in multiple formats. End-to-end tests are very effective at covering a lot of code in a single test.
Use visual testing
If a test grows to be very long because it checks so many elements on the page, see if it makes sense to test the entire page using Visual Testing.
before
1 | it('checks lots of things', () => { |
after
1 | it('checks lots of things', () => { |
Bonus: check out bahmutov/sudoku for visual component testing using open source tools, and read Visual testing for React components using open source tools.
Interactive and headed mode
You can find out if the test is currently running using the interactive mode which is when the user calls cypress open.
1 | if (Cypress.config('isInteractive')) { |
When you use the interactive mode you always see the browser, thus the browser is always headed. But when using the cypress run command, the browser might be headless or headed. You can find out how the browser is displayed:
1 | if (Cypress.browser.isHeaded) { |
When using cypress run, Electron is headless by default, while Chrome and Firefox browsers are headed by default. You can control the browser though:
1 | npx cypress run --browser chrome --headless |
Trying to pass both --headed and --headless CLI parameters raises an error.
Produce high quality video recording
Read the full blog post Generate High-Resolution Videos and Screenshots.
You can find most of the advice below implemented in bahmutov/cypress-movie. To generate better videos from tests
- set video compression to false
- set browser window size to larger value, which should work fine when using headless Chrome on CI
1 | // in your plugins file |
- hide command log
You can "expand" the application under test iframe to cover the entire window
1 | const clearViewport = () => { |
Call this function before the tests.
- use native Chrome Debugger Protocol to take full page screenshots. See "cypress-movie" project.
Use the page base url
Sometimes multiple tests visit a different base url. For example, you might usually go to the index page by setting baseUrl in the config file
1 | { |
Every test can cy.visit('/') and get to the index page. But imagine that a suite of tests is trying to visit and test the "About" page. It is located at /about.html, so every test has to visit it.
1 | describe('About', () => { |

Now, we can refactor the tests to avoid duplication. For example, we could move the cy.visit into beforeEach hook.
1 | /// <reference types="cypress" /> |
Works.
Or we could create a utility function:
1 | describe('About', () => { |
It works too.
Here is one more way to (abuse) test configuration feature introduced in Cypress v5.0.0. We will change the baseUrl in the describe block to apply to just these tests.
1 | describe('About', { baseUrl: '/about.html' }, () => { |
Notice the { baseUrl: '/about.html' } parameter in describe call. We can overwrite multiple config values using this parameter. In our case, we overwrite the baseUrl, appending the file name. In the cy.visit('') call we pass an empty string - because we do not want to append / at the end.
But the tests fail.
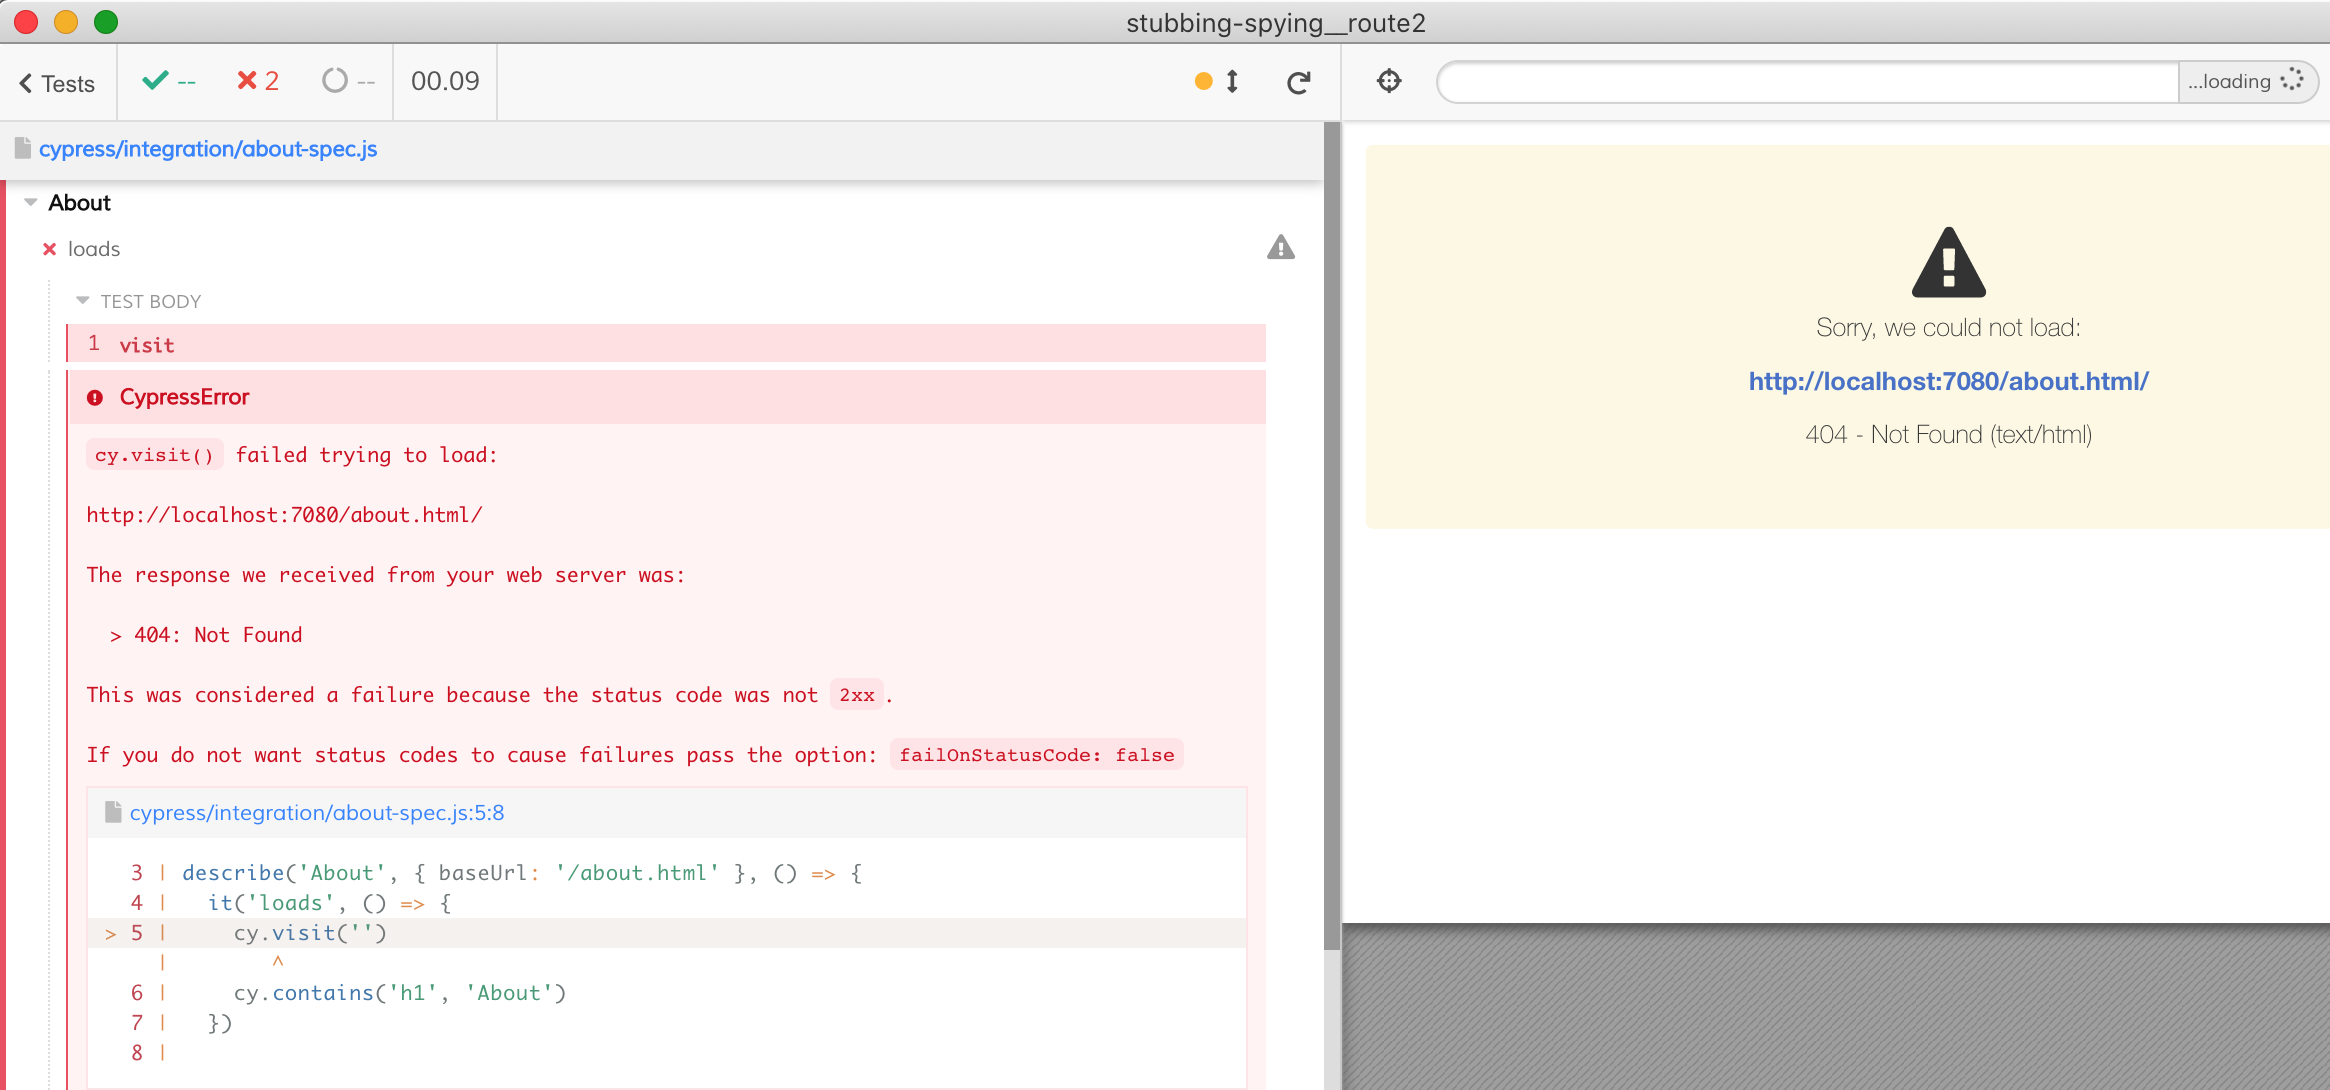
While our visit used an empty string, Cypress requires baseUrl to be a valid base URL and appends / at the end automatically.
Luckily, Cypress v5.4.0 has a fix for baseUrl that has params for issue #2101. If your base url is of the form ...?foo=bar then visiting '' would keep the original full url. Let's change our test by appending ? to the base url:
1 | - describe('About', { baseUrl: '/about.html' }, () => { |
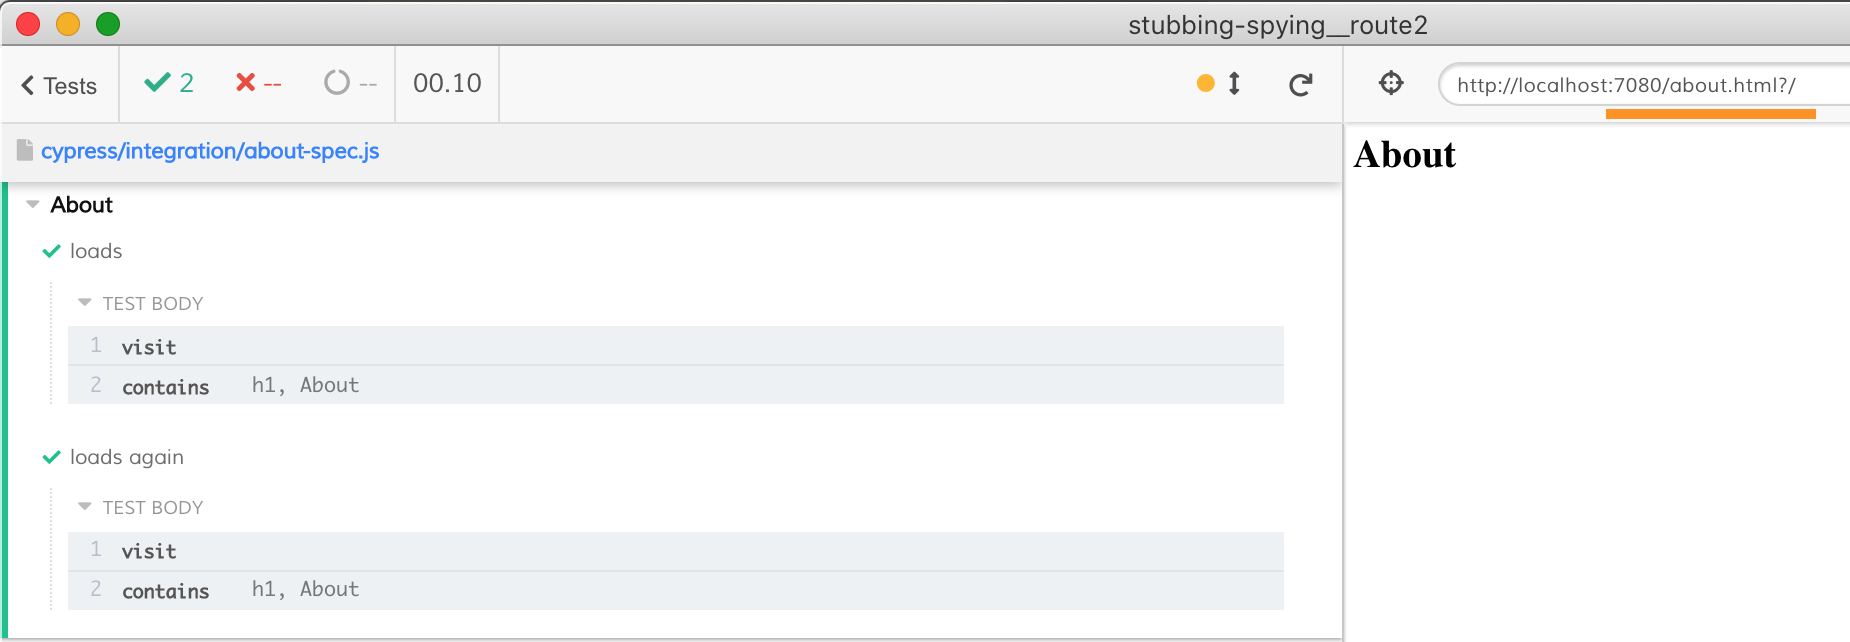
Now the tests pass - and the ?/ at the end of the URL is ignored
Pass the environment variables correctly
Imagine you need to pass database username and password from your test. These values are probably available as environment variables. How would you pass them to cypress run? You might try something like this in the package.json file. It will NOT work:
1 | { |
First, you do not need the node_modules\\.bin path when calling an NPM alias - they are automatically resolved by the npm run command. Thus always use simply:
1 | { |
The above command will NOT work yet. To see why, change the cypress run to cypress open to see the Cypress GUI.
1 | { |
Select the "Settings" tab and inspect the resolved environment variables.
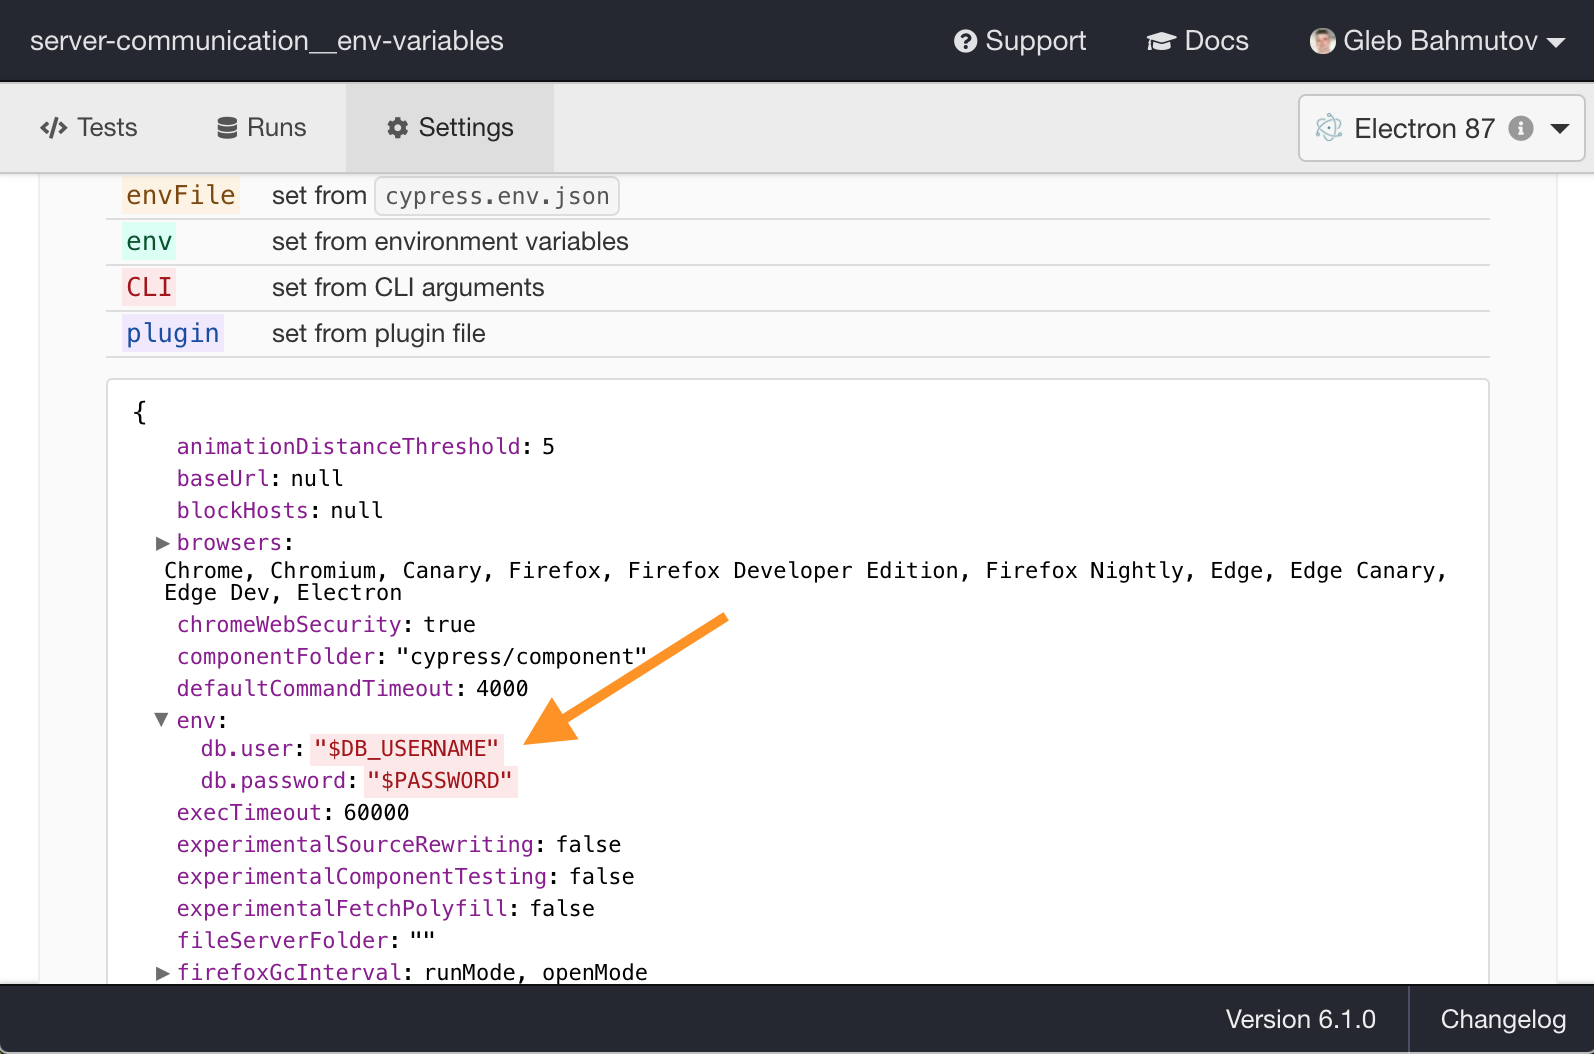
We have two problems:
- Instead of passing the environment variable's value, we got the strings "$DB_USERNAME" and "$PASSWORD". Resolving environment variables inside commands might be tricky and depend on the operating system.
- The username and the password are stored under names
db.useranddb.password, which might be not what you expect. From the dot notation, I would expect these values to create an objectdbwith propertiesuserandpassword.
But there are other trickier problems here. Let's change our NPM scripts to avoid single quotes around the values. We hope that now the environment variables are resolved correctly.
1 | { |
At first, it appears to work

Now, let's try a user name with a space.
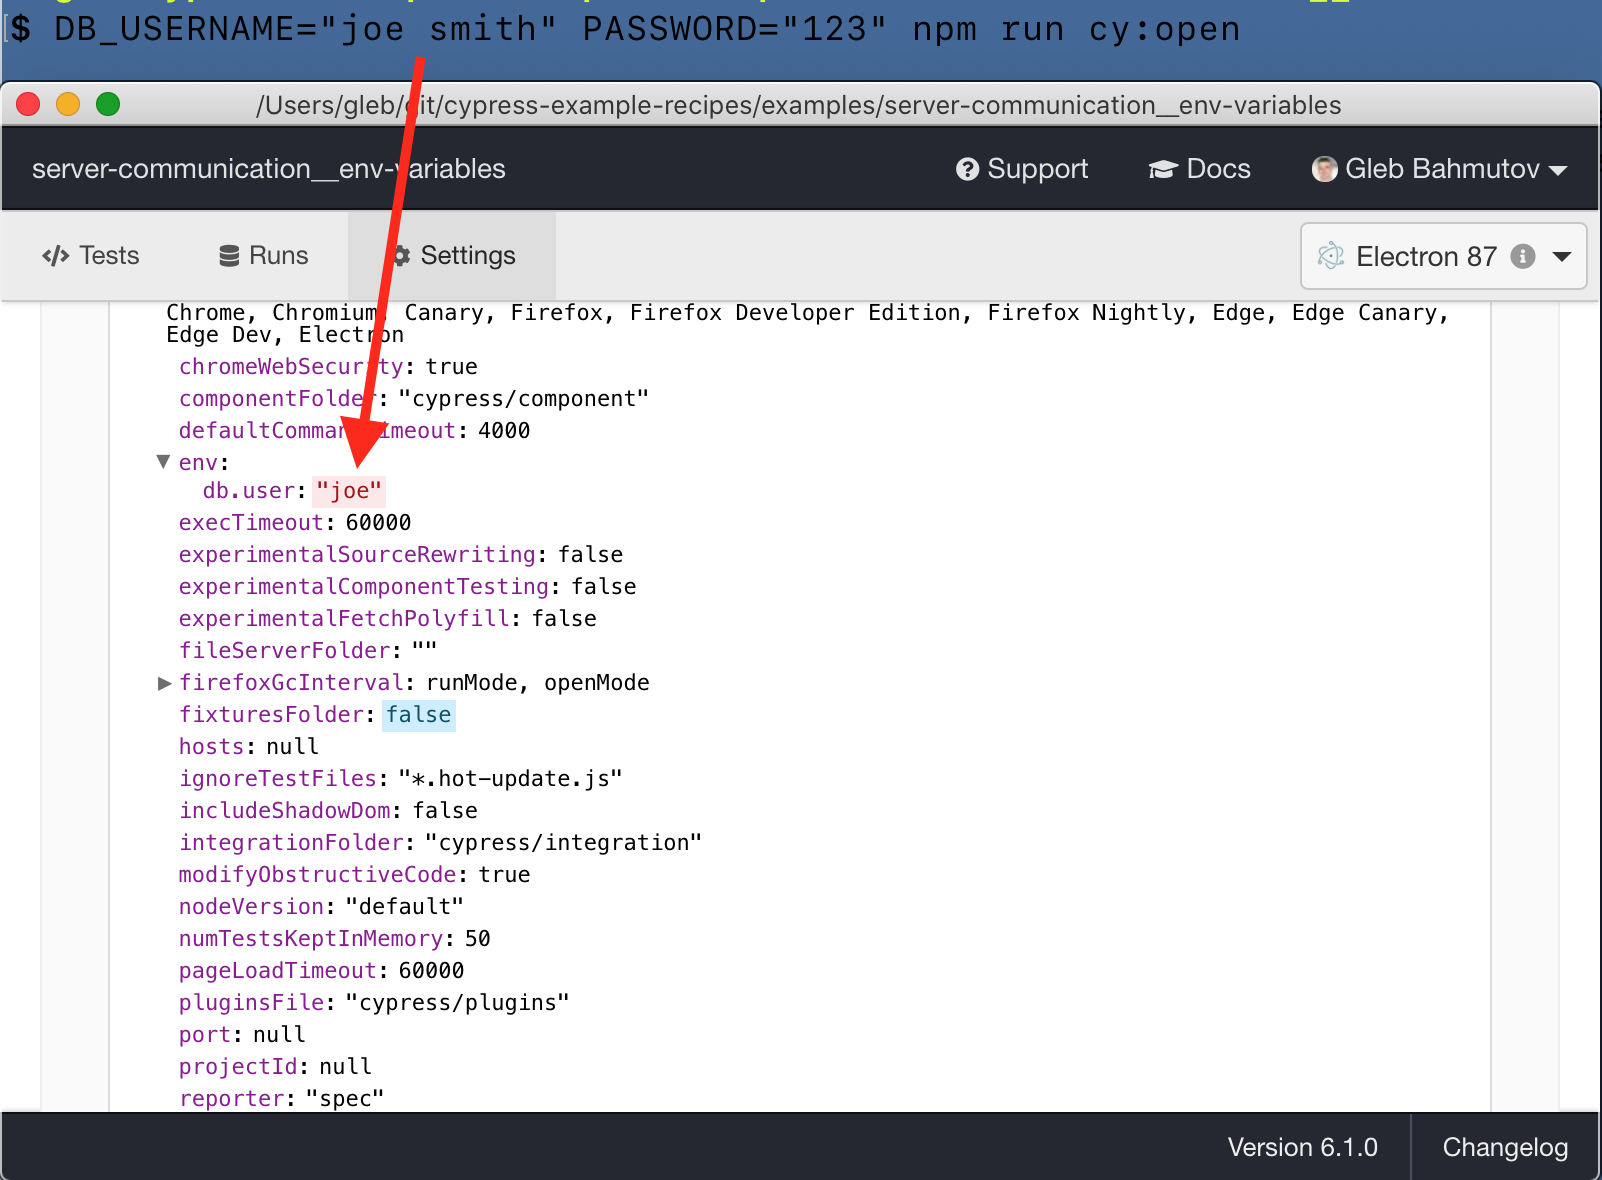
Ummm. The space inside the username value created problems; the cypress open command effectively received ended with --env db.user=joe smith,db.password=123. The part after --env db.user=joe was ignored!
Solution: Cypress can grab the environment variables in multiple ways. The most powerful and flexible way is to grab them from the process.env object using the plugins code.
1 | module.exports = (on, config) => { |
The plugins file runs in Node environment, has access to the process.env object. It can grab the variables, check their values, and place them into a single object db. Now the Settings tab shows the correct values.

Additional reading: the blog post Keep passwords secret in E2E tests and the recipe Environment variables.
Tip: when working locally you can use the utility as-a to conveniently inject environment variables when running any command.
Parse and use URL
Let's take a Next.js application with dynamic routes. We can scaffold one using the provided example.
You can find the complete source code at bahmutov/dynamic-routing-app
The app was initialized using the provided example command
1 | npx create-next-app --example dynamic-routing dynamic-routing-app |
The app contains two dynamic routes:
pages/post/[id]/index.js- e.g. matches
/post/my-example(/post/:id)
- e.g. matches
pages/post/[id]/[comment].js- e.g. matches
/post/my-example/a-comment(/post/:id/:comment)
- e.g. matches
Let's see how we can parse the above URLs to use them during tests. First we need to install Cypress and start-server-and-test:
1 | yarn add -D cypress start-server-and-test |
I can scaffold the Cypress files with my helper bahmutov/cly
1 | npx @bahmutov/cly init |
We place the base url localhost:3000 in cypress.json file and start the app and Cypress. Our first test can confirm the home page loads:
1 | describe('Dynamic routes', () => { |

Great, we can make sure the link "About" goes to the "About" page.
1 | it('goes to the about page', () => { |
The test passes, but with a tiny red flag. Notice little eye crossed icons next to the "contains" command?
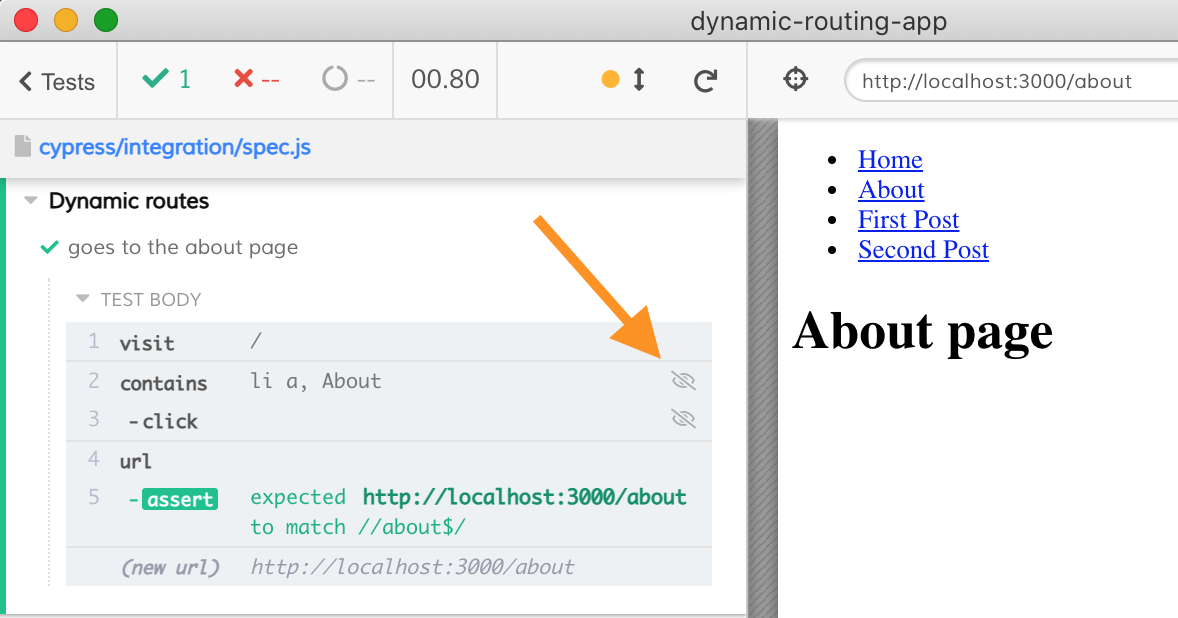
The Next.js application fetches a static HTML with the markup present but invisible. It is hydrated later - but we want to click on the link like a real user would, after it becomes visible. Let's add an assertion.
1 | it('goes to the about page', () => { |
Much better.
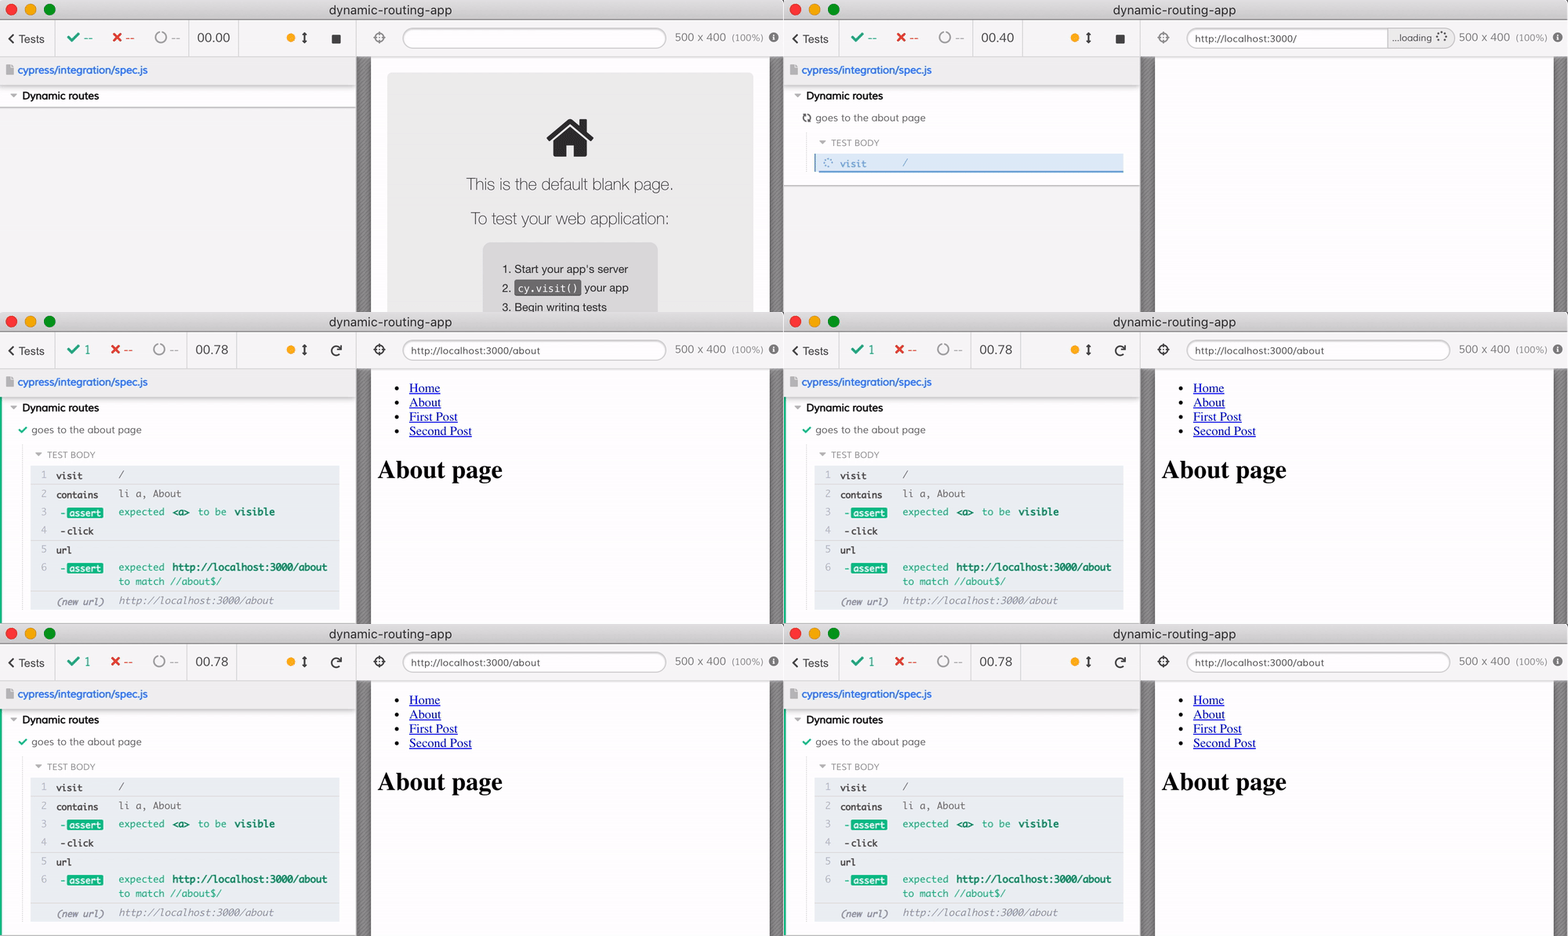
We assert that we go to the right page by using the expression cy.url().should('match', /\/about$/). It works, but the command cy.url returns the full URL. If you click on the command you will see what it yields:

We are interested only in the relative pathname - the /about part. Thus I suggest using cy.location command that parses the URL and can yield just the interesting part.
Now let's check the first post. We can start with the same test as before
1 | it('goes to the first post', () => { |
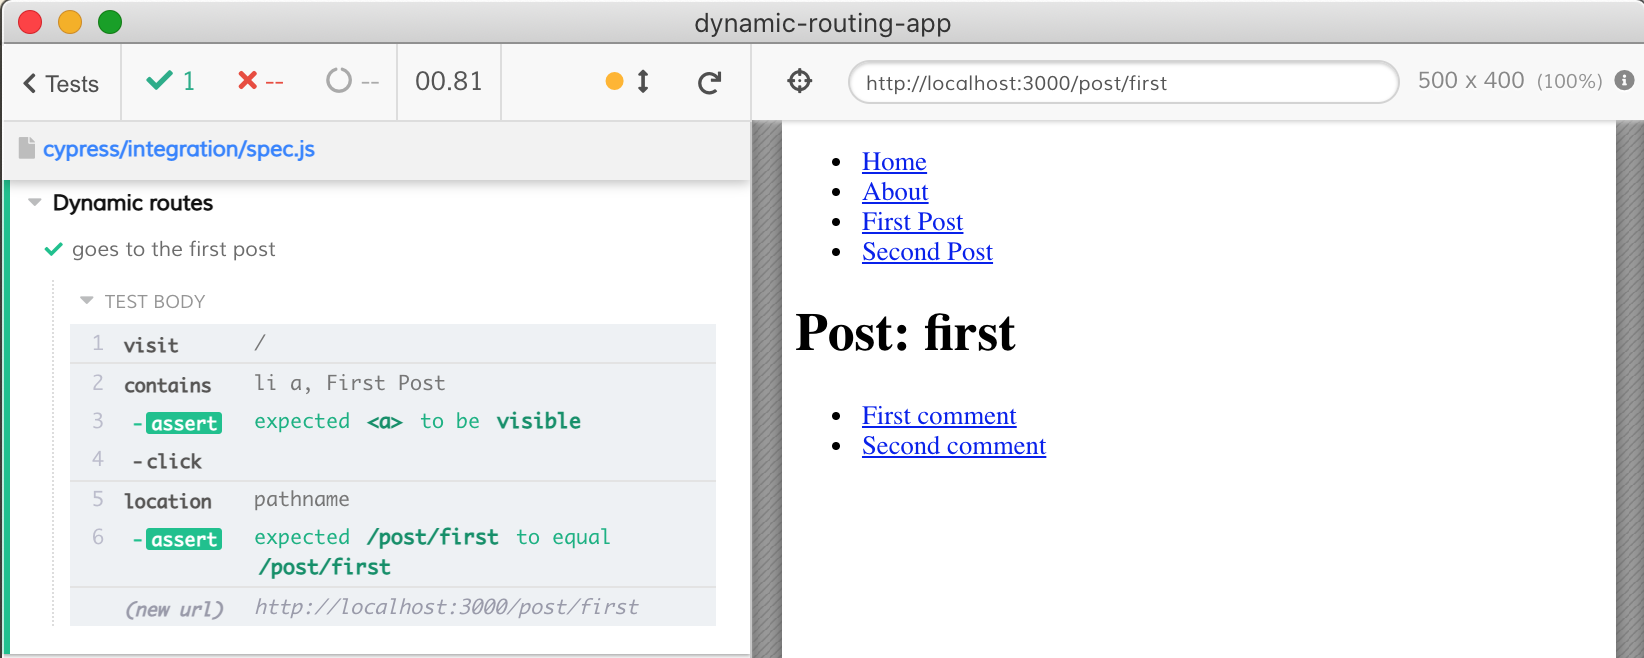
Now let's go to the first command. We need to click on the link, but before we do this, let's validate it. Let's grab the current post url and use it somehow in our tests.
1 | it('goes to the first comment', () => { |
After the assertion .should('include', '/post') passes, the value is yielded to the next command where we print it.
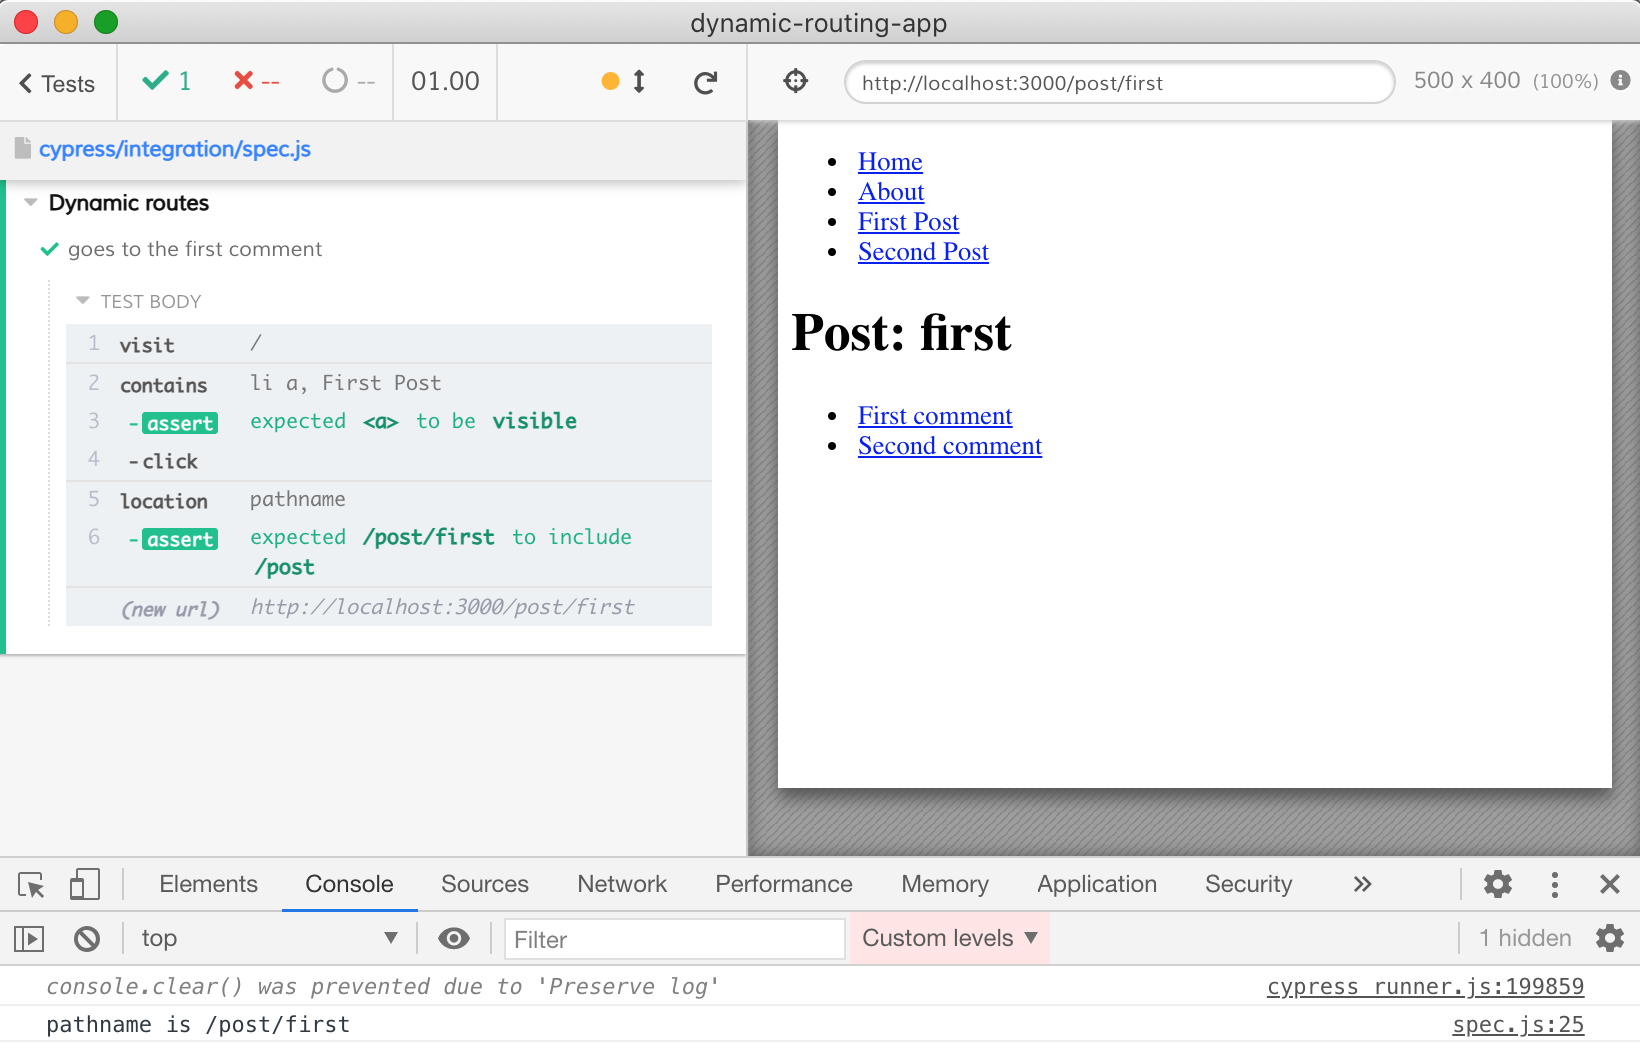
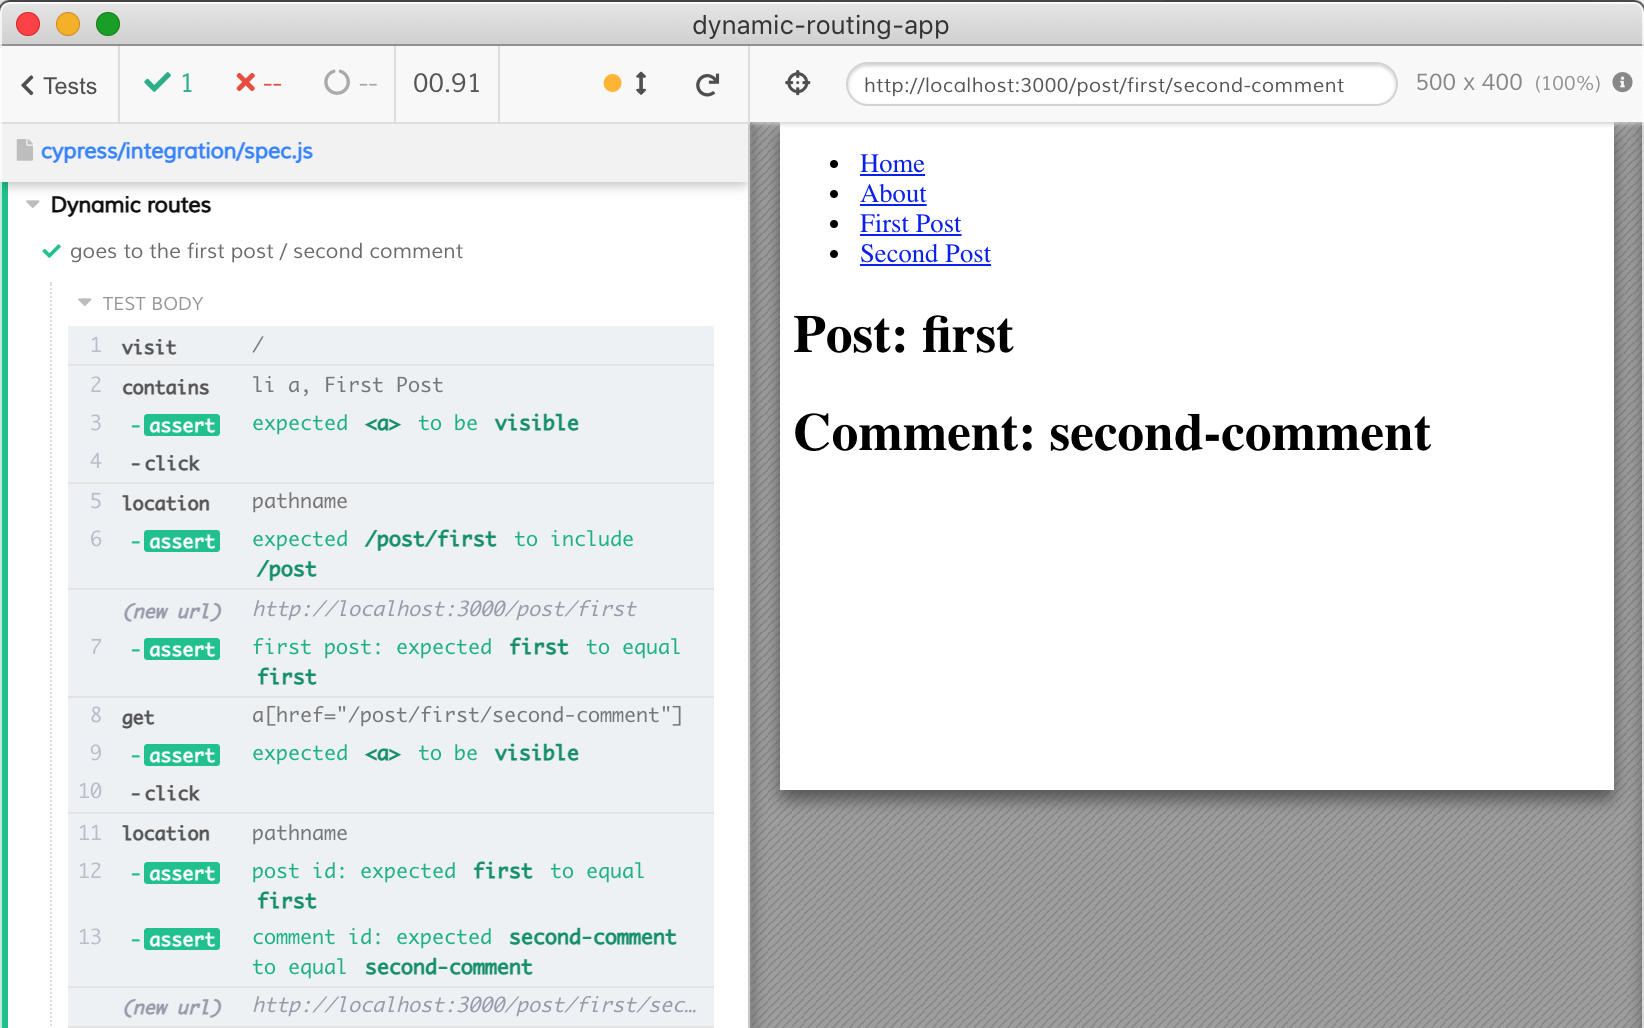
Now we have all the JavaScript magic we need to parse and slice URL. Let's even change the test and go to the second comment of the first post.
1 | it('goes to the first post / second comment', () => { |
We can parse, validate, and use the URL in our test.
Deal with target=_blank
Imagine a link on the page uses <a href="/about.html" target="_blank">About</a>. Cypress does not work with the second tab, so what can we do?
1 | it('loads the about page', () => { |
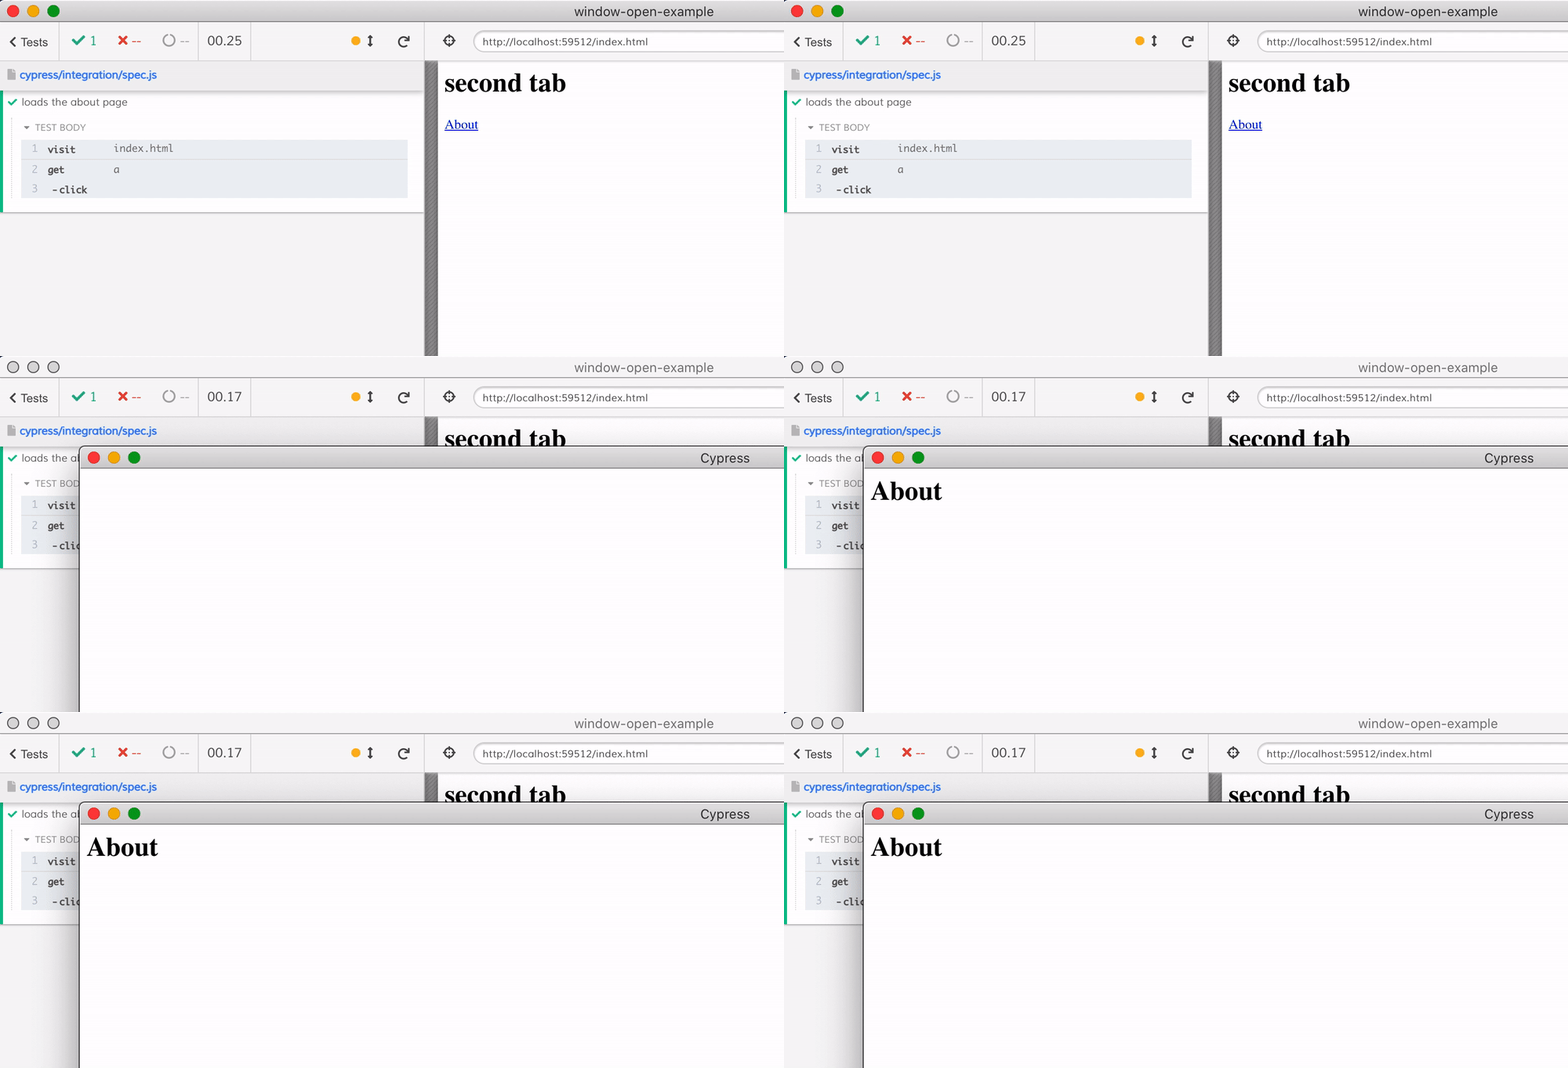
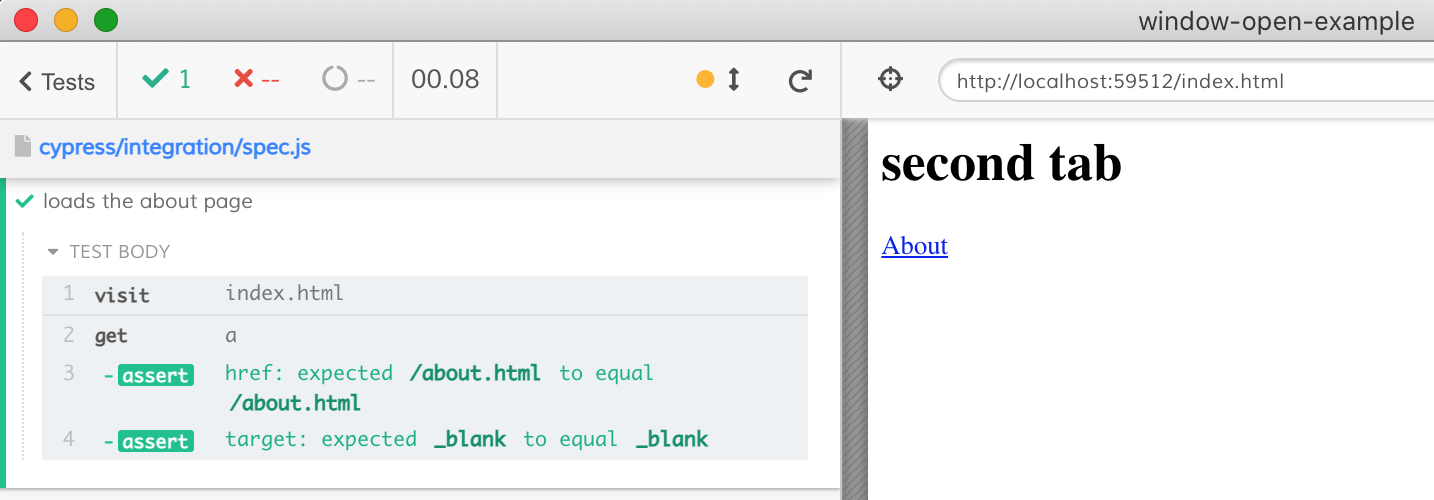
Figure out what you want to test. You can for example verify the link has the expected address and attribute target=_blank and call it a day.
1 | it('loads the about page', () => { |
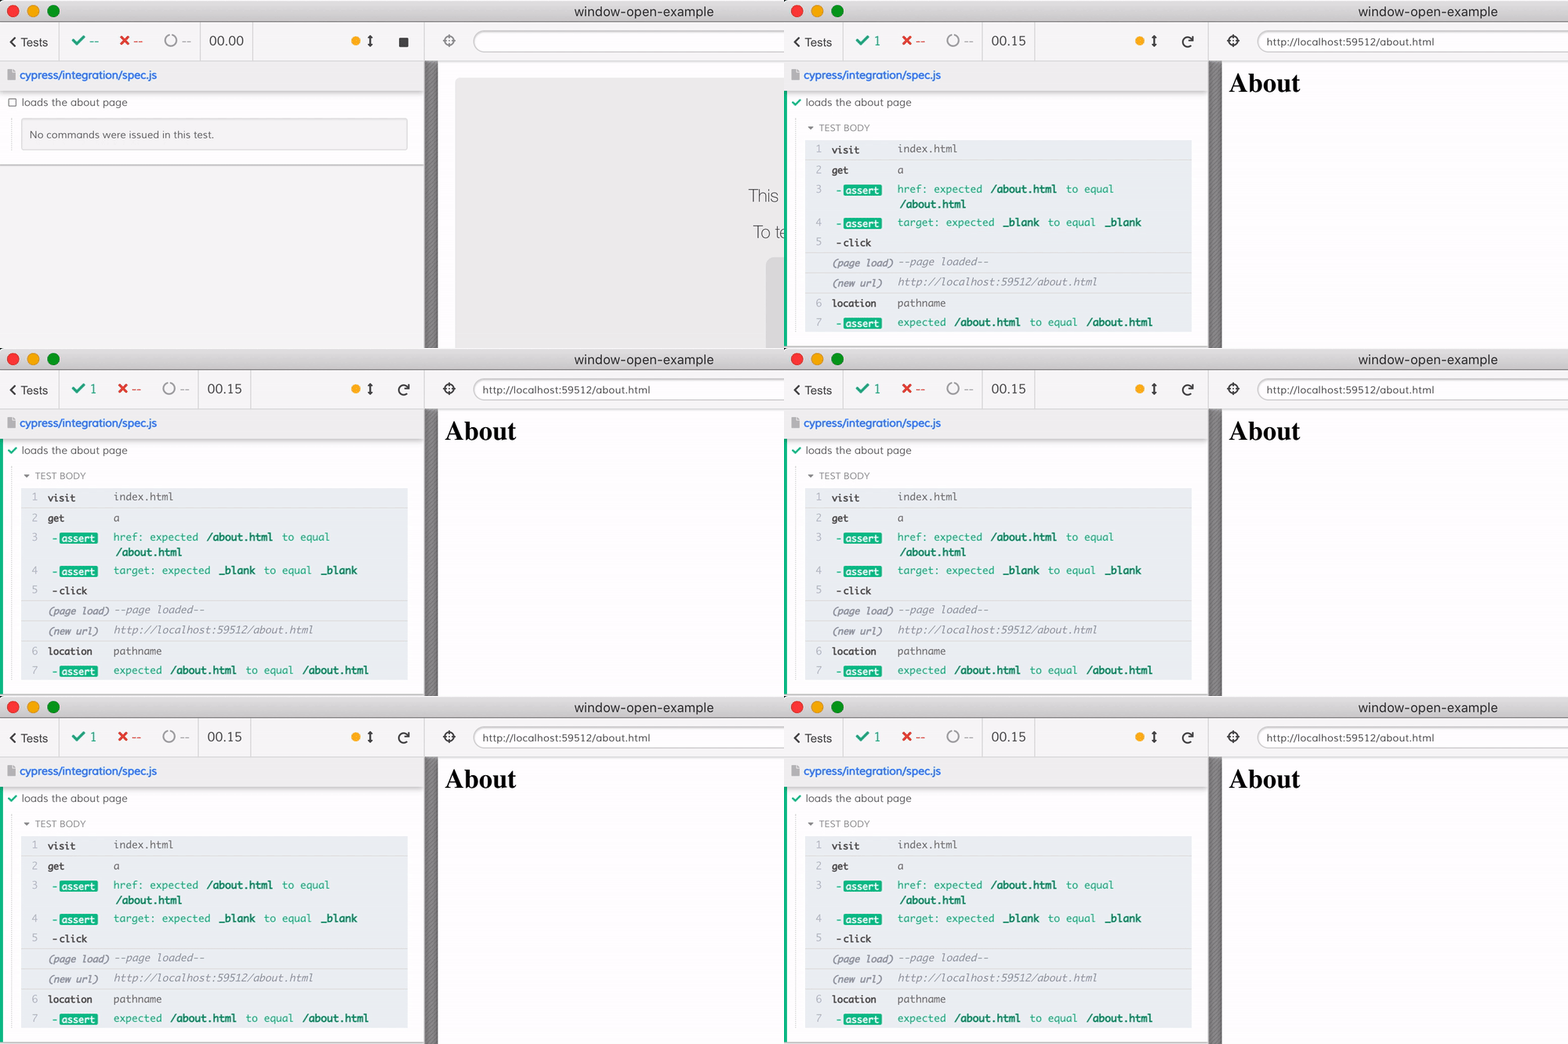
We can also change the target attribute before clicking the link (but after confirming it to be blank). Then we can verify the second "tab" loads correctly.
1 | it('loads the about page', () => { |
Deal with window.open
Tip: read the blog post Deal with Second Tab in Cypress for more advice.
Imagine the application under test uses window.open() to load a new URL in the second tab.
1 | <a href="/about.html" target="_blank">About</a> |
By default the /about.html page opens in a new tab - and we do not want that. Let's stub the window.open method instead.
1 | it('opens the about page', () => { |
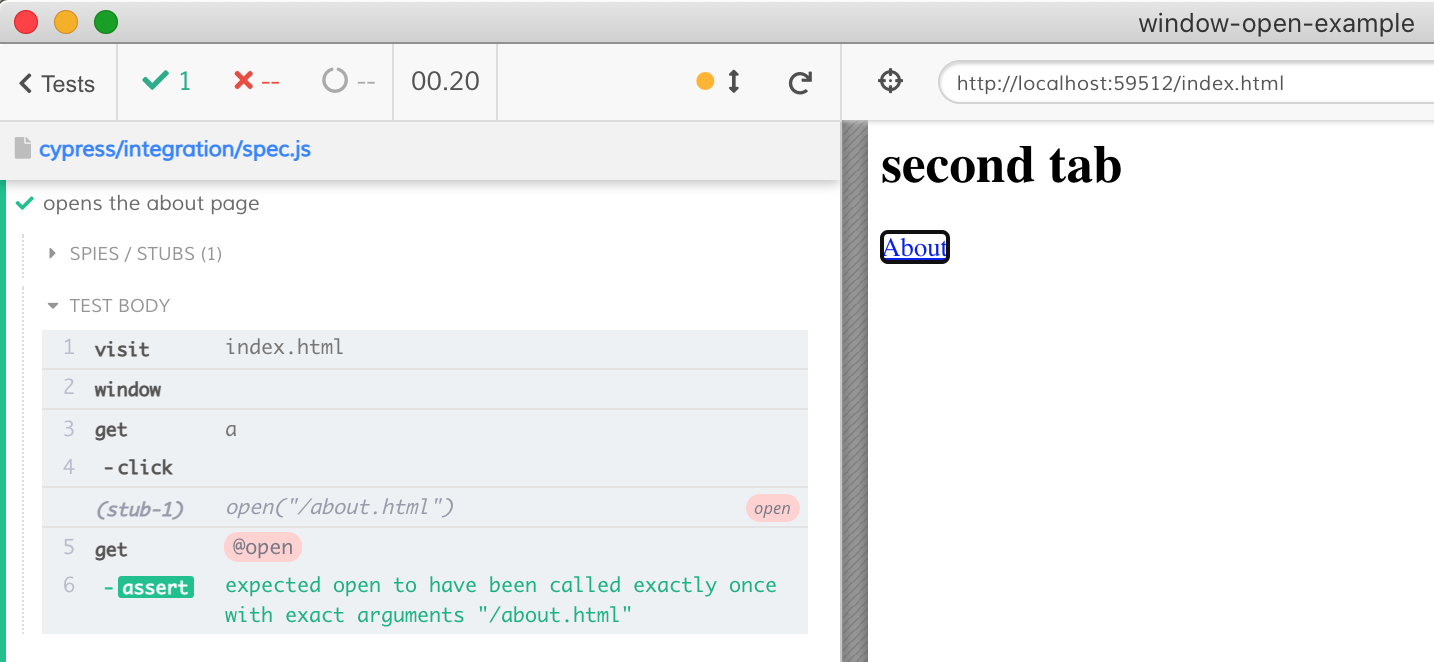
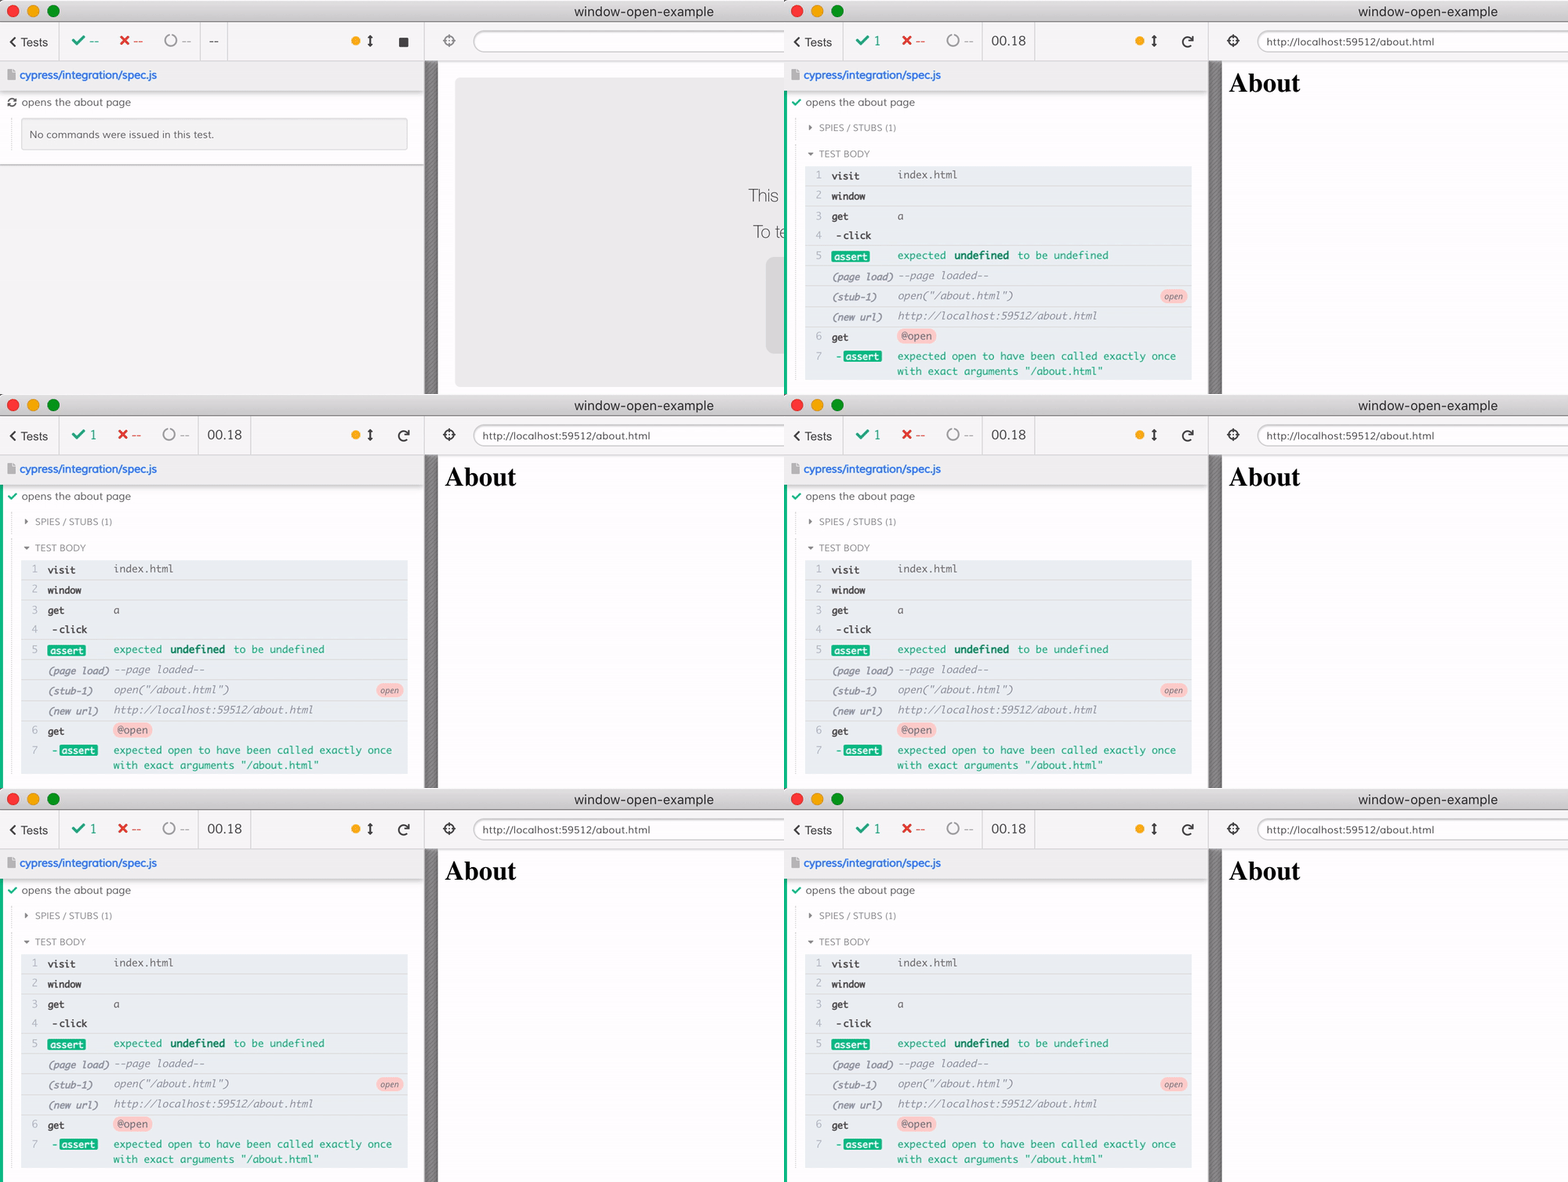
If we really want to load the new URL, let's call the original window.open method, passing _self as the second parameter.
Tip: use <method>.wrappedMethod to get to the original method wrapped in Sinon stub. When we call cy.stub(win, 'open') it replaces win.open method with a Sinon stub function. If we want to call the real win.open method, we can use the reference to the saved original function: the win.open.wrappedMethod is the original unstubbed win.open method.
1 | it('opens the about page', () => { |
See also: the post Stub window.open and video cy.stub: stub a method on the window object
Deal with window.location.replace
Imagine, our index.html does the following:
1 | <body> |
The redirect causes problems, as we cannot access the new origin from the test. We cannot simply stub the location.replace method - this property (and pretty much every property on the location object) is locked down; it is neither writable, nor configurable.
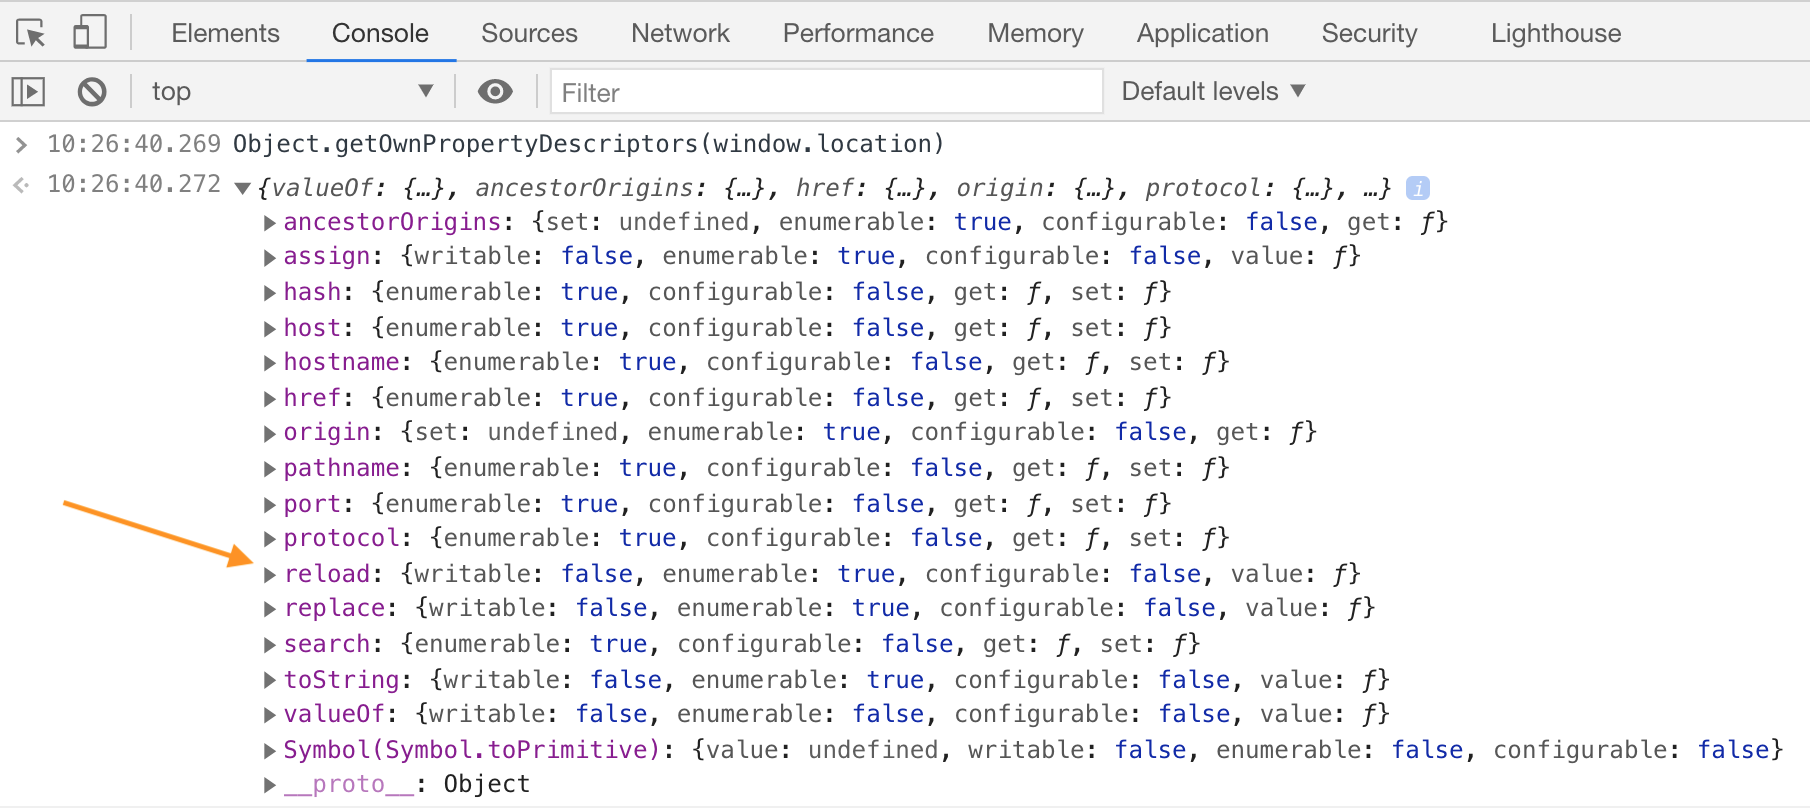
Thus we cannot use cy.stub(win.location, 'replace'). We cannot replace window.location property either - because it too is locked down. Instead we need to modify our application's code to avoid using the window.location.replace method completely.
During the test, we can use the cy.intercept command to modify the application code. For example, it could call window.__location.replace instead. Our test would create this dummy window.__location object before the application loads.
1 | /// <reference types="cypress" /> |
The test runs and passes. Notice there is no redirect, and our stub and intercept were called.

You can inspect the document the browser receives after the intercept replaced the window.location with window.__location string. The replacement happens at the proxy level, before the response is sent to the browser. See the presentation How cy.intercept works for details.

You can watch the above explanation in this video
Minimize memory use
Sometimes Cypress can crash during CI run due to running out of memory. Typically it shows a message like this:
1 | 10:38:58 AM: We detected that the Chromium Renderer process just crashed. |
You can profile memory usage every second with environment variables
1 | export DEBUG=cypress:server:util:process_profiler |
The things you can do to minimize the amount of memory used:
- try running tests without extra reporters, plugins, and preprocessors
- split specs to have fewer tests per spec. Cypress opens and closes the browser for every spec
- turn the video recording off with
video: falseusingcypress.jsonor environment variables - turn the command log off using the environment variable
CYPRESS_NO_COMMAND_LOG=1 - expose garbage collection and running it after each test. See issue 8525, but in general for Electron browser you want to use an environment variable
ELECTRON_EXTRA_LAUNCH_ARGS=--js-flags=--expose_gcand from the test callwindow.gc()method if available
1 | afterEach(() => { |
Tip: if Electron keeps crushing, try running tests using Chrome or Firefox browsers.
Start browser with specific time zone
You can start Cypress (and thus the browser it spawns) with specific time zone to see how the application handles it.
1 | $ <timezone> npx cypress open |
Typical time zones are America/New_York, Europe/Berlin, Europe/London, Asia/Tokyo.
Tip: an application can obtain its time zone using the following code snippet
1 | Intl.DateTimeFormat().resolvedOptions().timeZone |
For more information, read Testing Time Zones in Parallel
Scaffold the new projects faster
By default every new project scaffolds example specs when you run cypress open for the very first time. I have written an utility @bahmutov/cly to scaffold a sample project without opening Cypress and then deleting the many scaffolded spec files.
You still need to install Cypress as a dev dependency first, but then you can do
1 | npm i -D cypress |
You can scaffold a TypeScript or a bare-bones projects
1 | # adds appropriate tsconfig.json |
Watch me scaffolding new projects in the video below
Install Chromium via Puppeteer
Sometimes the CI machine you want to run tests on does not have Chrome installed, but you really want to use it to run your tests. For example, Chrome is more stable and crashes less often than Electron. If you cannot install Chrome browser using "normal" commands, you can install Chromium by installing Puppeteer NPM dependency.
1 | npm i -D puppeteer |
From the plugin file we can find the browser and insert it into the list of other system browsers discovered by Cypress.
1 | const puppeteer = require('puppeteer') |
Open Cypress and you should see "Chromium" in the drop down list of browsers.
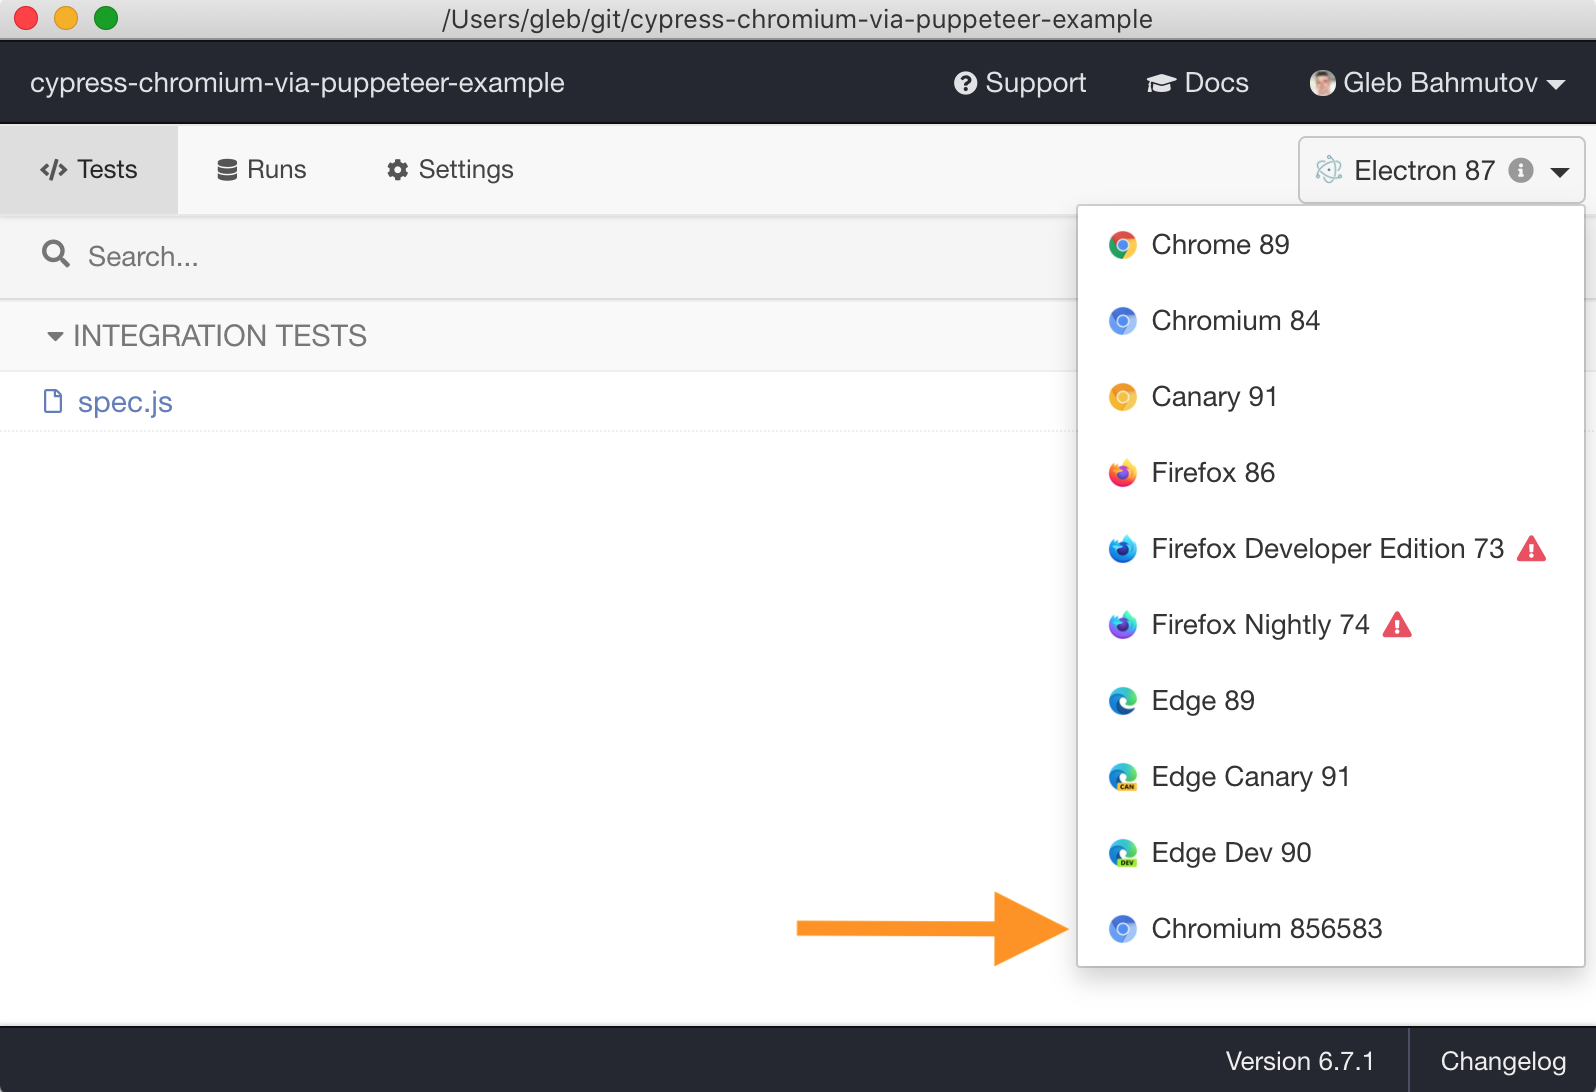
Tip: if you have problems with Cypress browser detection, run it with DEBUG=cypress:server:browsers environment variable.
To pick the Chromium browser in headless mode use the command:
1 | npx cypress run --browser chromium --headless |
See my example project cypress-chromium-via-puppeteer-example.
Tip: if you need to skip installing Puppeteer in some circumstances, use the environment variable PUPPETEER_SKIP_CHROMIUM_DOWNLOAD=true. I use this variable on some CIs to avoid waiting for the Chromium to download if I do not plan to run E2E tests in Chromium.
Create aliases before each test
If you create aliases using .as command, remember that aliases are reset before each test. Thus you cannot create them in the before hook and use from the second test:
1 | before(() => { |
Instead, create the aliases using beforeEach hook
1 | beforeEach(() => { |
Hover command
See bahmutov/cy-hover-example for links.
Wait for data
Tip: see the tested example at cypress-examples "Wait for data" recipe
Imagine we have a variable that later will receive some data. How do we retry the check from the test? Imagine we are waiting for a specific network request, and once it arrives it saves the list sent by the application.
Let me show you what will not work:
1 | let list |
The above code does not work because the expect(list).to.be.an('array') runs before the cy.get('#post-list').click() executes. The expect is immediate, while cy.get is chained and delayed.
You might delay checking the list by moving it into .then callback to be executed after the .click() command:
1 | let list |
The above code is slightly more correct, but is still wrong. It will check the value of the list variable AFTER clicking on the button, but without auto-retries, it will only check once. What are the chances that the cy.intercept worked by then? Pretty much zero.
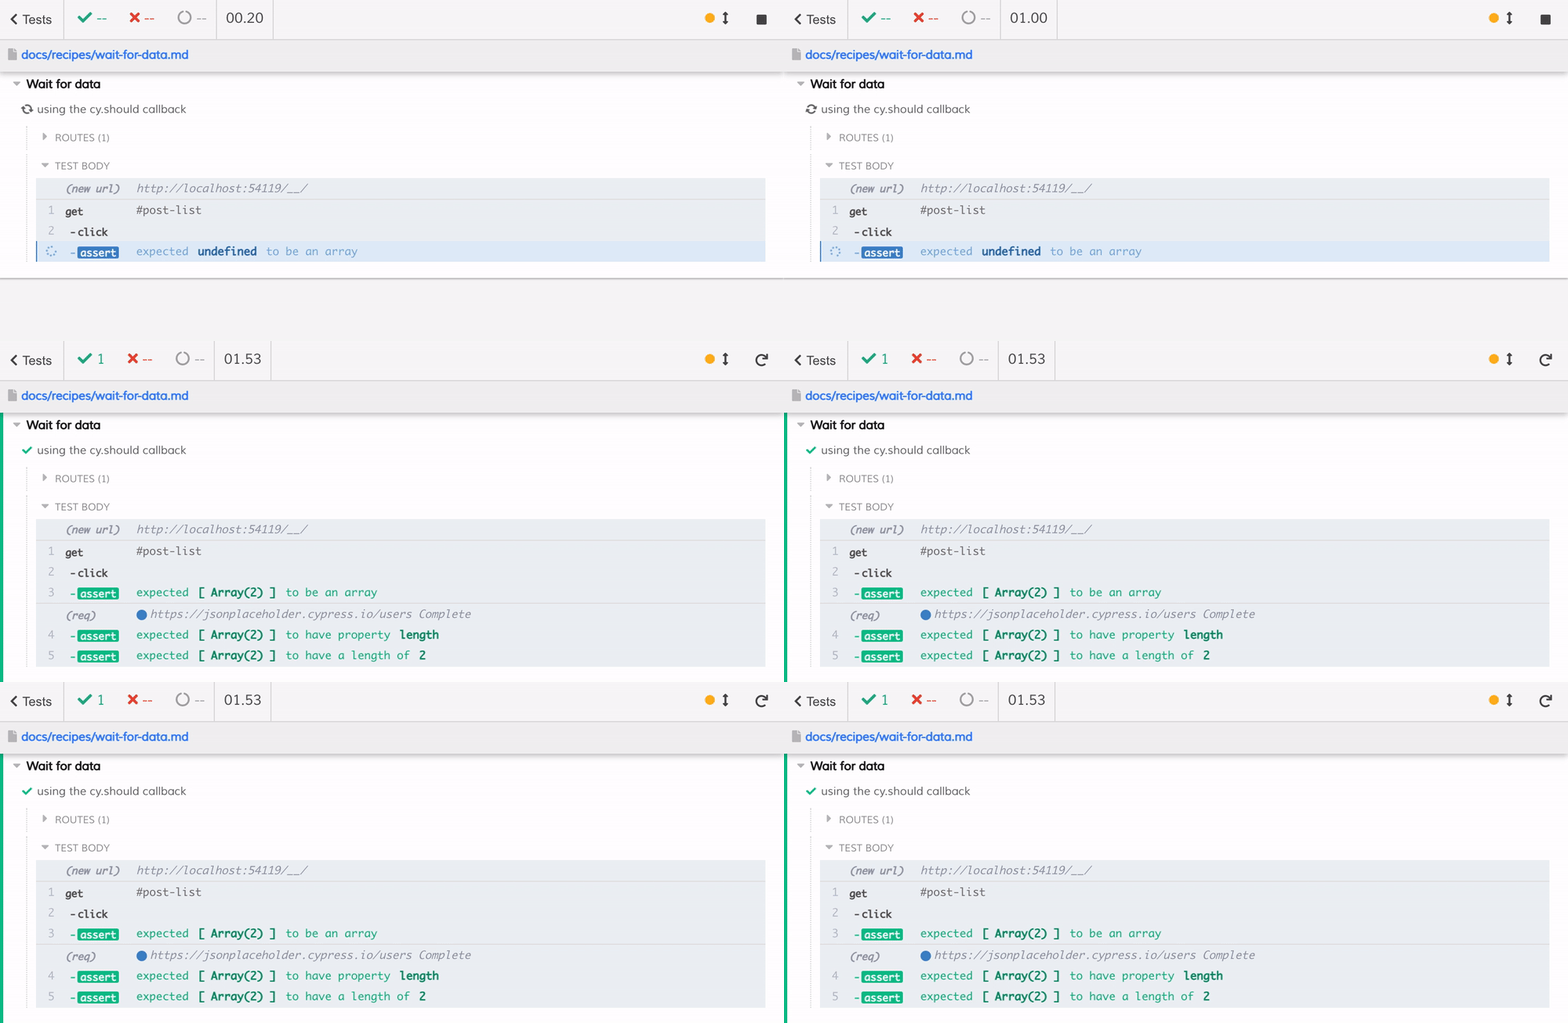
We need to retry checking the list, which we can do by changing the .then to .should command. The .should(cb) is retried automatically. Thus our first solution is to use the cy.should(callback) command:
1 | let list |
You can see the solution working in the recording below, where the application requests the data after about 1.3 second delay.
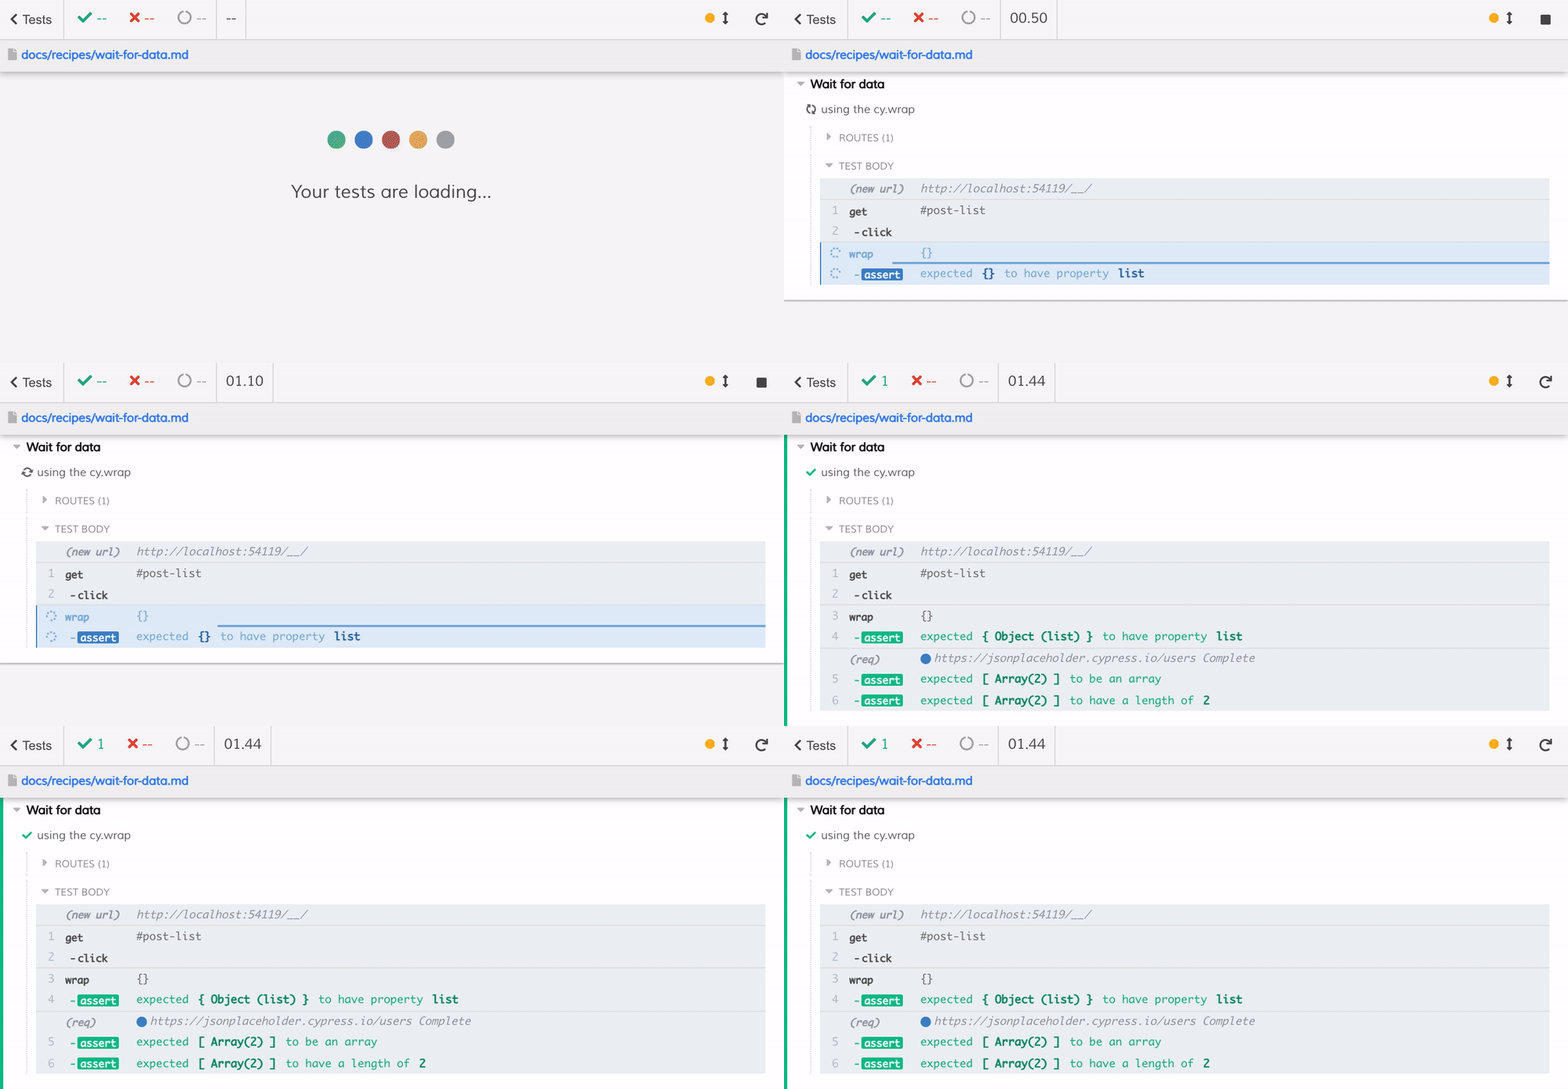
We can improve this solution a little bit by using cy.wrap command. We can wrap a reference to an object, and the intercept will set a property inside that object. This "trick" allows us to use implicit assertions completely bypassing the need for ".then" callbacks.
1 | // instead of a plain variable, store the list |
Make HTTP requests
Read Cypress request and cookies
Restart the tests
You can programmatically click the "Re-run" tests button from code to restart the tests
1 | window.top.document.querySelector('.reporter .restart').click() |
See cypress-grep and cypress-watch-and-reload examples.
Wait for network idle
Cypress is just JavaScript, and with the new cy.intercept you can implement your own "wait for the network to be idle for N seconds" feature.
1 | it('waits for network to be idle for 1 second', () => { |
I have moved the above helper into a plugin cypress-network-idle. The above test could be written as:
1 | cy.waitForNetworkIdle(1000) |
Watch the videos introduction to Cypress-network-idle plugin and Prepare Intercept And Wait Using cypress-network-idle Plugin.
Check if the network call has not been made
Here is a test that confirms a specific network call is NOT made until the application adds a new item.
1 | it('does not make POST /todos request on load', () => { |
Find good Cypress examples
You can find good Cypress example repositories by searching GitHub using topic cypress-example and user bahmutov
1 | github.com: topic:cypress-example user:bahmutov |
Here is direct link to the results.
Similarly, you can search for this topic under organization name cypress-io
1 | github.com: topic:cypress-example user:cypress-io |
Here is the direct link to the results.
Use cy.log to print to the Command Log
You can print the output of a command or a task using the cy.log command. For example, lets print the object yielded from a task
1 | cy.task('getImageResolution', 'test-smile.png').then(cy.log) |
If the object is large, cy.log shortens it and just prints Object{N} where N is the number of properties. We can print the entire object by passing it through a JSON.stringify method first.
1 | cy.task('getImageResolution', 'test-smile.png') |

Because cy.log returns void, it does not change the current subject, and yields its argument to the next Cypress command.
1 | cy.task('getImageResolution', 'test-smile.png') |
You can watch this example in this short video
Log error before throwing it
If you are making a request and want to log the possible errors, use .then + cy.log combination before an assertion.
1 | cy.request({ ... }) |
Use a single cy.contains command
Instead of using cy.get(selector).contains(text).should('exist') chain, you can simply use
1 | cy.contains(selector, text) |
- The assertion
should('exist')is already built into cy.contains command - The single command will be retried until the text appears or the command times out
Watch this short video to see the single command in action.
Disable Save Credit Card prompt
Sometimes when you fill a credit card form during the test, the Chrome browser asks if you want to save the credit card numbers.

Note: I have taken the credit card example from this example and ran it locally.
In order to stop Chrome browser from ever asking to store payment methods, you could navigate to the special chrome://settings/payments URL and flip the switch:

Unfortunately, I could not find an equivalent Chrome command line switch to turn it off when launching the browser. Thus I needed another way.
Turning the credit card save prompt off by changing the placeholder text
In my particular example I found that the browser did not show the "Save Credit Card" prompt if the place holder text did not include "credit" or "number" words.
1 | # shows the card save prompt |
Unfortunately, you could not change the placeholder attribute after the page has loaded. The test code below did not work:
1 | // changing the placeholder attribute |
Thus I have change the application's HTML values.
Turning the credit card save prompt off by using autocomplete off
In another credit card form example, I was able to successfully turn off the credit card save prompt by adding an attribute autocomplete=off on the form element itself.
1 | // get to the form that surrounds the credit card |
Try it - it might work for you.
Print timestamp with the error message
By default a failed test just prints the error message. You might want to have the timestamp to better debug the failure. The way to do this is to modify the error message in the failure event handler. This is what I have done in Cypress v8:
1 | // register error handler to catch any errors thrown during tests |
I am using the Cypress.on method instead of cy.on to make the handler apply to every test. Here is the failing test
1 | const f = { |
Here is the terminal output
1 | 1) prints error with timestamp: |
Add a custom delay command for better videos
I often use the custom delay command to make the recorded test videos clear. Cypress runs pretty fast, and sometimes it is hard to understand from the video what exactly has happening. So I often add a one second delay before clicking a button or checking a box.
1 | cy.get('button#submit') |
I extracted the .wait(1000, { log: false }) into a custom command delay.
1 | const delay = (subject, ms = 1000) => { |
The above command can be used in a chain or as a stand-alone parent command.
Visit the blank page to stop the running app
See the blog post Visit The Blank Page Between Cypress Tests.
Do not load pesky 3rd party script
Sometimes 3rd party scripts throw random errors when the page is changing quickly. In that case, stub the resource with an empty string.
1 | /** |
Deal with type module
If the project uses ES6 modules by specifying in the package.json "type": "module", this could cause problems for loading the Cypress plugin file. In that case, create a dummy package.json in the cypress folder. Specify the CommonJS type and Node will resolve the plugin file again.
1 | { |
See the example in bahmutov/verify-code-example.
Access a MySQL database
The test runner could access a database during the test to read some data. For example, the blog post How To Verify Phone Number During Tests Part 2 describes how to query a MySQL database to read the phone number verification code and entering it into the web application form.
Fix Create-React-App ESLint warnings
When creating a new application using Create-React-App, you will see ESLint warnings - because it does not know about the Cypress globals like cy and Cypress.

To fix, install Cypress ESLint plugin and add the recommended settings to the package.json
1 | { |
For more details, see How to configure Prettier and VSCode.
Use Lodash
The super useful Lodash library is bundled with Cypress under Cypress._ property. Thus you do not need to install it or even import it from the spec file.
1 | - import _ from 'lodash' |
If you need Lodash methods in your plugin file, you will need to install and require it, though.
Detect when the document reloads
If the page submits a form, or navigates, sometimes the test needs to wait for the new document to load. To accomplish this, we can compare the document reference before the navigation and after.
1 | // detect the form update by waiting for the new document |
The above code works, but the assertion dumps the document object into the Cypress Command Log, which takes up a lot of space there. Improved version without a very long assertion in the Command Log can use assert function.
1 | // detect the form update by waiting for the new document |
Time part of the test
You can time how long part of a test takes, or even an individual Cypress command. Then you can add an explicit assertion about the elapsed duration. For example, let's time how long the loading element in the application is visible. We can assert the loading element goes away in less than two seconds:
1 | let started |
See the full explanation in the video below:
For more, see the plugins cypress-timestamps and cypress-time-marks.
Difference between cy and Cypress globals
Cypress sets two global objects while running: cy and Cypress (if you want to avoid them, use local-cypress module). The cy object is only valid during the test execution; it can only be called inside a test callback function or inside a hook function (like before, beforeEach, afterEach, and after). The cy object schedules commands like cy.visit, creates spies cy.spy, and sets aliases using cy.as - all these operations only make sense in the context of a test. If you try to call a cy method outside the test, Cypress throws an error.
The global Cypress object has static helper methods. It holds the static information about the spec file itself, the operating system, and the test type.
1 | Cypress.arch |
The global Cypress also has the bundled libraries, like Cypress._ (Lodash), Cypress.$ (jQuery), Cypress.Promise (Bluebird), and a few others.
Finally, Cypress object has the configuration properties available at any time via Cypress.config method. All other data used during the test can be passed and stored in the Cypress.env method. You can call any Cypress method anywhere: from a test, outside the test, or even from DevTools console.
1 | // set an environment property "greeting" |
Watch the video Cypress vs cy Difference Explanation.
Compare two loaded files
Let's say you want to compare two binary files using base 64 encoding. You can use cy.readFile command and pass the file into the next step using cy.then callback
1 | cy.readFile('first.png', 'base64').then(first => { |
The above assertion might be verbose because it tries to print the values in the comparison. You can minimize the command log assertion message by throwing an error only if the images are not equal
1 | cy.readFile('first.png', 'base64').then(first => { |
Do not truncate arrays and objects in assertions
You can increase the truncate limit to see the full / larger objects when comparing them.
1 | chai.config.truncateThreshold = 200 |
Watch the video Increase Chai Truncate Threshold To Show More Information.
Vary test commands depending on the viewport
Imaging you want to run the same tests for two different resolutions: desktop and mobile. You can set the desktop viewport width and height in the cypress.json
1 | { |
By default you run the tests on Desktop. When you want to run the same tests using mobile resolution, you pass a new viewport
1 | $ npx cypress run --config viewportWidth=400,viewportHeight=700 |
During the test, you might need to skip / change a command to make it work on mobile screen. This is where checking the current viewport might be relevant. If you simply check the config viewport width, it does not give you the current value.
1 | // cypress run --config viewportWidth=400 |
But what if the tests mix the above settings with the cy.viewport command? The config value only has the viewport width passed through the command line (or the default value). Plus the Cypress.config(...) is a synchronous call, which is not chained in between the commands. This is why I prefer to use the application's window object. Not only it shows the current value, but organically works with cy.viewport and other chained commands.
1 | // start of the test |
Finally, if you must know the current application window width at that moment, the reference to the app's window is stored in the cy.state object. Thus you can use a synchronous call: cy.state('window').innerWidth.
cy.get vs cy.intercept commands
I often use cy.get and cy.contains commands to select elements on the page. Both commands retry until the element is there or the command times out, but there are certain differences.
cy.getcan yield multiple elements, whilecy.containsyields the first one onlycy.getuses the CSS selector, and if you need to find an element using the text you could use:contains. The text can only be a simple case-sensitive stringcy.containscan find using a regular expression or by text
I personally use cy.contains whenever I need a single element by text, and use cy.get if there are several elements to find.
Tip: for more examples of finding the elements by text and/or selector, see my querying examples and "Find elements by exact class or text" recipe.
See also
- my website cypress.tips
- subscribe to my monthly email Cypress Tips & Tricks
- Writing a Custom Cypress Command and How to Publish Custom Cypress Command on NPM
- Cypress blog, I have written a large number of blog posts there.
- Notes of Best Practices for writing Cypress tests
- The Hitchhikers Guide to Cypress End-To-End Testing
- Unit testing Vuex data store using Cypress.io Test Runner
- video playlist Cypress Tips & Tricks
- Cypress blog posts by Filip Hric