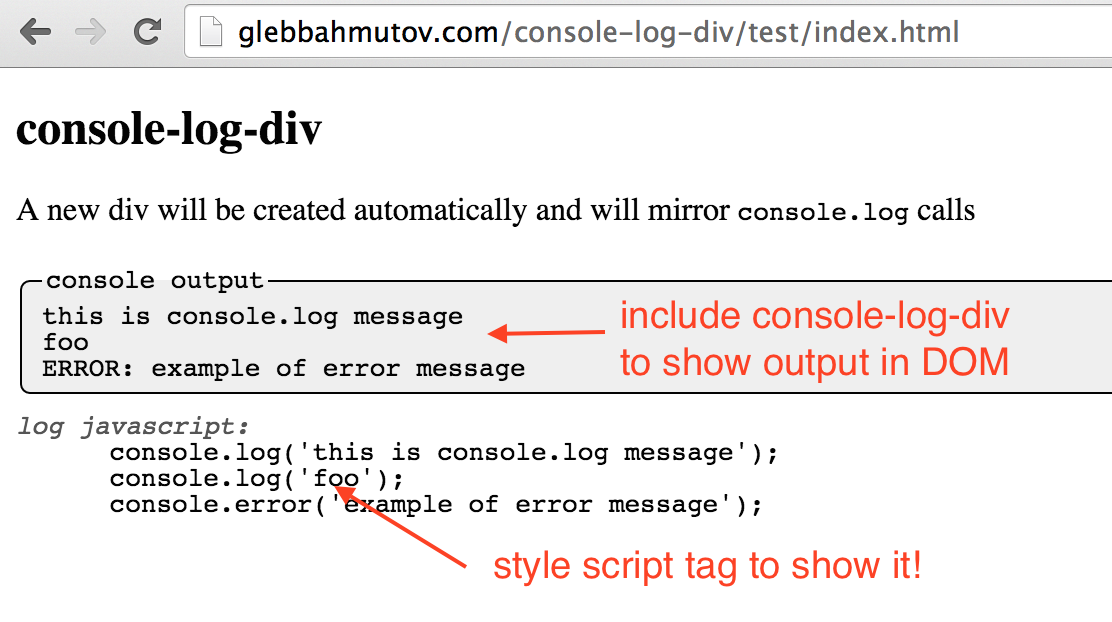
When creating small demo pages showing a piece of javascript, I often resort to just using single text paragraph "Open browser console to see output". This hides both the script's output and the script itself. Finally, I found a much better solution for my demos / jsfiddles. Here is the solution in action: demo

Showing console output in the DOM
Asking the user to open the browser console just to see a few lines of text is asking for too much.
You can simple include my console-log-div script instead. It will create a new element at the
end of the body element, where all console.log and console.error messages will be mirrored.
bower install console-log-div
<body>
    ....
    <script src="bower_components/console-log-div/console-log-div.js"></script>
</body>
You can even style the output element using .console-log-div, #console-log-div and #console-log-text
selectors.
Inside jsFiddle and other websites, you can proxy the console-log-div.js using RawGit by including this url
<script src="https://rawgit.com/bahmutov/console-log-div/master/console-log-div.js"></script>
Showing the script itself
When showing the script's output, why not include the script itself that produces this output?
By default, script elements have display: none style in modern browsers. You can simply style a particular
script to show it in the page!
1 | <head> |
Only the script #log will be visible in the page. Of course it will only be visible if inside the body element,
the script elements linked from head will not be displayed.
Hosting the demo on GitHub pages
Once the demo is working locally, we need to place it somewhere. For static pages I recommend using the GitHub pages. Making a static page for a project already hosted on
GitHub is as simple as making a new branch called gh-pages and pushing it to the remote.
Luckily, the commands: running the git commands, picking files, pushing - are all implemented
using an excellent Grunt plugin grunt-gh-pages. I like this particular
plugin because it allows to pick files to be deployed - not just deploying a specific directory.
If your project does not use Grunt as its build tool, one can easily run just the plugin
using my project grunty. Just create a JSON config file, for example called deploy.json
with the settings
1 | { |
Then install both the plugin and grunty
npm install --save-dev grunt-gh-pages grunty
Add the deploy command to the package.json scripts
"deploy": "grunty grunt-gh-pages gh-pages deploy.json"
The deploy command tells grunty to load plugin grunt-gh-pages and run the task gh-pages
(a single plugin can define multiple tasks) using the settings read from deploy.json file.
Then run the npm run deploy command whenever you want to deploy the current code
npm run deploy
Running "gh-pages:src" (gh-pages) task
Cloning ...
Cleaning
Fetching origin
...
Committing
Pushing
You can check out the deployed page at the web address <username>.github.io/<repo name>/
and see which files were deployed by lookin at the gh-pages branch in the repo.
The grunt-gh-pages plugin creates a temp folder .grunt that you can safely ignore
as far as git is concerned.
Github pages are great, but there they miss a key feature: "https" hosting. For example, to show any project using ServiceWorker, one needs to be served from a secure domain. If you need a simple "static" or even a dynamic page served from a https domain, here are the simple steps.
Use GitHub pages behind CloudFlare
If you just need to serve GitHub pages from a HTTPS and it is a static page, you can configure a free CloudFlare SSL service. This is not a completely secure solution, because the link between the CloudFlare to GitHub is NOT secured.
The details depend on your situation (if you have a separate custom domain pointing at your GitHub pages, for example my glebbahmutov.com points at bahmutov.githup.io service), follow the CloudFlare guide and the blog post by Louis Van de Calseyde
Hosting the demo on Heroku
If you want fully secure solution and the possibility to run a custom web server in the future, consider running a simple web server from a provider, like Heroku or Digital Ocean. Here are the steps for Heroku setup.
- Create Heroku account and log in
- Create a new personal application and give it a name
- Connect the application to Github and pick the repository
- If this is a simple application, I would enable "Automatic deploys". Every push to Github master would redeploy the application.
- Add a "Procfile" to the repo's root folder. The content should tell Heroku
that it is a web server and the command to start it. I typically just
use
web: npm start - Write
npm startcommand inpackage.json. For simple demos, we need a static webserver. I recommend using http-server- it is flexible and powerful.
Make sure to save it to the list of production dependencies for Heroku to install.
npm install --save http-serverYou can pass the name of the base folder to server, and no caching"start": "http-server dist -c-1".
- it is flexible and powerful.
Make sure to save it to the list of production dependencies for Heroku to install.
- Push the code to Github - it should deploy it automatically to Heroku.
- Test the application by opening
https://<app name>.herokuapp.comin your browser. If there are problems, you can see the server logs by installing Heroku Toolbelt and runningheroku logs --app <app name>