Let's take a web application and try to explain it to our users. For example todomvc.com - how do you write a tutorial or a guide to using it? In this blog post I will show a simple and effective way to write a web app tutorial using Markdown and Cypress tests. The created tutorial will never get out of date with respect to the application, since it will be continuously updated and verified using end-to-end tests.
Note: you can find the example application in bahmutov/cypress-book-todomvc and the finished guide at glebbahmutov.com/cypress-book-todomvc/.
Write Cypress tests in README
Using Markdown documents is my favorite way of writing guides and tutorials (and these blog posts!). It is simple, most code editors include some Markdown preview, and once I push the code to GitHub, it automatically renders Markdown files, including images.
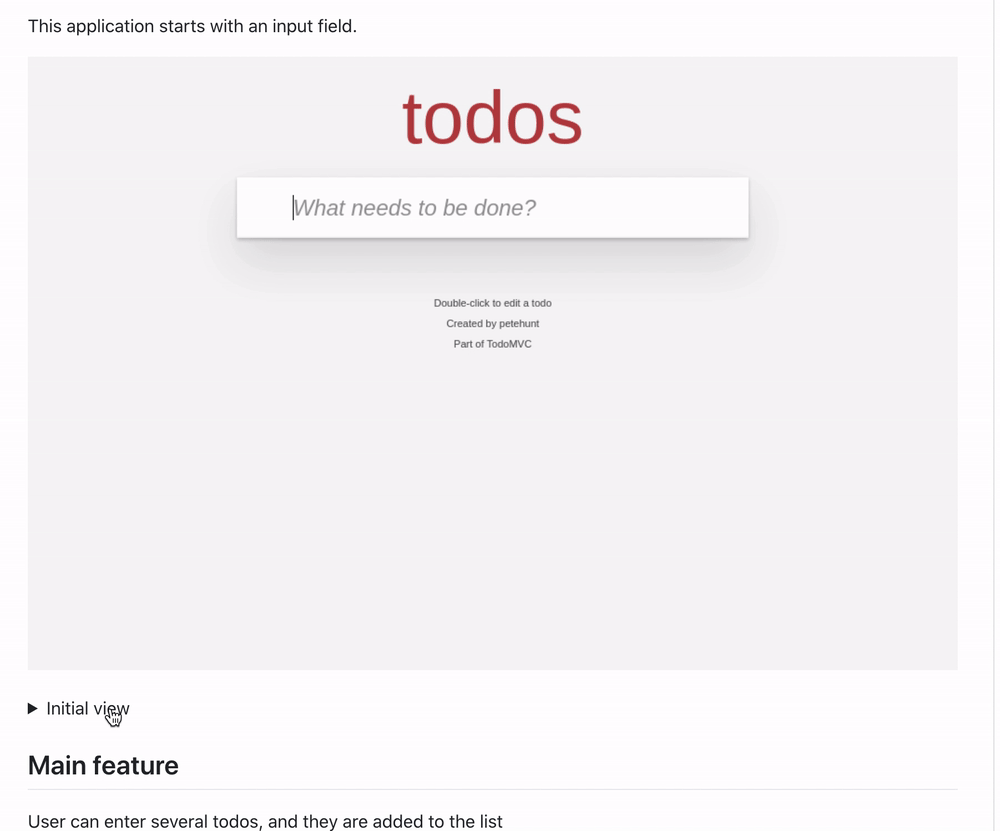
Let's say we are writing a tutorial for TodoMVC application in the project's README.md file. We might explain to the user that when the application loads, there is an initial screen with an input box.
This application starts with an input field.

Where do we get that application screenshot? We could grab it manually and add as a file to the repository. But what if the application changes? Outdates screenshots are confusing the users. You know what is always up-to-date? The end-to-end tests.
What if we could use end-to-end tests to update our screenshots?
Going one step further - what if the tests producing the screenshots lived very close to the tutorial itself to avoid getting out of sync?
What if the test producing the screenshots was located inside the README markdown text?
I have created a way to run a Cypress test straight from a Markdown file using cypress-fiddle. Just surround a JavaScript block with a special comment and point Cypress at it. Here is a test titled "Initial" from the README.md file
<!-- fiddle Initial -->
1
2
3
cy.visit('/')
cy.get('input').should('be.visible')
cy.screenshot('initial')

<!-- fiddle-end -->
Since we don't want to show the test itself (it will just confuse the user), we can "hide" it in the README source by placing it inside an HTML block
<details style="display:none">
<summary>Initial view</summary>
<!-- fiddle Initial -->
1
2
3
cy.visit('/')
cy.get('input').should('be.visible')
cy.screenshot('initial')

<!-- fiddle-end -->
</details>
When GitHub renders this README it shows "details" block. User or developer can click it to see the test commands.
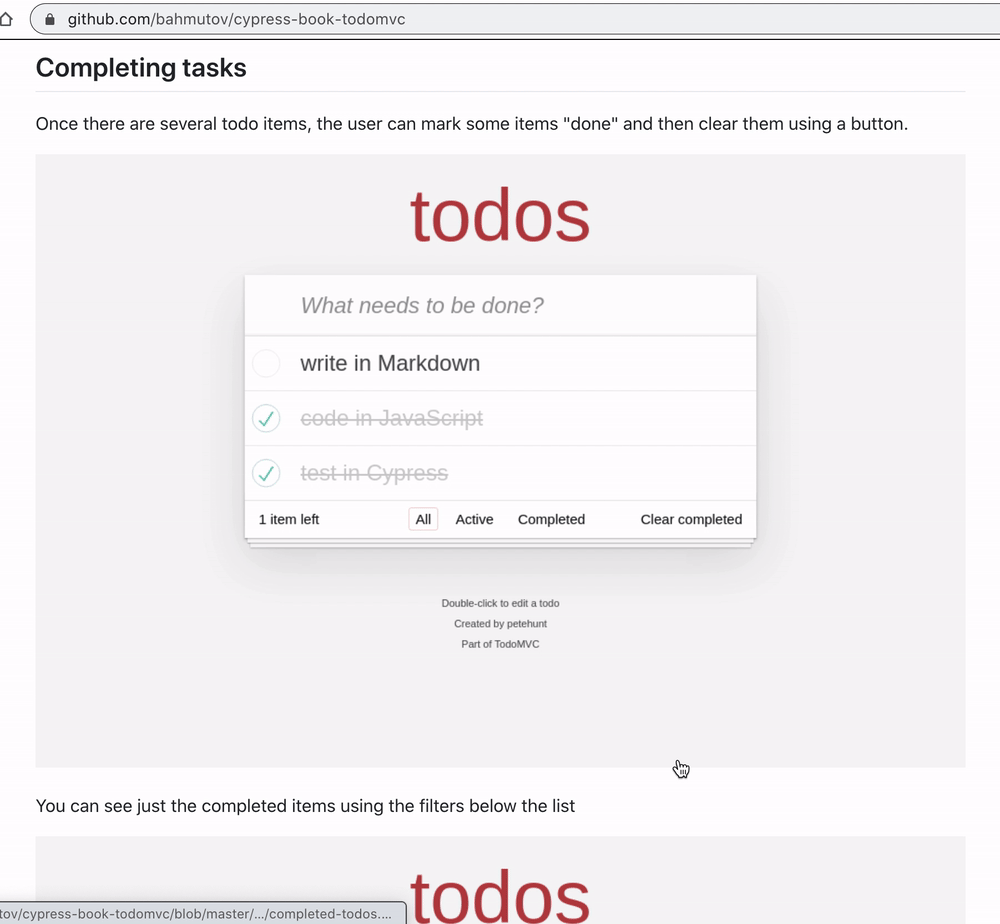
We can write tests to add and complete todos - they tests can be quite complicated. We can even write a longer test that shows the entire user story with several screenshots. Here is a section of the README showing how the user can complete todos:
## Completing tasks
Once there are several todo items, the user can mark some items "done" and
then clear them using a button.

You can see just the completed items using the filters below the list

The "Clear completed" button is at the bottom and becomes visible only if
there are completed items.

Hover over the button and click on it

Only a single active todo remains

<details style="display:none">
<!-- fiddle Completing tasks -->
1
2
3
4
5
6
7
8
9
10
11
12
13
14
15
16
17
18
19
20
21
22
23
24
25
26
27
28
29
30
31
32
33
34
cy.visit('/')
cy.get('.new-todo')
.type('write in Markdown{enter}')
.type('code in JavaScript{enter}')
.type('test in Cypress{enter}')
cy.get('.todo-list li').should('have.length', 3)
cy.contains('.view', 'code in JavaScript').find('.toggle').click()
cy.contains('.view', 'test in Cypress').find('.toggle').click()
cy.get('.todo-list li.completed').should('have.length', 2)
cy.screenshot('completed-todos')
cy.contains('.filters li', 'Completed').click()
cy.get('.todo-list li').should('have.length', 2)
cy.screenshot('just-completed-todos')
cy.contains('.filters li', 'All').click()
cy.get('footer.footer').screenshot('footer')
cy.contains('Clear completed')
.should('be.visible')
.then(($el) => {
$el.css({
textDecoration: 'underline',
border: '1px solid pink',
borderRadius: '2px',
})
})
cy.get('footer.footer').screenshot('clear-completed')
// clear completed items and take a screenshot
// of the single active todo
cy.contains('Clear completed').click()
cy.get('.todo-list li').should('have.length', 1)
cy.screenshot('remaining-todo')
<!-- fiddle-end -->
</details>
Here is how the above section of the README looks once the test runs and the screenshots are created.
Now that we have tests embedded in the README, let's talk about screenshots
Copy screenshots
When cy.screenshot command takes a screenshot, it is automatically saved as cypress/screenshots/<spec name>/<test name>.png file. We want to move it to a different spot, maybe rename it and post-process it (prepare for the web, or add watermark). We can use the 'after:screenshot' event to work with each screenshot:
1 | module.exports = (on, config) => { |
In bahmutov/cypress-book-todomvc cypress/plugins/index.js code we:
- ignore screenshots take on test failure
- ignore screenshots without a name. A screenshot for the tutorial should be taken with
cy.screenshot(<name>) - copy the screenshot to
imagesfolder - we only overwrite screenshots in the
imagesfolder when running on CI. This ensures that we don't forget to check in updates screenshots
If we do generate the "true" images on CI, how do we get them back to the repository?
Continuous Integration
To run tests on CI and to commit any new or changed screenshots, I will use GitHub Actions. We need to run Cypress tests and commit any changed files, pushing them back to the repository.
1 | name: main |
If there are no changed or new screenshots, the repo stays as is.
Publish static site
We already have a beautiful README file at bahmutov/cypress-book-todomvc, but we can also convert it into a static tutorial page for TodoMVC application. Let's use VuePress to convert README.md into an optimized static site.
1 | $ npm i -D vuepress |
We can configure the site title and path, and let's show a sidebar
1 | module.exports = { |
Now run the command npx vuepress build and there will be a static site in .vuepress/dist folder.
1 | $ npx vuepress build |
Since we build the site at CI, we can deploy it right away to GitHub Pages from our main.yml file.
1 | - name: Build site 🏗 |
You can see the pretty site at glebbahmutov.com/cypress-book-todomvc/. Note that VuePress completely hides the test blocks due to <details style="display:none"> markup.
Bonus 1 - test runner screenshots
By default the cy.screenshot command takes the screenshot of the application. You can also take the screenshot of the entire window, including the command log column on the left.
1 | cy.visit('/') |
Which produces the following screenshot:

Bonus 2 - movies
While cypress-book is a project for making application tutorials using screenshots, I am also thinking how to produce little movies from tests. You can follow the project at bahmutov/cypress-movie.